Type
Crochet
Difficulty
advanced
Category
blanket
AI Thinking Process
Planning
1. **Design Strategy**: Convert a Christmas tree textured blanket to bulky yarn (Alpachino Merino) with 7mm hook. Use bobble/cluster tree motifs on dc background, beginner-friendly. Remove 2 tree rows (top and bottom) for a more compact blanket.
2. **Construction Plan**: Worked flat, bottom-up in rows, with a simple sc border to finish.
3. **Quality Assurance**:
- Tree stitch multiple must align with foundation chain
- Bulky yarn = larger gauge; recalculate dimensions
- Maintain consistent stitch count each row
4. **Final Calculations**:
- Gauge: 10 sts × 6 rows = 4" in dc with 7mm hook
- Tree motif: 7-st repeat + 4 edge sts
- Foundation: ch 67 (9 trees × 7 + 4) = 63 dc + edges
- Trees per row: 9
- Tree rows: original 7 minus 2 = 5 tree rows
- Finished size: ~26" wide × ~36" long
Verification
1. **Completeness**: Materials, gauge, abbreviations, pattern stitch, instructions, border, finishing, attached chart section — all included.
2. **Consistency**: 63 dc + 2 edge dc on each side = stitch count consistent at 65 dc across (ch-3 counts as 1 dc). Tree repeat (7 sts) × 9 = 63, plus 1 dc each edge = 65. ✓
3. **Constraints**: 7mm hook ✓, Alpachino Merino bulky ✓, 2 tree rows removed (5 remaining) ✓, beginner level ✓, attached chart referenced not duplicated ✓.
4. **Safety**: Bobble = 5-dc cluster in one st; row counts verified; spacer rows of plain dc between tree rows confirmed.
Pattern
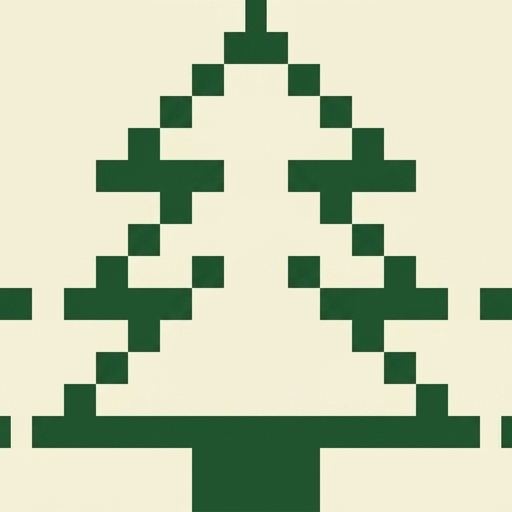
# Bulky Christmas Tree Textured Blanket
*A cozy, beginner-friendly throw featuring rows of bobble-stitch evergreens on a smooth double-crochet ground. Modified for bulky yarn and a faster make.*

---

## Skill Level
**Beginner** (confident with ch, sc, dc, and willing to learn the bobble/cluster stitch).

## Finished Measurements
- **Width:** approx. 26 in (66 cm)
- **Length:** approx. 36 in (91 cm)
- *(Lap throw / baby blanket size — modified from original by removing 2 tree rows)*

---

## Materials

### Yarn
- **Lana Grossa Alpachino Merino** (bulky weight; 70% merino / 30% alpaca; 109 yd / 100 m per 50 g ball)
- **Main Color (MC) — background:** approx. 500 yd (460 m) / ~5 balls in cream or natural
- **Contrast Color (CC) — trees:** approx. 200 yd (185 m) / ~2 balls in evergreen, sage, or forest green
- *(Optional additional CC for variety — see Attached Stitch Chart notes)*

### Hook
- **7 mm crochet hook** (US size between K/10.5 and L/11)

### Notions
- Yarn needle for weaving in ends
- Stitch markers (4–6, for marking pattern repeats)
- Scissors
- Measuring tape

---

## Gauge
- **10 dc × 6 rows = 4 in (10 cm)** in double crochet using 7 mm hook
- **One tree motif** measures approx. 2¾ in (7 cm) wide × 4 rows tall
- **Make a 6 × 6 in swatch in pattern** before starting. Adjust hook size if needed.

---

## Abbreviations (US Terms)
- **ch** = chain
- **sl st** = slip stitch
- **sc** = single crochet
- **dc** = double crochet
- **st(s)** = stitch(es)
- **sk** = skip
- **rep** = repeat
- **MC / CC** = main color / contrast color
- **BO5 (5-dc bobble)** = [yo, insert hook in indicated st, yo, pull up loop, yo, pull through 2 loops] 5 times in same st, yo, pull through all 6 loops on hook. Push bobble to **RS (right side)** of work.

---

## Pattern Notes
- Ch-3 at the beginning of a row **counts as 1 dc**.
- Blanket is worked **flat, in rows**, from the bottom up.
- Trees are formed by clusters of bobbles arranged in a triangle (4 bobbles → 3 bobbles → 2 bobbles → 1 bobble) over 4 consecutive RS rows.
- Carry CC loosely up the side when possible; otherwise cut and rejoin (see Color Management).
- Total tree rows: **5** (the original 7 has been reduced by 2 — one removed from top and one from bottom).

---

## Stitch Multiple & Foundation Math
- **Tree repeat:** 7 sts wide (1 bobble column + 6 background dc between trees)
- **Trees across:** 9
- **Foundation chain:** (9 × 7) + 4 edge chains = **67 ch**
- **Working stitch count per row:** 65 dc (ch-3 = 1 dc + 63 dc + 1 dc at end) ✓

---

## Attached Stitch Chart

A separate **stitch chart panel is attached** to this pattern. Refer to that chart for the visual grid of the tree motif and color placement — **do not** look for an ASCII grid in the written instructions.

- **Location:** The attached chart appears immediately after the written pattern section, as a standalone visual panel.
- **How to read for crochet (flat rows):**
  - Read **RS (odd-numbered) rows right → left**.
  - Read **WS (even-numbered) rows left → right**.
  - Each square = 1 stitch; each row of the chart = 1 row of crochet.
  - **Filled/colored squares** = bobble (BO5) worked in CC.
  - **Open squares** = dc worked in MC.
- **Color-change handling:** When the next stitch is a different color, complete the last yarn-over of the previous stitch with the new color so the new stitch starts clean.
- **Stitch-count integration:** Each charted tree spans 1 column of the 7-st repeat. The 6 background dc between trees are not shown individually in the motif chart — they are implied by the spacing. The chart shows **one tree** over 4 RS rows; repeat that motif **9 times across** and **5 times vertically** (with 1 plain RS row + 1 WS row between tree rows).

---

## Color Management
- **Between trees in the same row:** drop CC to WS, pick up MC, and carry CC behind the work for no more than 6 sts. If your carry pulls, cut and rejoin instead.
- **Between tree rows:** cut CC, weave in ends, rejoin when the next tree row begins. (5 tree rows = 5 join/cut points — manageable for beginners.)
- **All bobbles** are worked in CC; **all dc background** in MC.

---

## Instructions

### Foundation
With **MC**, ch **67**.

### Row 1 (WS — setup):
Dc in 4th ch from hook (skipped chs count as 1 dc), dc in each ch across. **(65 dc)**

### Row 2 (RS — plain):
Ch 3 (counts as dc), turn. Dc in each st across, dc in top of turning ch. **(65 dc)**

### Row 3 (WS — plain):
Rep Row 2. **(65 dc)**

---

### Tree Row Block (worked over 4 RS rows + alternating WS rows)
*The block is worked once per tree row. Repeat the entire block 5 times total.*

**Setup for tree:** On the next RS row, join CC at start (or carry up). Each "Tree RS Row" follows the chart. WS rows are worked in MC with plain dc all the way across.

#### Tree RS Row A (base of tree — 4 bobbles wide per tree):
Ch 3 (MC, counts as dc), turn. Dc in next 3 sts in MC.
*With CC: BO5 in next st. With MC: dc in next st. With CC: BO5 in next st. With MC: dc in next st. With CC: BO5 in next st. With MC: dc in next st. With CC: BO5 in next st.*
With MC: dc in next 3 sts.
*Rep from * to * for each of the remaining 8 trees, spacing with 3 MC dc between trees (i.e., 7-st repeat: BO5, dc, BO5, dc, BO5, dc, BO5… then 3 dc spacer to next tree).*
End with dc in last 3 sts and dc in top of turning ch in MC. **(65 sts)**

*Beginner tip: Place a stitch marker at the start of each tree's 7-st block to keep alignment.*

#### WS Row (plain, MC):
Ch 3, turn. Dc in each st across (treat bobbles as 1 st — work into top of bobble), dc in top of turning ch. **(65 dc)**

#### Tree RS Row B (3 bobbles wide, centered):
Ch 3 (MC), turn. Dc in next 4 sts MC.
*CC: BO5. MC: dc. CC: BO5. MC: dc. CC: BO5.* MC: dc in next 4 sts.
Rep across for all 9 trees, then end with MC dc to end. **(65 sts)**

#### WS Row (plain, MC):
Ch 3, turn, dc across. **(65 dc)**

#### Tree RS Row C (2 bobbles wide):
Ch 3 (MC), turn. Dc in next 5 sts MC.
*CC: BO5. MC: dc. CC: BO5.* MC: dc in next 5 sts.
Rep across for all 9 trees. **(65 sts)**

#### WS Row (plain, MC):
Ch 3, turn, dc across. **(65 dc)**

#### Tree RS Row D (1 bobble — treetop):
Ch 3 (MC), turn. Dc in next 6 sts MC.
*CC: BO5.* MC: dc in next 6 sts.
Rep across for all 9 trees, dc to end. **(65 sts)**

#### WS Row (plain, MC):
Ch 3, turn, dc across. Cut CC. **(65 dc)**

---

### Spacer Rows Between Tree Blocks
Work **2 plain MC rows** (1 RS + 1 WS, each: ch 3, turn, dc across — 65 dc) before starting the next Tree Row Block.

---

### Repeating the Pattern
Work **Tree Row Block** a total of **5 times**, separated by spacer rows.

**Row count check:**
- Setup: 3 rows
- Per tree block: 8 rows (4 RS tree rows + 4 WS plain rows) × 5 blocks = 40 rows
- Spacers between blocks: 2 rows × 4 gaps = 8 rows
- Final plain rows after last tree block: 3 rows
- **Total: 3 + 40 + 8 + 3 = 54 rows** ≈ 36 in at 6 rows / 4 in ✓

### Final Rows
After the 5th Tree Row Block, work **3 plain MC dc rows** (ch 3, turn, dc across). Do not fasten off — proceed to border.

---

## Border

### Round 1 (sc edging, MC):
Ch 1, do not turn. Work sc evenly around entire blanket:
- 1 sc in each st across top and bottom edges
- 2 sc per row-end along sides
- 3 sc in each corner st
Join with sl st to first sc.

### Round 2 (reverse sc / crab stitch, MC):
Ch 1. Working **left to right** (reverse direction), sc in each st around. Join with sl st. Fasten off, leaving a 6-in tail.

---

## Finishing
1. Weave in **all ends** securely on WS using yarn needle. Pay extra attention to bobble color-change points.
2. **Block the blanket:**
   - **Wet block (recommended):** Soak in cool water with wool wash for 20 minutes. Gently squeeze out excess water (do not wring). Lay flat on blocking mats, pin to 26 × 36 in, square the corners, and air-dry fully.
   - **Steam block (alternative):** Pin to size; hover steam iron 1–2 in above surface. Do not press directly on bobbles — it will flatten them.
3. Allow to dry completely before unpinning.

---

## Beginner Tips
- **Practice the bobble** on a small swatch first. The push-to-RS step is critical — the bobble pops on the right side.
- **Count after every row.** You should always have 65 sts. If not, find the error before continuing.
- **Use stitch markers** at the start of each 7-st repeat for the first tree row of each block. Remove them after Row D.
- **Don't pull bobbles too tight** — they should sit proudly on the surface, not be buried.

Enjoy your cozy bulky tree blanket! 🎄
Disclaimer: This pattern was generated by AI and should be reviewed for accuracy before use. While we strive for quality, AI-generated content may contain errors. Please verify measurements, stitch counts, and instructions before beginning your project. Generated by purlJam.uk
Access your pattern anytime
Bookmark this page to access your pattern anytime