Type
Knitting
Difficulty
beginner
Category
pullover
AI Thinking Process
Planning
Verification
Pattern
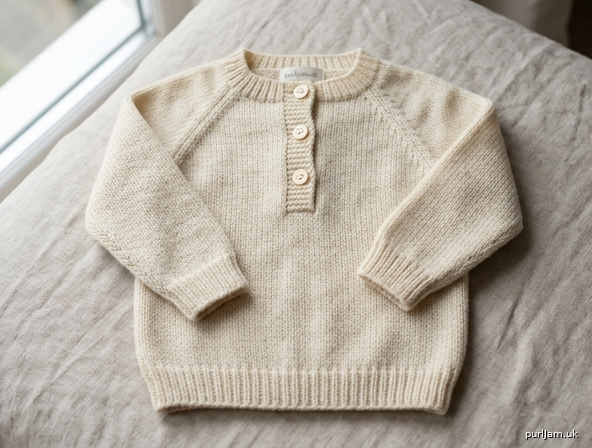
Button-Back Baby Raglan Pullover
A seamless top-down raglan for babies, worked in soft worsted yarn. A three-button placket at the back neck makes dressing easy — no tugging over little heads. Stockinette fabric, 1×1 rib, and knit-front-and-back increases keep every step beginner-friendly. There are no side seams to irritate sensitive skin.
Difficulty: Beginner
Skills used: Long-tail cast-on, knit, purl, kfb, k2tog, ssk, working flat and in the round, 1×1 rib, simple yo/k2tog buttonhole, binding off in rib.
Sizes
0–3 (3–6, 6–12, 12–18, 18–24) months
To fit chest: 16 (18, 20, 21, 22)" [40.5 (45.5, 51, 53.5, 56) cm]
Shown with about 2–2¼" [5–5.5 cm] positive ease for growing room.
Instructions are written for the smallest size, with larger sizes in parentheses. When only one number is given, it applies to all sizes. Circle your size throughout before you begin.
Finished Measurements
| 0–3 | 3–6 | 6–12 | 12–18 | 18–24 | |
|---|---|---|---|---|---|
| Chest circumference | 18" (45.5 cm) | 20" (51 cm) | 22" (56 cm) | 23¼" (59 cm) | 24" (61 cm) |
| Length, back neck to hem | 9¾" (25 cm) | 10½" (26.5 cm) | 12" (30.5 cm) | 12¾" (32.5 cm) | 14" (35.5 cm) |
| Yoke depth (CO to underarm) | 4¼" (11 cm) | 4½" (11.5 cm) | 5" (12.5 cm) | 5¼" (13.5 cm) | 5½" (14 cm) |
| Body length, underarm to hem | 5½" (14 cm) | 6" (15 cm) | 7" (18 cm) | 7½" (19 cm) | 8½" (21.5 cm) |
| Sleeve length, underarm to cuff | 6" (15 cm) | 7" (18 cm) | 8" (20.5 cm) | 9" (23 cm) | 10" (25.5 cm) |
| Upper arm | 8" (20.5 cm) | 8½" (21.5 cm) | 9¼" (23.5 cm) | 9½" (24 cm) | 10" (25.5 cm) |
Yarn
Worsted weight (CYC 4), soft and machine-washable. Superwash wool, cotton, or acrylic blends are ideal — baby clothes need frequent washing.
Yardage: 300 (350, 425, 475, 550) yd [275 (320, 390, 435, 500) m]
Example yarns: Cascade 220 Superwash, Berroco Vintage, Lion Brand Cotton-Ease, Knit Picks Brava Worsted, or any machine-washable worsted that matches gauge.
Solid colors show the raglan lines clearly. Optional: work the body in 4-round stripes for a simple “printed” look — change color at the start of a round and carry unused yarn up the inside for short intervals, or snip and weave in.
Needles
- US 7 / 4.5 mm: 16" (40 cm) circular for the body, plus a set of DPNs (or a long circular for magic loop) for the neck and sleeves
- US 5 / 3.75 mm: 16" (40 cm) circular and DPNs (or magic loop) for ribbing
Adjust needle size if needed to obtain gauge. The neck is too small for a 16" circular at first — start the yoke on DPNs or magic loop and switch to the 16" circular when the stitches fit comfortably.
Notions
- 4 stitch markers, plus 1 contrasting marker for beginning of round
- Waste yarn or stitch holders
- 3 buttons, ½" (13 mm) diameter
- Tapestry needle
- Sewing needle and thread to match (for buttons)
Gauge
20 stitches and 28 rounds = 4" (10 cm) in stockinette stitch on larger needles, after blocking.
Please swatch. A baby sweater is small, and ½" of gauge difference changes the chest by more than an inch. If you have too many stitches in 4", go up a needle size; if too few, go down.
Abbreviations (US)
BO — bind off
BOR — beginning of round
CO — cast on
k — knit
k2tog — knit 2 together (right-leaning decrease)
kfb — knit into the front and then the back of the same stitch (1 stitch increased)
p — purl
pm — place marker
rep — repeat
rnd(s) — round(s)
RS — right side
slm — slip marker
ssk — slip 1 knitwise, slip 1 knitwise, knit those 2 sts together through the back loop (left-leaning decrease)
st(s) — stitch(es)
St st — stockinette stitch (knit every rnd in the round; knit RS / purl WS when flat)
WS — wrong side
yo — yarn over
Notes
- The sweater is a top-down raglan. You start at the neck, grow the yoke with increases, park the sleeves, then knit the body and each sleeve downward. Length is easy to customize: try it on (or measure against a sweater that fits) before you start the ribbing.
- A back button placket is worked flat for the first 2½" (6.5 cm), then the yoke is joined and worked in the round. The opening is only at the neck — the rest of the back is closed and seamless.
- Button bands: the first 4 and last 4 stitches are worked in garter stitch (knit every row) while the yoke is flat. After joining, those stitches become part of the back and are knit in stockinette like everything else.
- Raglan increases use kfb, the most beginner-friendly increase. Each increase row/round adds 8 stitches.
- Yarn care: choose a fiber that can go in the washer. Superwash wool can relax and grow when wet-blocked — check your swatch.
- Buttons on baby garments must be sewn on very securely (through the holes several times, then through the shank again). If you prefer, substitute snaps.
Pattern
Yoke
Cast on and neck ribbing (worked flat)
With smaller needles and long-tail cast-on, CO 50 (56, 58, 60, 60) sts.
Setup row (WS): K4 (garter band), p1, k1 across to last 4 sts, k4 (garter band).
Change to larger needles.
The 4 stitches at each end are the button bands. Knit them on every row. The stitches between the bands are 1×1 rib for 6 rows, then stockinette.
Row 1 (RS): K4, *k1, p1; rep from * to last 4 sts, k4.
Row 2 (WS): K4, work sts as they appear (knit the knits, purl the purls) to last 4 sts, k4.
Row 3 (RS) — buttonhole: K4, *k1, p1; rep from * to last 4 sts, k1, k2tog, yo, k1.
Rows 4–6: Repeat Row 2 on WS and Row 1 on RS, ending with a WS row.
Ribbing measures about 1" (2.5 cm). 50 (56, 58, 60, 60) sts.
Place raglan markers
Next row (RS) — setup, no increases: K4, k3 (5, 5, 6, 6) left-back sts, pm, k10 sleeve sts, pm, k16 (18, 20, 20, 20) front sts, pm, k10 sleeve sts, pm, k3 (5, 5, 6, 6) right-back sts, k4.
Marker check (4 raglan markers): 4 band + 3 (5, 5, 6, 6) + 10 + 16 (18, 20, 20, 20) + 10 + 3 (5, 5, 6, 6) + 4 band = 50 (56, 58, 60, 60) ✓
Raglan increases, still worked flat
Work stockinette with garter bands, increasing at each raglan every RS row.
Increase row (RS): K4, *knit to 1 st before marker, kfb, slm, kfb; rep from * 3 more times, knit to last 4 sts, k4.
(8 sts increased)
WS row: K4, purl to last 4 sts, k4. Slip markers as you come to them.
Repeat the last 2 rows 5 more times (6 increase rows total while flat), and at the same time work two more buttonholes on the right band (last 4 sts of the RS row: k1, k2tog, yo, k1) on the 3rd and 6th RS rows of this section (pattern Rows 11 and 17 from the cast-on).
After 6 flat increase rows: 50 (56, 58, 60, 60) + 48 = 98 (104, 106, 108, 108) sts ✓
Placket measures about 2½" (6.5 cm) from the cast-on. Three buttonholes are complete.
Join to work in the round
Joining row (RS): Work one more Increase row as established (kfb at each raglan). At the end of the row, join to work in the round, being careful not to twist. Place a contrasting BOR marker between the two 4-st bands (center back). The two bands now sit next to each other at the back; the opening exists only in the 2½" already worked flat.
Joining increase: 98 (104, 106, 108, 108) + 8 = 106 (112, 114, 116, 116) sts ✓
Flat increase rows completed: 7. Remaining increase rounds: 5 (6, 7, 8, 9).
From here, knit every stitch (stockinette in the round). The former band stitches are no longer worked in garter.
Next rnd (even): Knit.
Increase rnd: *Knit to 1 st before raglan marker, kfb, slm, kfb; rep from * 3 more times, knit to BOR. (8 sts increased)
Next rnd: Knit.
Repeat the last 2 rounds 4 (5, 6, 7, 8) more times, for 5 (6, 7, 8, 9) increase rounds in the round.
Total increase rows/rounds: 7 flat + 5 (6, 7, 8, 9) in the round = 12 (13, 14, 15, 16) ✓
Yoke stitches: 50 (56, 58, 60, 60) + 8 × 12 (13, 14, 15, 16) = 146 (160, 170, 180, 188) sts ✓
Section counts at the underarm:
| Section | 0–3 | 3–6 | 6–12 | 12–18 | 18–24 |
|---|---|---|---|---|---|
| Back (incl. former bands) | 38 | 44 | 46 | 50 | 52 |
| Left sleeve | 34 | 36 | 38 | 40 | 42 |
| Front | 40 | 44 | 48 | 50 | 52 |
| Right sleeve | 34 | 36 | 38 | 40 | 42 |
| Total | 146 | 160 | 170 | 180 | 188 |
Yoke measures about 4¼ (4½, 5, 5¼, 5½)" [11 (11.5, 12.5, 13.5, 14) cm] from the cast-on. If it is a little short, knit even rounds (no increases) until that depth; do not add extra increases.
Divide body and sleeves
Dividing rnd: Knit to first raglan marker (this is the left back), remove marker, place next 34 (36, 38, 40, 42) sleeve sts on waste yarn, remove next marker, CO 6 (6, 8, 8, 8) sts for the underarm, knit 40 (44, 48, 50, 52) front sts, remove marker, place next 34 (36, 38, 40, 42) sleeve sts on waste yarn, remove last raglan marker, CO 6 (6, 8, 8, 8) sts for the underarm, knit to BOR (right back).
Body: 38 (44, 46, 50, 52) back + 40 (44, 48, 50, 52) front + 6 (6, 8, 8, 8) + 6 (6, 8, 8, 8) underarms = 90 (100, 110, 116, 120) sts ✓
You now have only the body stitches on the needle. The BOR remains at center back. Switch to the 16" circular if you have not already.
Body
Work even in stockinette (knit every round) until the body measures 4 (4½, 5½, 6, 7)" [10 (11.5, 14, 15, 18) cm] from the underarm divide.
Hem
Change to smaller needles.
Rib rnd: *K1, p1; rep from * around.
Repeat Rib rnd until ribbing measures 1½" (4 cm).
Bind off loosely in rib (knit the knits, purl the purls as you bind off). If the hem feels tight, bind off with the larger needle.
Body from underarm to bind-off: 5½ (6, 7, 7½, 8½)" [14 (15, 18, 19, 21.5) cm] ✓
Sleeves
Work both sleeves the same.
Place 34 (36, 38, 40, 42) held sleeve sts onto larger DPNs (or a long circular for magic loop). With RS facing, beginning at the center of the underarm cast-on, pick up and knit 6 (6, 8, 8, 8) sts across the underarm, then knit the sleeve sts. Place BOR at the center of the underarm.
34 (36, 38, 40, 42) + 6 (6, 8, 8, 8) = 40 (42, 46, 48, 50) sts ✓
If a small hole appears at either underarm corner, close it later with the tapestry needle — do not pick up extra stitches.
Knit 3 (4, 4, 4, 5) rounds even.
Decrease rnd: K1, k2tog, knit to last 3 sts, ssk, k1. (2 sts decreased)
Work Decrease rnd every 4th (5th, 5th, 5th, 6th) round 6 (6, 7, 8, 8) more times — 7 (7, 8, 9, 9) decrease rounds total.
40 (42, 46, 48, 50) − 2 × 7 (7, 8, 9, 9) = 26 (28, 30, 30, 32) sts ✓
Work even until sleeve measures 4½ (5½, 6½, 7½, 8½)" [11.5 (14, 16.5, 19, 21.5) cm] from the underarm.
Cuff
Change to smaller DPNs.
Rib rnd: *K1, p1; rep from * around.
Repeat Rib rnd until cuff measures 1½" (4 cm).
Bind off loosely in rib.
Sleeve from underarm to bind-off: 6 (7, 8, 9, 10)" [15 (18, 20.5, 23, 25.5) cm] ✓
Finishing
- Weave in all ends on the wrong side.
- At the bottom of the back placket opening, overlap the two bands by about ½" (1.5 cm) and tack them together on the wrong side with a few firm stitches so the slit cannot spread.
- Sew three buttons to the left back band, opposite the buttonholes. Stitch through each button several times and finish with a reinforcing knot on the wrong side.
- Close any underarm gaps with the tapestry needle.
- Block gently to the finished measurements. For superwash wool, wet-block and pat to size — do not stretch the ribbing. For acrylic, a light steam (iron hovering, not pressing) is enough.
Care: Machine wash on gentle in cool water; lay flat to dry, unless your yarn label allows dryer use.
Customize (optional, still beginner)
- Length: Knit the body longer or shorter before the hem rib. Babies need a little extra length for diapers; if in doubt, add ½" (1.5 cm).
- Sleeves: Try the sweater on and start the cuff when the sleeve hits the wrist with the arm slightly bent.
- Stripes: Change color every 4 rounds on the body. Join a new color at BOR and knit the first stitch of the new color through both the new and old yarns to reduce a jog, or ignore the jog — on a baby sweater it is barely visible.
- Duplicate-stitch “print”: After blocking, add a small heart, star, or initial on the chest with leftover yarn and a tapestry needle. This is the easiest way to add a motif without knitting colorwork.
Quick reference — stitch counts
| Stage | 0–3 | 3–6 | 6–12 | 12–18 | 18–24 |
|---|---|---|---|---|---|
| Cast on | 50 | 56 | 58 | 60 | 60 |
| After all raglan increases | 146 | 160 | 170 | 180 | 188 |
| Body after divide | 90 | 100 | 110 | 116 | 120 |
| Each sleeve after pick-up | 40 | 42 | 46 | 48 | 50 |
| Each cuff | 26 | 28 | 30 | 30 | 32 |
Disclaimer: This pattern was generated by AI and should be reviewed for accuracy before use. While we strive for quality, AI-generated content may contain errors. Please verify measurements, stitch counts, charts, and instructions before beginning your project. Generated by purlJam.uk
Love this pattern?
Save this pattern to your free PurlJam libraryAccess your pattern anytime
Bookmark this page to access your pattern anytime