Type
Crochet
Difficulty
intermediate
Category
custom
AI Thinking Process
Planning
Verification
Pattern
Café au Lait Lace Tank
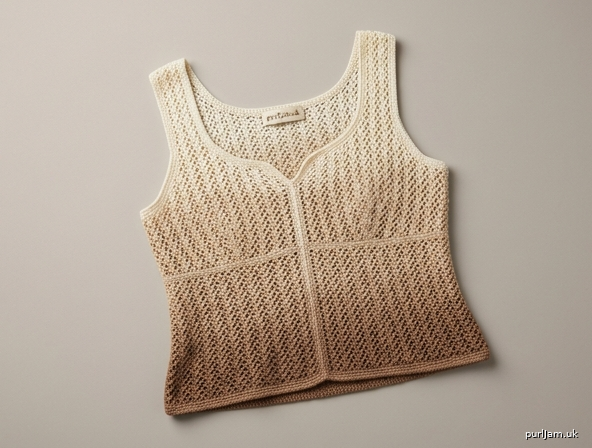
A cropped, fitted sleeveless tank with a Queen Anne neckline, wide straps, empire shaping, a flared hem, and a dreamy ivory-to-mocha ombre — all in one easy openwork lace stitch.
Description
This waist-length tank is worked flat in a single, repeating openwork "V-lace" stitch from hem to shoulder. The bodice is gently fitted with subtle empire-waist shaping, a slightly flared hem, and a graceful Queen Anne neckline (a soft center dip framed by higher curved points). Two front bust panels meet at a tidy center-front join. A smooth ombre gradient carries you from ivory at the neckline down to warm mocha brown at the hem, and every edge is cleaned up with single crochet.
Skill level: Easy (advanced-beginner / easy-intermediate)
Materials
- Yarn: Lace weight (US #0 Lace / 2-ply), approx. 400–650 yds per 50 g.
- Color A – Ivory (neckline/top)
- Color B – Cream / Light Beige
- Color C – Tan / Latte
- Color D – Mocha Brown (hem)
- Total yardage (all colors combined):
- XS: ~1150 yds • S: ~1250 yds • M: ~1400 yds • L: ~1600 yds • XL: ~1800 yds • XXL: ~2000 yds
- Split roughly evenly across the 4 shades (about ¼ of total each).
- Hook: US B-1 (2.25 mm) main hook; US A (2.0 mm) for edging (optional, for tidier edges).
- Notions: Tapestry needle, 6–8 stitch markers, scissors, blocking mats + rust-proof pins, spray bottle or basin for wet blocking.
Gauge
24 sts & 12 rows = 4" (10 cm) in V-Lace pattern, blocked, using US B-1 (2.25 mm).
Gauge check: One lace repeat = 4 sts = ⅔" (1.67 cm) wide. A 24-st swatch (6 repeats) should measure 4". Take gauge seriously — lace weight blocks open significantly, so block your swatch before measuring.
Sizes (XS – XXL)
Designed for 2–3" (5–7.5 cm) of negative-to-zero ease for a fitted look.
| Size | To fit bust | Finished bust (blocked) | Cast-on sts per panel* | Total lace repeats/panel |
|---|---|---|---|---|
| XS | 30–32" | 32" | 96 | 24 |
| S | 33–35" | 35" | 104 | 26 |
| M | 36–38" | 38" | 112 | 28 |
| L | 39–41" | 41" | 120 | 30 |
| XL | 42–44" | 44" | 128 | 32 |
| XXL | 45–47" | 47" | 136 | 34 |
*"Panel" = Front or Back. Two panels seamed = finished bust. Numbers below are written for XS (96); substitute your size's stitch count wherever you see [96]. Every size is a multiple of 4, so all instructions work identically.
Finished length (empire-cropped): approx. 17–18" (43–46 cm) from shoulder to flared hem.
Abbreviations (US terms)
| Abbr. | Meaning |
|---|---|
| ch | chain |
| sc | single crochet |
| dc | double crochet |
| sk | skip |
| sp | space |
| st(s) | stitch(es) |
| V-st | (dc, ch 1, dc) all in same st/sp |
| rep | repeat |
| RS / WS | right side / wrong side |
| beg | beginning |
| sl st | slip stitch |
| tog | together |
Special Stitch
V-Stitch (V-st): Work (dc, ch 1, dc) all into the same indicated stitch or space.
The V-Lace Pattern (used throughout)
Worked over a multiple of 4 sts + 2.
- Foundation Row (WS): Ch the required number, dc in 4th ch from hook, *sk 1 ch, V-st in next ch, sk 1 ch, dc in next ch; rep from * across. Turn.
- Row 1 (RS): Ch 3 (counts as first dc), *V-st in the ch-1 sp of next V-st, dc in the sp between V-st groups (the "dc gap"); rep from * across, ending dc in top of turning ch. Turn.
- Row 2: Rep Row 1.
Rep Row 1 for pattern. The fabric self-aligns: every V-st sits on the V-st below, every plain dc on the plain dc below. Stitch count stays constant at [96] sts per row (24 V-sts + 25 anchoring dc for XS — see note).
Counting note: For a 96-st panel you will have 24 V-sts separated/anchored by plain dc. Each row consumes and produces the same number of stitches — if your count drifts, you've likely missed a "dc gap." Place a marker in every 6th V-st to self-check.
Pattern Notes
- Construction: Worked flat in 2 panels (Front & Back). Empire shaping and neckline are worked into each panel; pieces are then seamed at sides and shoulders. The center-front join closes the two front bust cups at the bustline.
- Turning chains: Ch 3 at the start of a dc row counts as one dc.
- Loops: Work under both loops unless stated.
- Ombre: Change color at the start of a RS row on plain (non-shaping) rows only. See the Ombre Map below.
- Shaping method: To keep the single lace stitch unbroken, empire shaping is done by stepping hook size and by paired edge decreases at panel sides (never mid-lace). Flare at the hem uses a larger hook, not extra repeats.
- Stitch counts are given at the end of shaped rows in (parentheses).
Ombre Color Map (bottom-up)
Work the panel from hem (bottom) up to shoulder. Because you start at the mocha hem and finish at the ivory neckline:
| Section (from hem) | Rows | Color |
|---|---|---|
| Flared hem + lower bodice | Rows 1–6 | D – Mocha |
| Empire lower | Rows 7–12 | C – Tan |
| Empire upper / bust | Rows 13–18 | B – Cream |
| Chest + neckline + straps | Rows 19–end | A – Ivory |
Smooth-gradient option: For a true fade, alternate one row of the old color with one row of the new color across a 4-row transition band at each color change (D→C, C→B, B→A). This "row-striping" blend eliminates hard lines.
Hook-Stepping for Shaping (empire + flare)
To create the flared hem and empire nip without breaking the lace:
- Flared hem (Rows 1–4): use US C-2 (2.75 mm) → panel measures ~10% wider.
- Lower bodice / empire pull-in (Rows 5–12): switch to US B-1 (2.25 mm) → true gauge.
- Empire waist (narrowest point, Rows 10–12): switch to US 7 (1.65 mm) for 3 rows → ~8% narrower for the fitted waist.
- Bust & up (Row 13+): return to US B-1 (2.25 mm).
This gives the fitted empire silhouette while every row keeps the same [96] stitch count and the same lace pattern — no increases/decreases in the body until the armhole/neckline.
INSTRUCTIONS
(Written for XS. Replace [96] with your size's cast-on: XS 96 · S 104 · M 112 · L 120 · XL 128 · XXL 136.)
BACK PANEL
1. Flared Hem
With Color D (Mocha) and US C-2 (2.75 mm) hook, ch [98] (= [96] + 2).
- Foundation Row (WS): Dc in 4th ch from hook (first "dc gap"), *sk 1 ch, V-st in next ch, sk 1 ch, dc in next ch; rep from * to end. Turn. ([96] sts: 24 V-sts + plain dc)
- Rows 1–4: Work V-Lace Row 1 four times. Keep count at ([96]) each row.
Math check: [98] ch − 2 turning-ch allowance = [96] working sts, divisible by 4 ✓.
2. Lower Bodice (empire pull-in begins)
Switch to US B-1 (2.25 mm).
- Rows 5–9: Work V-Lace Row 1. ([96]) each row.
- Change to Color C (Tan) at start of Row 7 (RS).
3. Empire Waist (narrowest)
Switch to US 7 (1.65 mm).
- Rows 10–12: Work V-Lace Row 1. ([96]) each row. (Fabric naturally cinches ~8% for the fitted waist.)
4. Bust & Upper Body
Return to US B-1 (2.25 mm).
- Change to Color B (Cream) at start of Row 13.
- Rows 13–18: Work V-Lace Row 1. ([96]) each row.
5. Armhole Shaping
- Change to Color A (Ivory) at start of Row 19.
- Row 19 (RS): sl st across first 8 sts (2 lace repeats), ch 3, work in pattern to last 8 sts, turn — leave last 8 sts unworked. ([80] sts) Check: [96] − 8 − 8 = [80], divisible by 4 ✓.
- Row 20 (WS): Ch 3, work pattern to end. ([80])
- Rows 21–24: Work V-Lace Row 1. ([80]) each row.
6. Back Neck & Shoulders
- Rows 25–28: Work even in pattern. ([80])
- Row 29 (RS) – shape back neck: Work pattern over first 24 sts (right shoulder strap), turn; leave remaining 56 sts unworked. (24 sts)
- Work 2 rows even on these 24 sts. Fasten off. This is one wide shoulder strap.
- Rejoin Ivory to the last 24 sts at the opposite edge (left shoulder). Work pattern over these 24 sts for 3 rows to match. Fasten off. Center back-neck sts left open: [80] − 24 − 24 = 32 sts. ✓
FRONT PANEL (Queen Anne neckline + center-front join)
Work the Front identically to the Back through Row 18 (hem, empire, bust) so the pieces match at the sides. Then diverge for the neckline.
1.–4. Same as Back
Cast on [98], work Foundation + Rows 1–18 with the same hook-stepping and colors (Mocha → Tan → Cream), keeping ([96]) each row.
5. Center-Front Bust Join
At Row 18 the front cups meet at center front. If you worked the front as two separate half-panels (see optional method below), join them now:
- Lay both half-panels RS up, meeting at center. With Color B and tapestry needle (or sl st with US B-1), join the two center edges with a flat whipstitch or sl-st seam from the empire line up to the point where the Queen Anne dip will begin. This forms the tidy center-front join at the bust.
Simplest method: Work the Front as ONE panel (like the Back) and simply mark center front — the "join" then reads as a decorative center sc line added in Finishing. Both approaches give the same look; choose based on comfort.
6. Armhole Shaping (mirror of Back)
- Change to Color A (Ivory) at start of Row 19.
- Row 19 (RS): sl st across first 8 sts, ch 3, pattern to last 8 sts, turn. ([80])
- Rows 20–22: Work even. ([80])
7. Queen Anne Neckline
The Queen Anne shape = a soft center dip with two higher curved points and wide straps. Divide the [80] sts:
- Left front (24 sts) — strap + point
- Center dip (32 sts) — lowered curve
- Right front (24 sts) — strap + point Check: 24 + 32 + 24 = 80 ✓.
Right Strap:
- Row 23 (RS): Work pattern over first 24 sts; turn. (24)
- Row 24: Ch 3, work to end. (24)
- Neck-edge curve (Rows 25–27): At the neck edge only, decrease 1 V-unit (4 sts) at the start of Row 25: sl st over 4 sts, ch 3, pattern to end. (20) Work Rows 26–27 even. (20)
- Rows 28–32: Work even in pattern to match Back shoulder length. Fasten off. (20)
Left Strap: Rejoin Ivory to the last 24 sts (mirror image).
- Row 23 (RS): Rejoin, ch 3, work pattern over these 24 sts; turn. (24)
- Row 24: even. (24)
- Row 25: Work pattern to last 4 sts, turn (leave 4 sts unworked). (20)
- Rows 26–32: even. Fasten off. (20)
Center Dip (32 sts): Leave the center 32 sts unworked — this forms the lowered Queen Anne curve. It will be shaped smooth with sc edging in Finishing.
STRAP LENGTH / SHOULDER
Both Front straps (20 sts each) and Back straps (24 sts each) will be seamed at the shoulder. Because Front straps narrowed by one V-unit at the neck, ease the extra 4 Back sts evenly when seaming — the wide strap tapers slightly toward the neck for the Queen Anne look.
FINISHING
1. Seaming
- Block all pieces first (see Blocking) for easiest, tidiest seams.
- Shoulder seams: With RS together, mattress-stitch (or sl st) each Front strap to its matching Back strap. Ease the 4-st difference evenly.
- Side seams: With RS together, seam Front to Back along each side from hem to armhole. Match empire rows and color changes.
2. Center-Front Join (if not already joined)
With Color B and tapestry needle, work a neat vertical line of sc or slip stitches up the center front from the empire line to the base of the Queen Anne dip, cinching the bust cups together. Weave in ends.
3. Single Crochet Edging (all edges)
Use US A (2.0 mm) or US B-1 and match the color of the adjacent section (Ivory around neck/armholes, Mocha around hem).
- Neckline (Queen Anne): Join Ivory at right shoulder seam. Sc evenly around the entire neckline — 1 sc per st along straps, 2 sc per row-end down each strap edge, and 3 sc into the base corners of the center dip to keep the curve smooth and prevent flaring. Work the center-dip curve at a rate of 2 sc per row-end so it lies flat. Sl st to first sc. Fasten off.
Tip: If the dip cups outward, remove 1 sc every few inches; if it gapes, add 1. The neckline should hug, not pucker.
- Armholes: Join Ivory at underarm seam. Sc evenly around each armhole: 1 sc per st across shoulder, 2 sc per row-end up/down the armhole edges, working sc2tog at the underarm corner to avoid gaping. Sl st to join. Fasten off.
- Hem: Join Mocha at a side seam. Sc evenly across the flared hem — 1 sc in each st and 1 sc in each ch-1 sp to preserve the flare's stretch. Sl st to join. Fasten off.
4. Weave in Ends
Weave all ends into same-color sections on the WS. Trim.
BLOCKING (essential for lace)
- Wet block: Soak the finished top in cool water with a drop of wool wash for 15–20 minutes. Do not agitate.
- Gently squeeze out water (never wring); roll in a towel and press.
- Pin to blocking mats to the finished measurements for your size (see Sizes table). Open up every V-st and ch-1 space so the lace pattern shows.
- Pin the neckline into the smooth Queen Anne curve — coax the center dip into a gentle scoop and the shoulder points slightly upward.
- Pin the hem into a soft flare.
- Let dry completely (24–48 hrs) before unpinning. Reblock after each wash.
Final Measurement Checklist (blocked)
| Point | XS target |
|---|---|
| Bust (Front + Back) | 32" |
| Empire waist | ~28–29" (cinched) |
| Flared hem | ~34" |
| Shoulder strap width | ~3.3" (20–24 sts) |
| Total length (shoulder to hem) | 17–18" |
All stitch counts verified: cast-on [96] (÷4 ✓) → armhole [80] (÷4 ✓) → neckline split 24 + 32 + 24 = 80 ✓ → strap 20 sts (÷4 ✓). Gauge 24 sts = 4" confirms [96] sts = 16" flat = 32" around at bust.
Enjoy your Café au Lait Lace Tank — from ivory shoulders to a warm mocha hem. ☕
Disclaimer: This pattern was generated by AI and should be reviewed for accuracy before use. While we strive for quality, AI-generated content may contain errors. Please verify measurements, stitch counts, and instructions before beginning your project. Generated by purlJam.uk
Access your pattern anytime
Bookmark this page to access your pattern anytime