Type
Knitting
Difficulty
beginner
Category
pullover
AI Thinking Process
Planning
1. **Design Strategy**: A beginner-friendly boxy drop shoulder pullover inspired by 80s/90s Carlo Colucci style — oversized fit, boatneck, worked flat in stocking stitch with ribbed hem, cuffs and neckband. Worsted weight for quick results.
2. **Construction Plan**: Knit flat in four pieces (back, front, two sleeves), seamed at shoulders and sides; sleeves picked up from armhole edge and worked down to cuff.
3. **Quality Assurance**:
- Ensure generous positive ease (oversized, ~15 cm/6") so sizing is clearly larger than actual bust.
- Boatneck stitch counts must match between front and back for clean shoulder seams.
- Sleeve pick-up rate must match row gauge to avoid puckering.
4. **Final Calculations**: Tension 18 sts × 24 rows = 10 cm in st st on 5 mm needles. Finished bust: S 102 / M 112 / L 122 / XL 132 / 2XL 142 cm. Back/Front CO: 92/100/110/118/128 sts. Length to shoulder: 60/62/64/66/68 cm. Armhole depth: 24/25/26/27/28 cm → pick up 86/90/94/98/100 sts. Sleeve length: 45 cm; cuff: 40/42/44/46/48 sts.
Verification
1. **Completeness**: Back, Front, Shoulder join, Sleeves, Neckband, Finishing — all present.
2. **Consistency**: 92 sts ÷ 18 sts/10cm = 51.1 cm × 2 = 102 cm bust ✓ (all sizes verified similarly).
3. **Constraints**: Boxy/oversized ✓, boatneck ✓, beginner-level ✓, UK terminology and metric-first ✓, worsted ✓.
4. **Safety**: Decrease rate on sleeves checked: 86 → 40 sts over ~100 rows = 23 decreases each side, ~every 4th row ✓.
Pattern
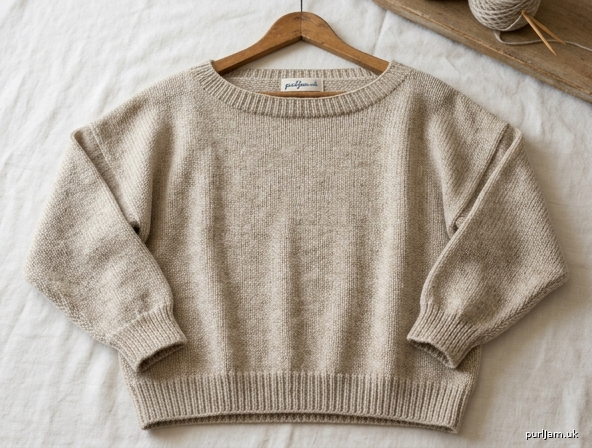
# CARLO — Oversized Drop Shoulder Boatneck Pullover

*A relaxed, boxy worsted-weight pullover with a wide boatneck and dropped shoulders. Inspired by the bold, oversized silhouettes of 1980s Italian knitwear. A perfect first jumper project.*

---

## SIZES

| Size | S | M | L | XL | 2XL |
|---|---|---|---|---|---|
| To fit bust (cm) | 84–89 | 89–94 | 94–102 | 102–112 | 112–122 |
| To fit bust (in) | 33–35 | 35–37 | 37–40 | 40–44 | 44–48 |
| Finished bust (cm) | 102 | 112 | 122 | 132 | 142 |
| Finished bust (in) | 40 | 44 | 48 | 52 | 56 |
| Ease | ~15 cm / 6" positive (oversized) |

Pattern is written for size S, with larger sizes in brackets: S (M, L, XL, 2XL).

---

## MATERIALS

- **Yarn:** Worsted weight (Aran), approx.
  - S: 900 m / M: 1000 m / L: 1100 m / XL: 1200 m / 2XL: 1300 m
  - (suggested: smooth wool or wool blend, ~100 m per 50 g)
- **Needles:**
  - 5 mm (UK 6 / US 8) straight or circular needles — main fabric
  - 4 mm (UK 8 / US 6) needles — ribbing
- **Notions:** Tapestry needle, stitch markers, tape measure

---

## TENSION (GAUGE)

- **18 sts × 24 rows = 10 cm (4")** in stocking stitch on 5 mm needles, after blocking.
- Please take time to check your tension — it determines the finished size.

---

## ABBREVIATIONS

- **k** — knit
- **p** — purl
- **st(s)** — stitch(es)
- **st st** — stocking stitch (k on RS, p on WS)
- **CO** — cast on
- **BO** — bind/cast off
- **RS / WS** — right side / wrong side
- **k2tog** — knit two together (right-leaning decrease)
- **ssk** — slip, slip, knit (left-leaning decrease)
- **rep** — repeat

---

## FINISHED MEASUREMENTS

| Measurement | S | M | L | XL | 2XL |
|---|---|---|---|---|---|
| Bust (cm) | 102 | 112 | 122 | 132 | 142 |
| Length to shoulder (cm) | 60 | 62 | 64 | 66 | 68 |
| Armhole depth (cm) | 24 | 25 | 26 | 27 | 28 |
| Sleeve length (cm) | 45 | 45 | 45 | 45 | 45 |
| Upper sleeve (cm) | 48 | 50 | 52 | 54 | 56 |
| Cuff (cm) | 22 | 23 | 24 | 26 | 27 |

---

## CONSTRUCTION OVERVIEW

This jumper is worked flat in four pieces. The Back and Front are simple rectangles with no armhole shaping — a hallmark of the drop shoulder. After seaming the shoulders, sleeves are picked up along the straight side edge of the armhole and worked downwards to the cuff. Side and underarm seams are sewn last. The wide boatneck requires no shaping.

---

## BACK

With 4 mm needles, CO **92 (100, 110, 118, 128) sts.**

*Math check: 92 sts ÷ 18 sts per 10 cm × 10 = 51.1 cm × 2 = 102 cm bust ✓*

**Rib:**
Row 1 (RS): *k1, p1*; rep from * to end.
Row 2 (WS): *p1, k1*; rep from * to end.
(For even stitch counts — M, XL — adjust so rib ends correctly: *k1, p1* across, ending k1 if needed.)
Work in k1, p1 rib for **6 cm**, ending with a WS row.

**Body:**
Change to 5 mm needles. Work in st st (k on RS, p on WS) until piece measures **60 (62, 64, 66, 68) cm** from cast-on edge, ending with a WS row.

*Math check: 60 cm × 24 rows per 10 cm = 144 rows from CO ✓*

**Shoulders & Back Neck:**
Next row (RS): k **28 (31, 35, 38, 42)** sts (right shoulder), BO centre **36 (38, 40, 42, 44)** sts loosely for back neck, k to end (28 (31, 35, 38, 42) sts for left shoulder).

*Math check: 28 + 36 + 28 = 92 ✓ / 31 + 38 + 31 = 100 ✓ / 35 + 40 + 35 = 110 ✓ / 38 + 42 + 38 = 118 ✓ / 42 + 44 + 42 = 128 ✓*

Work each shoulder separately for 2 more rows in st st, then BO all sts.
(Alternatively, place shoulder sts on holders for a 3-needle bind-off in finishing.)

---

## FRONT

Work exactly as for Back, including the boatneck shaping at the top. Front and Back are identical.

---

## JOIN SHOULDERS

With RS together, seam the right shoulder (28 (31, 35, 38, 42) sts) using mattress stitch or a 3-needle bind-off. Repeat for the left shoulder. The wide centre opening forms the boatneck. Lay flat and measure the neck opening — it should sit at approximately **40–44 cm wide**.

---

## SLEEVES (make 2)

Lay the joined body flat. Place markers on the front and back side edges, measuring **24 (25, 26, 27, 28) cm** down from the shoulder seam on each side.

With 5 mm needles, RS facing, beginning at one marker, pick up and knit **86 (90, 94, 98, 100) sts** evenly along the armhole edge to the opposite marker.

*Pick-up rate check: 24 cm × 24 rows per 10 cm = ~58 rows on each side = 116 row-edges. Pick up roughly 3 sts for every 4 rows: 116 × ¾ ≈ 87 sts ≈ 86 sts ✓*

Beginning with a WS purl row, work in st st.

**Sleeve shaping:**
Decrease row (RS): k2, k2tog, k to last 4 sts, ssk, k2. *(2 sts decreased)*

Work the decrease row every **4th row** a total of **23 (24, 25, 26, 26) times.**

*Math check (size S): 86 − (23 × 2) = 86 − 46 = 40 sts ✓*
*M: 90 − 48 = 42 ✓ / L: 94 − 50 = 44 ✓ / XL: 98 − 52 = 46 ✓ / 2XL: 100 − 52 = 48 sts*

After decreases, **40 (42, 44, 46, 48) sts** remain. Continue straight in st st (if needed) until sleeve measures **39 cm** from pick-up edge.

**Cuff:**
Change to 4 mm needles. Work in k1, p1 rib for **6 cm.**
BO all sts loosely in rib.

Total sleeve length: ~45 cm ✓

---

## NECKBAND (optional — recommended for stability)

With 4 mm needles and RS facing, beginning at left shoulder seam, pick up and knit approximately **72 (76, 80, 84, 88) sts** evenly around the entire neck opening (front and back). Place marker and join in the round.

Work in k1, p1 rib for **3 cm.**
BO loosely in rib.

*Note: a folded double neckband (6 cm worked then folded inside and sewn down) creates a sturdier boatneck if preferred.*

---

## FINISHING

1. Weave in all ends on the WS.
2. With RS together, sew side seams from hem to underarm using mattress stitch.
3. Sew underarm/sleeve seams from cuff to underarm.
4. **Block** the finished jumper to measurements: dampen, lay flat, pat into shape, and allow to dry fully. Blocking will even out the stocking stitch and set the boxy drape.

---

## STYLING NOTES

The wide boatneck is intended to slip slightly off one shoulder for a relaxed, late-80s look. For a more **cropped** version, work the body to 50 (52, 54, 56, 58) cm before shoulder shaping. For a more fitted look, choose one size smaller.

Enjoy your finished CARLO jumper — bold, boxy, and beginner-friendly.
Disclaimer: This pattern was generated by AI and should be reviewed for accuracy before use. While we strive for quality, AI-generated content may contain errors. Please verify measurements, stitch counts, and instructions before beginning your project. Generated by purlJam.uk
Access your pattern anytime
Bookmark this page to access your pattern anytime