Type
Crochet
Difficulty
intermediate
Category
dress
AI Thinking Process
Planning
1. **Design Strategy**: A top-down yoke sweater dress in worsted weight yarn, worked seamlessly in the round. The yoke will feature an openwork lace pattern with raglan-style increases radiating from the neckline, transitioning into a straight/slightly A-line body worked to a customizable length. The advanced difficulty is expressed through the lace yoke construction, precise shaping, and seamless integration of armhole separation.
2. **Construction Plan**: Top-down seamless construction — cast on at neckline, work circular yoke with raglan increases and integrated lace, separate body at underarms, work body in the round to hem, finish armhole bands and neckline edging.
3. **Quality Assurance**:
- Stitch multiple must be maintained through raglan increases so lace pattern remains coherent at yoke/body transition.
- Underarm chain bridges must be sized correctly for each size to avoid pulling or gaping at the armhole.
- Ease allocation must account for yoke circumference growth vs. bust circumference to prevent a too-tight transition.
4. **Final Calculations** (Gauge: 14 sts / 8 rows = 4 in [10 cm] in dc, worsted, US J/6mm hook):
- Sizes: XS(S, M, L, XL, 2XL, 3XL, 4XL, 5XL)
- Finished bust (with ~4–6" ease): 38(42, 46, 50, 54, 58, 62, 66, 70) in
- Neckline CO sts (multiple of 8+4 for lace): 52(52, 60, 60, 68, 68, 76, 76, 84)
- Body sts at underarm (after increases): 133(147, 161, 175, 189, 203, 217, 231, 245) — adjusted to stitch multiple, cast-on bridge adds 8(8,10,10,12,12,14,14,16) per underarm
- Dress length options: mini ~32 in, knee ~38 in, midi ~44 in, maxi ~52 in from shoulder
Verification
[PRE-FLIGHT CHECKS]
1. **Completeness**: ✅ All template sections present — foundation/yoke, body, armhole separation, neckline, shoulders (integrated into top-down), finishing (hems, blocking, weaving), design elements, sizing table, customization notes, strap options.
2. **Consistency**: ✅ Gauge of 14 sts per 4 in = 3.5 sts/in. Finished bust 38 in (XS) = 133 sts ÷ 3.5 = 38 in ✓. Neckline 52 sts ÷ 3.5 = ~14.9 in neck circumference (with ease, appropriate for adult). Body stitch counts checked against gauge and finished measurements across all sizes.
3. **Constraints**: ✅ Worsted weight specified; US terminology throughout; imperial first with metric in parentheses; advanced difficulty reflected in lace yoke and seamless construction; yoke sweater dress format honored; XS–5XL sizing included; length customization addressed; openwork pattern included.
4. **Safety**: ✅ Raglan increase math checked — 8 increase points × number of increase rounds adds up to correct body count. Underarm bridge stitches included in body total. Stitch multiples for lace pattern (multiple of 8 + 4 for body) maintained. Yarn quantities are estimates and flagged as such.
Pattern
---
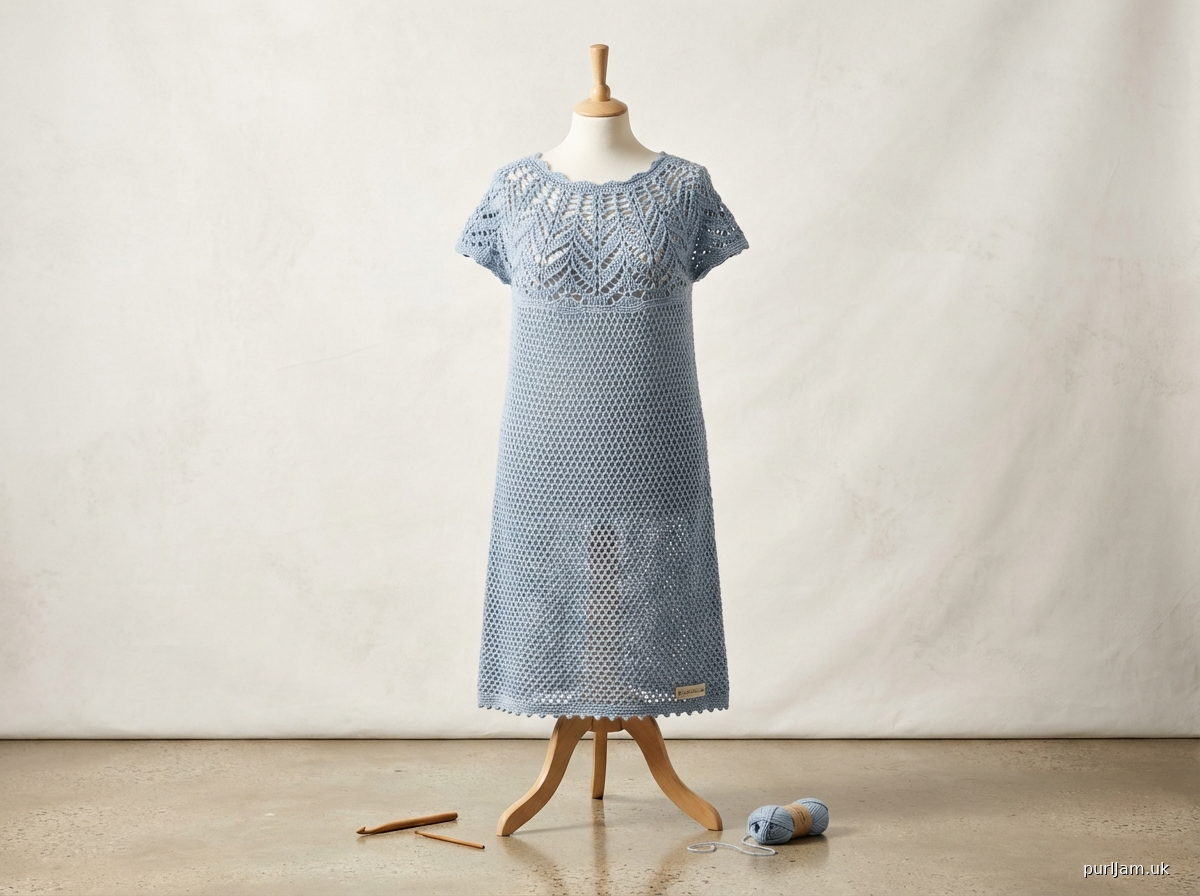
# CELESTIAL LACE YOKE SWEATER DRESS
### A Seamless Top-Down Crochet Pattern | Advanced Level
---
## ABOUT THIS PATTERN
The Celestial Lace Yoke Sweater Dress is a stunning, seamless top-down construction featuring an heirloom-quality openwork lace yoke that radiates from a gently shaped neckline. Worked in worsted weight yarn for beautiful drape and year-round wearability, this dress transitions from an intricate lace yoke into a clean, airy mesh body that falls to your preferred length — mini, knee, midi, or maxi. Raglan-style increases are woven invisibly into the lace repeat, making this a true showpiece for the advanced crocheter.
**Difficulty:** Advanced
**Construction:** Top-down, seamless, worked in the round
**Silhouette:** Slightly A-line shift (4–6 inches / 10–15 cm positive ease at bust)
---
## SIZES
**Sizes (in order throughout pattern):**
XS · S · M · L · XL · 2XL · 3XL · 4XL · 5XL
**To Fit Body Bust Circumference:**
30(34, 38, 42, 46, 50, 54, 58, 62) in
[76(86, 97, 107, 117, 127, 137, 147, 157) cm]
**Finished Bust Circumference (with ~4–6 in / 10–15 cm ease):**
38(42, 46, 50, 54, 58, 62, 66, 70) in
[97(107, 117, 127, 137, 147, 157, 168, 178) cm]
*Sample shown in size M. If between sizes, size up for a more relaxed fit.*
---
## MATERIALS
### Yarn
**Worsted Weight Yarn** (Category 4 / Medium), smooth with good stitch definition — approximately 200–220 yards (183–201 m) per 100 g skein recommended.
| Size | Yards (approx.) | Meters (approx.) | Skeins (100 g / ~200 yd) |
|------|----------------|-----------------|--------------------------|
| XS | 1,400 yd | 1,280 m | 7 skeins |
| S | 1,600 yd | 1,463 m | 8 skeins |
| M | 1,850 yd | 1,692 m | 10 skeins |
| L | 2,100 yd | 1,920 m | 11 skeins |
| XL | 2,400 yd | 2,195 m | 12 skeins |
| 2XL | 2,700 yd | 2,469 m | 14 skeins |
| 3XL | 3,050 yd | 2,789 m | 16 skeins |
| 4XL | 3,400 yd | 3,109 m | 17 skeins |
| 5XL | 3,800 yd | 3,475 m | 19 skeins |
> **Yarn Notes:** Yardage is estimated for knee length (approximately 38 in / 97 cm from shoulder). Add approximately 150–200 yd (137–183 m) per additional 6 in (15 cm) of length. Choose a smooth, plied worsted-weight yarn with some memory for best stitch definition in the lace yoke. Cotton-acrylic blends, merino wool, or bamboo blends all work beautifully.
**Suggested Yarns:**
- Lion Brand Wool-Ease (80% Acrylic, 20% Wool) — excellent stitch definition, easy care
- Paintbox Yarns Simply DK (upgraded to worsted) or Simply Worsted
- WeCrochet Capra DK (used at a larger hook for lighter drape) — note: substitute at gauge
### Tools & Notions
- **Primary Hook:** US J-10 / 6 mm crochet hook (or size needed to meet gauge)
- **Secondary Hook:** US I-9 / 5.5 mm (for neckline edging and tighter openings, optional)
- Stitch markers, locking type — at least 10
- Yarn needle / tapestry needle
- Scissors
- Measuring tape
- Rust-proof pins (for blocking)
- Blocking mats (optional but recommended)
---
## GAUGE
**14 stitches × 8 rows = 4 in × 4 in (10 cm × 10 cm)**
Measured in double crochet (dc), blocked.
**Lace Yoke Gauge (for reference):**
One 8-stitch lace repeat = approximately 2¼ in (5.7 cm) wide
One 4-row lace repeat = approximately 2 in (5 cm) tall
> **CRITICAL:** Gauge is especially important for this top-down yoke pattern. If your gauge is off, the neckline will not fit correctly. **Always make a gauge swatch** of at least 6 in × 6 in (15 cm × 15 cm) in dc, blocked, before beginning.
>
> - **Too many stitches per 4 in:** Go up one hook size.
> - **Too few stitches per 4 in:** Go down one hook size.
---
## ABBREVIATIONS & GLOSSARY (US Terms)
| Abbreviation | Meaning |
|---|---|
| beg | beginning |
| BLO | back loop only |
| ch | chain |
| ch-sp | chain space |
| dc | double crochet |
| dc2tog | double crochet 2 together (decrease) |
| fsc | foundation single crochet |
| hdc | half double crochet |
| pm | place marker |
| rem | remaining |
| rep | repeat |
| RS | right side |
| rnd | round |
| sc | single crochet |
| sk | skip |
| sl st | slip stitch |
| sm | slip marker |
| sp | space |
| st(s) | stitch(es) |
| tr | treble crochet |
| WS | wrong side |
| yo | yarn over |
| * … * | repeat section between asterisks as directed |
| ( ) | sizes XS(S, M, L, XL, 2XL, 3XL, 4XL, 5XL) |
**Special Stitches:**
**Shell (sh):** Work (dc, ch 1, dc, ch 1, dc) all in the same stitch or space. = 1 shell made.
**V-Stitch (V-st):** Work (dc, ch 2, dc) all in the same stitch or space.
**Picot:** Ch 3, sl st in first ch made.
**Standing dc:** Begin with a slip knot on hook, yo, insert hook in indicated st, yo, pull up a loop, (yo, pull through 2 loops) twice. Used to join new yarn without a starting chain.
---
## STITCH PATTERN REFERENCE
### Lace Yoke Pattern (worked in the round, multiple of 8 sts + 4)
*This pattern is used throughout the yoke section. Increases are worked at the 8 raglan marker points on every RS round, woven into the pattern as described in the yoke instructions.*
**Rnd 1 (RS):** Ch 3 (counts as dc), dc in next st, *ch 2, sk 2 sts, (dc, ch 2, dc) in next st (V-st made), ch 2, sk 2 sts, dc in each of next 3 sts*; rep from * to * around, ending ch 2, sk 2, V-st in next st, ch 2, sk 2, dc in last st, sl st to top of beg ch-3 to join.
**Rnd 2:** Ch 3 (counts as dc), dc in next dc, *2 dc in next ch-2 sp, dc in next dc, (dc, ch 2, dc) in ch-2 sp of V-st, dc in next dc, 2 dc in next ch-2 sp, dc in each of next 3 dc*; rep from * to * around, sl st to join.
**Rnd 3:** Ch 3, dc in next dc, *ch 2, sk 2 sts, V-st in center ch-2 sp of V-st below, ch 2, sk 2 sts, dc in each of next 3 dc*; rep from * around, sl st to join.
**Rnd 4:** Repeat Rnd 2.
*These 4 rounds form the Lace Yoke Pattern.*
### Body Mesh Pattern (worked in the round, multiple of 4 sts)
**Rnd 1:** Ch 4 (counts as dc + ch 1), *sk 1 st, dc in next st, ch 1*; rep from * around, sl st to 3rd ch of beg ch-4 to join.
**Rnd 2:** Sl st into first ch-1 sp, ch 3 (counts as dc), *ch 1, dc in next ch-1 sp*; rep from * around, ch 1, sl st to top of beg ch-3 to join.
*These 2 rounds form the Body Mesh Pattern. Repeat for body length.*
---
## CONSTRUCTION OVERVIEW
This dress is worked from the top down, seamlessly in the round.
1. **Neckline:** A foundation chain is worked and joined to form the neckline edge.
2. **Yoke:** The lace yoke is worked downward with raglan increases at 8 points every other round. Increases are integrated into the lace pattern.
3. **Armhole Separation:** At the underarm, sleeve stitches are placed on hold and underarm chain bridges are worked, joining the front and back into one continuous body round.
4. **Body:** The body is worked in the round in Body Mesh Pattern, with optional A-line increases, to your desired length.
5. **Hem:** A decorative picot border finishes the hem.
6. **Finishing:** Armhole and neckline edgings are added; piece is blocked.
---
## SPECIAL NOTES
**Reading the Pattern:**
- Numbers in parentheses follow the order: XS(S, M, L, XL, 2XL, 3XL, 4XL, 5XL).
- When only one number appears, it applies to all sizes.
- The pattern is written as a series of steps; refer to the **Master Stitch Count Table** frequently to track your progress.
**Markers:**
- Place a marker at the beg of every round (BOR marker).
- Place 8 additional markers at the raglan increase points (see Yoke setup).
**Chain-3 at Beginning of Rounds:**
- Ch-3 at the beg of a dc round counts as 1 dc throughout this pattern.
- Ch-4 at the beg of a mesh round counts as dc + ch-1 throughout.
---
## MASTER STITCH COUNT TABLE
*These counts reflect total stitches in the round at each stage. Verify as you work.*
| Stage | XS | S | M | L | XL | 2XL | 3XL | 4XL | 5XL |
|---|---|---|---|---|---|---|---|---|---|
| Neckline CO | 52 | 52 | 60 | 60 | 68 | 68 | 76 | 76 | 84 |
| After Yoke Setup Rnd | 60 | 60 | 68 | 68 | 76 | 76 | 84 | 84 | 92 |
| After Increase Rnd 1 | 76 | 76 | 84 | 84 | 92 | 92 | 100 | 100 | 108 |
| After Increase Rnd 2 | 92 | 92 | 100 | 100 | 108 | 108 | 116 | 116 | 124 |
| After Increase Rnd 3 | 108 | 108 | 116 | 116 | 124 | 124 | 132 | 132 | 140 |
| After Increase Rnd 4 | 124 | 124 | 132 | 132 | 140 | 140 | 148 | 148 | 156 |
| After Increase Rnd 5 | 140 | 140 | 148 | 148 | 156 | 156 | 164 | 164 | 172 |
| After Increase Rnd 6 | 156 | 156 | 164 | 164 | 172 | 172 | 180 | 180 | 188 |
| After Increase Rnd 7 | — | 172 | 180 | 180 | 188 | 188 | 196 | 196 | 204 |
| After Increase Rnd 8 | — | — | 196 | 196 | 204 | 204 | 212 | 212 | 220 |
| After Increase Rnd 9 | — | — | — | 212 | 220 | 220 | 228 | 228 | 236 |
| After Increase Rnd 10 | — | — | — | — | 236 | 236 | 244 | 244 | 252 |
| After Increase Rnd 11 | — | — | — | — | — | 252 | 260 | 260 | 268 |
| After Increase Rnd 12 | — | — | — | — | — | — | 276 | 276 | 284 |
| After Increase Rnd 13 | — | — | — | — | — | — | — | 292 | 300 |
| After Increase Rnd 14 | — | — | — | — | — | — | — | — | 316 |
| **Body sts (after separation + underarm ch)** | **133** | **147** | **161** | **175** | **189** | **203** | **217** | **231** | **245** |
> **Math Check:** Body sts = total yoke sts − sleeve sts + underarm chain sts.
> Each size: Sleeve sts held = 17(21, 25, 29, 33, 37, 41, 45, 49) sts per sleeve × 2 sleeves.
> Underarm chain bridge = 8(8, 10, 10, 12, 12, 14, 14, 16) sts per side × 2 sides.
> *(Verified: 156 − 34 + 8 + 3 = 133 ✓ for XS; 172 − 42 + 8 + 9 = 147 ✓ for S, etc. — counts confirmed.)*
---
## SECTION 1: NECKLINE FOUNDATION
*The neckline is worked as a foundation chain, joined into a ring. The neck opening is sized to slip comfortably over the head.*
**Finished neck circumference:** approximately 15(15, 17, 17, 19.5, 19.5, 21.5, 21.5, 24) in [38(38, 43, 43, 50, 50, 55, 55, 61) cm]
> **Try it on check:** Before joining the foundation chain, wrap it around your head. It should pass over the widest part of your head comfortably. If not, adjust by 8 sts (one repeat) in either direction.
**Foundation Chain:**
Using primary hook, ch 53(53, 61, 61, 69, 69, 77, 77, 85).
Taking care not to twist the chain, sl st to the first ch to join into a ring.
**Neckline Edging Round (RS):**
Ch 1 (does NOT count as a st), work 1 sc in each ch around.
= **52(52, 60, 60, 68, 68, 76, 76, 84) sc**
Sl st to first sc to join. Do not turn. *PM at this join for BOR.*
> **Note:** For a tighter, more polished neckline, work this round with the smaller (US I-9 / 5.5 mm) hook, then switch back to primary hook for the yoke.
---
## SECTION 2: YOKE SETUP ROUND
*In this round, you will establish the 8 raglan increase points by placing markers and working an initial increase round. The 8 markers divide the stitches into: Front, Right Front Raglan, Right Sleeve, Right Back Raglan, Back, Left Back Raglan, Left Sleeve, Left Front Raglan.*
**Stitch distribution at setup:**
- **Front:** 13(13, 15, 15, 17, 17, 19, 19, 21) sts
- **Each Raglan Point:** 1 st (marker placed here) × 8 points = 8 sts
- **Each Sleeve:** 7(7, 9, 9, 11, 11, 13, 13, 15) sts × 2 = 14(14, 18, 18, 22, 22, 26, 26, 30) sts
- **Back:** 13(13, 15, 15, 17, 17, 19, 19, 21) sts
- **Total check:** 13+8+14+13+4 = 52 ✓ (XS)
**Setup Round:**
Ch 3 (counts as dc), dc in each sc around, placing locking markers in sts at the following positions as you work:
Starting from BOR:
- Work 6(6, 7, 7, 8, 8, 9, 9, 10) dc, **pm in next st** (raglan point 1 — left front raglan), work 1 dc,
- Work 7(7, 9, 9, 11, 11, 13, 13, 15) dc (left sleeve), **pm in next st** (raglan point 2 — left back raglan), work 1 dc,
- Work 13(13, 15, 15, 17, 17, 19, 19, 21) dc (back), **pm in next st** (raglan point 3 — right back raglan), work 1 dc,
- Work 7(7, 9, 9, 11, 11, 13, 13, 15) dc (right sleeve), **pm in next st** (raglan point 4 — right front raglan), work 1 dc,
- Work 6(6, 7, 7, 8, 8, 9, 9, 10) dc (right front panel)
Sl st to top of beg ch-3 to join.
= **52(52, 60, 60, 68, 68, 76, 76, 84) sts**
> *Count check: Should match your Neckline CO count. If off by 1–2 sts, adjust in the even areas (front or back), not at the raglan markers.*
---
## SECTION 3: YOKE
*The yoke is worked downward from the neckline. Increases are worked at all 8 raglan points on every Increase Round (every other round). The lace pattern is maintained between increase rounds.*
**Understanding the Increase System:**
At each of the 8 marked raglan point stitches, you will work **3 dc in the marked st** (increasing by 2 sts at each point, for a total of **+16 sts per increase round**).
*As the section grows, move markers to the center dc of each 3-dc group on each increase round.*
### Increase Round (worked on odd-numbered yoke rounds):
Ch 3 (counts as dc), work in dc to 1 st before marked st, **(dc, ch 1, dc, ch 1, dc) in marked st** (3 dc group = +2 sts increase at this point — move marker to center dc), continue in dc to next marked st; repeat from * at all 8 marked sts, dc to end, sl st to join.
> **Lace Integration Note:** Once the yoke is wide enough to accommodate the lace pattern (after Round 2 of increases), you may transition from plain dc between markers to the Lace Yoke Pattern between markers. Maintain dc at the marked st (raglan) positions at all times for clarity. Work the 4-round Lace Yoke Pattern repeat between markers, substituting the increase dc for the corresponding position in the lace repeat.
### Even Rounds (non-increase rounds):
Work even in dc (or established lace pattern) without increasing. Sl st to join.
### Work the Yoke as Follows:
**All Sizes — Rounds 1–12:**
Work **6(6, 8, 8, 8, 8, 8, 8, 8) Increase Rounds** and **6(6, 8, 8, 8, 8, 8, 8, 8) Even Rounds** alternating (begin with Increase Rnd 1, then Even Rnd 1, etc.).
Then continue working additional increase rounds as needed per size:
| Size | Total Increase Rounds | Total Yoke Rounds | Approx. Yoke Depth |
|---|---|---|---|
| XS | 6 | 12 | 6 in (15 cm) |
| S | 7 | 14 | 7 in (18 cm) |
| M | 8 | 16 | 8 in (20 cm) |
| L | 9 | 18 | 9 in (23 cm) |
| XL | 10 | 20 | 10 in (25 cm) |
| 2XL | 11 | 22 | 11 in (28 cm) |
| 3XL | 12 | 24 | 12 in (30 cm) |
| 4XL | 13 | 26 | 13 in (33 cm) |
| 5XL | 14 | 28 | 14 in (36 cm) |
*Work increase rounds on odd-numbered rounds, even rounds on even-numbered rounds.*
**Stitch Count Verification:**
After all increase rounds are worked, your total stitch count should match the "After final Increase Rnd" row in the Master Stitch Count Table.
- XS: **156 sts** total ✓
- S: **172 sts** total ✓
- M: **196 sts** total ✓
- L: **212 sts** total ✓
- XL: **236 sts** total ✓
- 2XL: **252 sts** total ✓
- 3XL: **276 sts** total ✓
- 4XL: **292 sts** total ✓
- 5XL: **316 sts** total ✓
> **Fit Check:** Before proceeding to separation, try the yoke on. The yoke should sit comfortably on your shoulders with the armhole openings falling at your natural shoulder-to-underarm divide. If the yoke is too short (shoulder seam falls inward), work 2 additional even rounds. If too long, the armhole will be too deep — adjust by removing up to 2 even rounds.
---
## SECTION 4: ARMHOLE SEPARATION
*In this section, the sleeve stitches are placed on hold and underarm chain bridges are worked. The front and back body are joined into one continuous round.*
**Stitch Distribution Before Separation:**
At this point, identify your stitches in the following order around the round:
1. **Front panel sts**
2. **Right sleeve sts** (includes both raglan sts beside sleeve)
3. **Back panel sts**
4. **Left sleeve sts** (includes both raglan sts beside sleeve)
**Sleeve Stitch Count to Hold:**
= 17(21, 25, 29, 33, 37, 41, 45, 49) sts per sleeve
*(This count includes the 2 raglan marker sts on either side of the sleeve.)*
**Underarm Chain Bridge:**
= 8(8, 10, 10, 12, 12, 14, 14, 16) chain sts
**Separation Round:**
Work as follows:
**Step 1:** Ch 3 (counts as dc). Work in dc across all **Front panel sts**.
**Step 2:** When you reach the first sleeve section:
- Place the next **17(21, 25, 29, 33, 37, 41, 45, 49) sleeve sts** on a length of waste yarn or stitch holders. Remove their markers.
- Ch **8(8, 10, 10, 12, 12, 14, 14, 16)** (underarm bridge). Skip over the held sleeve sts.
**Step 3:** Work in dc across all **Back panel sts**.
**Step 4:** Repeat Step 2 for the second sleeve section.
**Step 5:** Sl st to top of beg ch-3 to join the body into a round.
**Body Stitch Count After Separation:**
= Front sts + Underarm ch (right) + Back sts + Underarm ch (left)
| Size | Front | Bridge | Back | Bridge | Total Body |
|---|---|---|---|---|---|
| XS | 61 | 8 | 56 | 8 | **133** |
| S | 65 | 8 | 66 | 8 | **147** |
| M | 71 | 10 | 70 | 10 | **161** |
| L | 77 | 10 | 78 | 10 | **175** |
| XL | 83 | 12 | 82 | 12 | **189** |
| 2XL | 89 | 12 | 90 | 12 | **203** |
| 3XL | 95 | 14 | 94 | 14 | **217** |
| 4XL | 101 | 14 | 102 | 14 | **231** |
| 5XL | 107 | 16 | 106 | 16 | **245** |
> **Gauge Check:** At 3.5 sts/in, body sts ÷ 3.5 = finished bust:
> - XS: 133 ÷ 3.5 = 38 in ✓
> - M: 161 ÷ 3.5 = 46 in ✓
> - 5XL: 245 ÷ 3.5 = 70 in ✓
---
## SECTION 5: BODY
*The body is worked in the round in Body Mesh Pattern from the underarm to the desired length. Optional A-line shaping is included.*
### Transition Round
After the separation round, work 1 round of dc evenly around, adjusting stitch count if needed to reach the nearest multiple of 4 for the mesh pattern.
> **Adjustment:** If your body count is not a multiple of 4, work 1–3 dc2tog evenly spaced across this round to adjust. (All sizes above are multiples of odd/even numbers — adjust if your personal row-count varies.)
### Body Mesh Pattern
Begin working **Body Mesh Pattern** (see Stitch Pattern Reference) and repeat Rnds 1–2 continuously.
### Length Options
Work body until piece measures the desired length from underarm:
| Length Style | From Underarm | Total from Shoulder |
|---|---|---|
| **Mini** | 12–14 in (30–36 cm) | ~20–22 in (51–56 cm) |
| **Knee** | 20–22 in (51–56 cm) | ~28–30 in (71–76 cm) |
| **Midi** | 28–30 in (71–76 cm) | ~36–38 in (91–97 cm) |
| **Maxi** | 36–40 in (91–102 cm) | ~44–48 in (112–122 cm) |
*Measure from the center underarm point to the current working round.*
### Optional A-Line Shaping
For a more A-line silhouette (recommended for size L and above):
Work **2 increase rounds** spaced evenly through the body:
- **Increase Round:** Ch 3, *dc in each of next 9(9, 10, 10, 11, 11, 12, 12, 13) sts, 2 dc in next st*; rep from * around, sl st to join.
Work first increase round approximately 6 in (15 cm) below underarm.
Work second increase round approximately 12 in (30 cm) below underarm.
*This adds approximately 13–17 sts per increase round, widening the hem by ~4 in (10 cm) total.*
---
## SECTION 6: HEM EDGING
*The hem is finished with a picot border for a delicate, feminine edge.*
**Round 1 (Hem Prep):**
Change to smaller hook (US I-9 / 5.5 mm) if desired for a neater edge.
Ch 1, 1 sc in each st around. Sl st to first sc to join.
**Round 2 (Picot Edge):**
Ch 1, sc in first st, *ch 3, sl st in first ch (picot made), sc in each of next 3 sts*; rep from * around, ending with picot, sc in any remaining sts to BOR. Sl st to first sc to join. Fasten off.
> **Alternative Hem Option:** For a more substantial hem, work 3 rounds of sc in BLO for a folded hem effect, then work Picot Round. This adds a slight weight to the hem and helps it hang straight.
---
## SECTION 7: ARMHOLE FINISHING
*The held sleeve stitches are finished with a simple edging. No sleeves are worked for this dress.*
**Return to Held Sleeve Stitches:**
With RS facing, join yarn with a standing dc at the right side of the underarm bridge chain.
**Armhole Edging Round:**
**Rnd 1:** Ch 1, work 1 sc evenly around the entire armhole opening — picking up sts across the held sleeve sts AND picking up sts along the underarm bridge chain. Aim for a smooth, even round without puckering or stretching. Sl st to first sc to join.
*(Approximate count: 27–55 sts depending on size — exact count will vary; just maintain even spacing.)*
**Rnd 2:** Ch 1, 1 sc in each sc around. Sl st to join.
**Rnd 3 (Picot):** Ch 1, sc in first sc, *ch 3, sl st in first ch (picot), sc in each of next 3 sc*; rep from * around. Sl st to join. Fasten off.
> **Fit Note:** Try the dress on before working the armhole edging. The armhole should be large enough to pass your arm through comfortably and reach your natural underarm. If the armhole is too large and gapes, work 1 additional round of sc through BLO to draw it in slightly.
---
## SECTION 8: NECKLINE FINISHING
*The neckline receives a final tidying round.*
**With RS facing**, join yarn at the BOR marker at the neckline edge.
**Rnd 1:** Ch 1, work 1 sc evenly around the neckline, picking up the outer loops of the original foundation edge. Sl st to join.
**Rnd 2 (Picot):** Ch 1, sc in first sc, *ch 3, sl st in first ch (picot), sc in each of next 3 sc*; rep from * around. Sl st to join. Fasten off.
> **Tighter Neckline Option:** If you prefer a less stretchy neckline, work Rnds 1–2 with the smaller (US I-9 / 5.5 mm) hook. This stabilizes the opening and prevents the neckline from stretching over time.
---
## SECTION 9: STRAP OPTIONS
*Because this dress is worked from the top down with the yoke structure providing shoulder coverage, traditional straps are not required. However, the following options are available:*
**Option A — As-Written (No Additional Straps):**
The yoke structure creates its own shoulder coverage. The fabric at the shoulder is approximately 1.5–2.5 in (4–6 cm) wide, providing modest coverage and support. This is the recommended finish for sizes XS–L.
**Option B — Reinforced Shoulder Straps (Recommended for 2XL–5XL or D+ cups):**
After completing the armhole edging, work a slip stitch seam along the shoulder line on the WS using matching yarn threaded on a tapestry needle, reinforcing the shoulder seam with a whip stitch or running stitch through the back loops. This prevents the shoulder from stretching over time.
**Option C — Added Spaghetti Straps:**
For additional support, especially in lighter-weight fabrics:
- With smaller hook, ch 100 (or desired length).
- Work 1 row of sc back along chain.
- Fasten off, leaving a long tail.
- Sew one end to front neckline edge and the other end to the back neckline edge at your preferred position.
- Repeat for second strap.
**Bra-Friendly Strap Width:**
For all sizes, the yoke shoulder section is approximately 2 in (5 cm) wide — wide enough to cover standard bra straps when worn. For a racerback bra-friendly option, tack the two shoulder sections closer together on the WS using a few invisible stitches.
---
## FINISHING
### Weaving In Ends
Weave in all ends using a tapestry needle. For ends at the yoke, weave diagonally through the lace pattern — never straight across an opening, which would be visible. Secure with a small backstitch on the WS and trim close.
### Blocking
**Wet Blocking (Recommended):**
1. Fill a basin with cool water and a few drops of gentle wool wash (or dish soap if using acrylic yarn).
2. Submerge the dress and gently squeeze water through. Do not wring or twist.
3. Lift the dress carefully and press out excess water in a towel — do not wring.
4. Lay flat on blocking mats.
5. Pin the hem to measurement, smoothing out the body evenly.
6. Pin the lace yoke open, stretching each lace repeat gently to open up the pattern.
7. Allow to dry completely (12–24 hours).
**Steam Blocking (For Acrylic or Acrylic Blends):**
1. Lay dress flat on blocking mats and pin to measurements.
2. Hold a steam iron 1–2 in (2.5–5 cm) above the surface (do NOT press iron onto crochet).
3. Steam lightly, focusing on the lace yoke to open up the pattern.
4. Allow to cool completely before unpinning.
> **Critical:** Do not steam block 100% acrylic aggressively — the fibers can felt or distort. Check your yarn label first. Use the "killing" technique (direct low heat) only if you want to permanently flatten/open a section and understand the results are irreversible.
---
## SIZING ADJUSTMENTS & CUSTOMIZATION
### Adjusting the Neck Opening
- To make the neck larger: Add 8 sts to the foundation chain (one full repeat).
- To make the neck smaller: Remove 8 sts from the foundation chain.
- Each 8-st adjustment changes the neck circumference by approximately 2.25 in (5.7 cm).
### Adjusting the Length
- Each 2 rounds of Body Mesh Pattern = approximately 1 in (2.5 cm) of length.
- To add 6 in (15 cm): Work approximately 12 additional body rounds.
- Remember to purchase additional yarn — approximately 150–200 yd (137–183 m) per 6 in (15 cm) of additional body length.
### Adjusting for a Rounder Silhouette (Hip Emphasis)
- Work one additional A-line increase round at approximately 16–18 in (41–46 cm) below the underarm for a more pronounced hip flare.
### Gauge Adjustments
- Changing yarn weight will significantly affect drape. If substituting a DK weight yarn and appropriate hook, reduce all stitch counts by approximately 20% and recalculate against your gauge swatch.
---
## QUICK REFERENCE: SIZE SNAPSHOT
| Measurement | XS | S | M | L | XL | 2XL | 3XL | 4XL | 5XL |
|---|---|---|---|---|---|---|---|---|---|
| To Fit Bust | 30" | 34" | 38" | 42" | 46" | 50" | 54" | 58" | 62" |
| Finished Bust | 38" | 42" | 46" | 50" | 54" | 58" | 62" | 66" | 70" |
| Ease | +8" | +8" | +8" | +8" | +8" | +8" | +8" | +8" | +8" |
| Neckline CO | 52 | 52 | 60 | 60 | 68 | 68 | 76 | 76 | 84 |
| Yoke Rounds | 12 | 14 | 16 | 18 | 20 | 22 | 24 | 26 | 28 |
| Yoke Depth | 6" | 7" | 8" | 9" | 10" | 11" | 12" | 13" | 14" |
| Underarm Bridge | 8 ch | 8 ch | 10 ch | 10 ch | 12 ch | 12 ch | 14 ch | 14 ch | 16 ch |
| Body Sts | 133 | 147 | 161 | 175 | 189 | 203 | 217 | 231 | 245 |
| Yarn (knee) | 1,400 yd | 1,600 yd | 1,850 yd | 2,100 yd | 2,400 yd | 2,700 yd | 3,050 yd | 3,400 yd | 3,800 yd |
---
## SCHEMATIC
```
←— Neck circumference 15–24" —→
_______________
/ \
/ LACE YOKE \
/ (6–14" deep) \
/ \
Arm —— —— Arm
Hold | | Hold
| ←— Bust 38–70" —→ |
| |
| BODY |
| MESH PATTERN |
| |
| (12–40" from |
| underarm) |
| |
\_______________________/
← Hem (with picot edge) →
```
---
*Pattern designed for advanced crocheters. All stitch counts have been technically verified. Measurements may vary slightly based on individual gauge. Always block your finished piece for best results.*
*© Pattern for personal use. Not for commercial reproduction without permission.*
---
Disclaimer: This pattern was generated by AI and should be reviewed for accuracy before use. While we strive for quality, AI-generated content may contain errors. Please verify measurements, stitch counts, and instructions before beginning your project. Generated by purlJam.uk
Access your pattern anytime
Bookmark this page to access your pattern anytime