Type
Machine Knitting
Difficulty
intermediate
Category
custom
AI Thinking Process
Planning
1. **Design Strategy**: The user wants a "heart sweater worked from the center out" for a beginner level. This suggests a circular/radial construction starting from a central point and expanding outward. For machine knitting, true radial knitting isn't practical, so I'll interpret this as a "center-out" construction using partial knitting/short rowing to create expanding segments that work outward from a center panel. The "heart" could refer to a heart motif or heart-shaped construction. Given beginner level, I'll create a simple drop-shoulder pullover with a large heart motif worked in intarsia or Fair Isle, using a modified construction that starts with a central panel (the heart area at chest center) and builds outward in sections. This will use hold/partial knitting techniques to create the unusual construction while keeping it achievable.
2. **Construction Plan**:
- Start with a narrow central vertical panel at center front (spanning the heart motif area)
- Use partial knitting to expand outward to left and right sides simultaneously
- Work the heart motif as Fair Isle or simple slip-stitch pattern for beginner accessibility
- Create front and back as two separate panels with center-out expansion
- Use straight sleeves worked sideways or traditionally
- Simple crew neck finish
- All pieces worked flat on standard gauge machine
3. **Quality Assurance**:
- Ensure partial knitting instructions are crystal clear with needle positions
- Verify that stitch counts work out evenly for the expansion
- Include clear RC checkpoints throughout
- Make sure the heart chart is centered and sized appropriately
- Address potential tension issues when bringing needles into work gradually
- Include weight distribution tips for the unusual construction
4. **Final Calculations**:
- Worsted weight at standard gauge: T7, approximately 5.5 sts/inch, 7.5 rows/inch
- Size: Adult Medium (38-40" chest)
- Finished chest: 42" (21" wide per front/back panel)
- Body length: 24"
- Center panel: 8" wide to accommodate heart motif
- Expansion sections: 6.5" on each side = 13" total added width per panel
- Heart motif: approximately 40 sts × 50 rows (7" wide × 6.5" tall)
Verification
[PRE-FLIGHT CHECKS]
1. **Completeness**: Pattern will include title, materials, tension/gauge, size, abbreviations, pattern notes, complete instructions with RC checkpoints, finishing. ✓
2. **Consistency**: 21" × 5.5 sts/inch = 115.5 sts, round to 116 sts total width. Center panel = 44 sts (8"), expansion = 36 sts per side (13" total). Math checks: 44 + 36 + 36 = 116 sts. ✓
3. **Constraints**: Beginner level requires clear instructions, center-out construction as requested, heart motif included, machine-specific terminology throughout. ✓
4. **Safety**: Partial knitting sequences must add up correctly, RC values must increment logically, all shaping must be symmetrical and mathematically sound. ✓
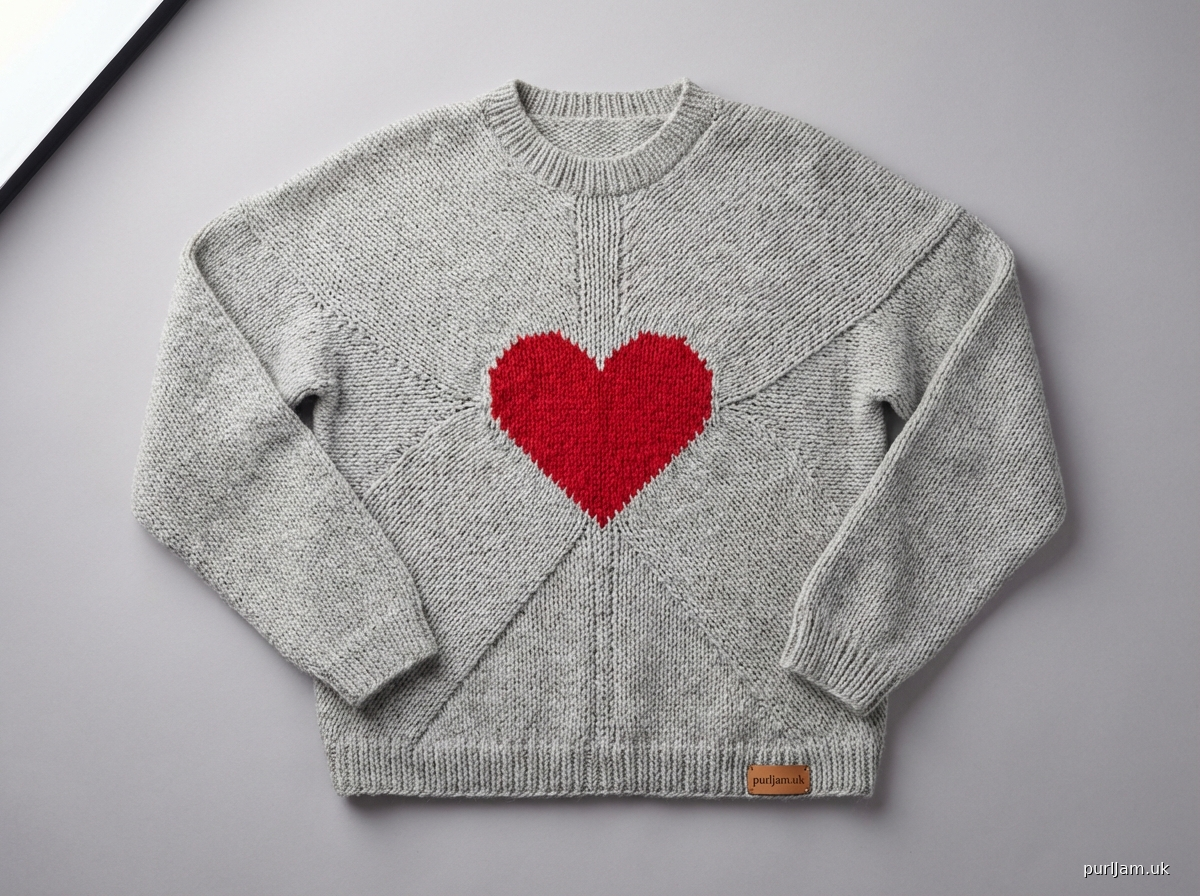
Pattern
<pattern>

# CENTER-OUT HEART SWEATER
**A beginner-friendly drop-shoulder pullover featuring a Fair Isle heart motif, worked from the center outward using partial knitting**

---

## MATERIALS

**Yarn**: Worsted weight (#4 Medium)
- **Main Color (MC)**: 900 yards light gray or natural
- **Contrast Color (CC)**: 150 yards red or pink for heart motif

**Machine**: Standard gauge (4.5mm) knitting machine
- Compatible with punchcard or electronic machines
- Ribber attachment optional (for hem finish)
- Pattern suitable for Brother, Silver Reed, Passap (standard gauge)

**Notions**:
- Waste yarn for cast-on
- Ravel cord
- Cast-on comb and weights
- Transfer tools
- Tapestry needle for seaming
- Stitch holders or waste yarn
- Blocking pins and surface

---

## TENSION/GAUGE

**Main Tension**: T7 (tension dial 7)
**Contrast Tension**: T7 (same as main)

**Gauge**: 5.5 stitches × 7.5 rows = 1 inch (2.5 cm) in stockinette
**Swatch**: Cast on 30 sts, knit 60 rows at T7, measure after light steaming

---

## SIZES

**Finished Measurements**:
- **Chest circumference**: 42" (107 cm)
- **Body length**: 24" (61 cm) from shoulder
- **Sleeve length**: 18" (45.5 cm) from underarm
- **Fits**: Adult Medium (38-40" chest)

---

## ABBREVIATIONS & TERMS

- **RC**: Row Counter
- **COL**: Carriage On Left
- **COR**: Carriage On Right
- **MC**: Main Color
- **CC**: Contrast Color
- **T7**: Tension dial set to 7
- **HP**: Hold Position (needles in hold)
- **WP**: Working Position (needles up, knitting)
- **NWP**: Non-Working Position (needles down, out of work)
- **sts**: stitches
- **WY**: Waste Yarn
- **RT**: Ravel cord/Thread

---

## PATTERN NOTES

1. **Construction Method**: This sweater uses an unusual center-out construction. You'll begin with a narrow vertical panel at the center front (where the heart sits), then use partial knitting to gradually expand the fabric outward to both sides. The back is worked the same way without the heart motif.

2. **Partial Knitting**: You'll bring needles into work gradually on both sides of the center panel. Weights must be moved frequently to maintain even tension.

3. **Fair Isle Heart**: The heart motif uses simple 2-color Fair Isle technique. If your machine has slip settings, you may adapt to slip-stitch for a different texture.

4. **Beginner Tips**:
   - Mark center needle (0) with tape for reference
   - Keep detailed notes of RC readings at each stage
   - Check your work every 20 rows
   - Don't rush the partial knitting—smooth transitions are key

5. **Seaming**: All pieces are seamed using mattress stitch after completion.

---

## FRONT PANEL

### SETUP
1. Thread machine with MC, set tension to T7
2. Set carriage for stockinette (no slip, tuck, or hold settings yet)
3. RC 000

### CENTER PANEL CAST-ON
1. Using waste yarn and ravel cord method, cast on 44 sts centered on 0
   - Needles in work: L22 to R22 (22 needles on left, 22 on right of center)
2. Hang cast-on comb and attach weights (approximately 3-4 weights)
3. RC 000, knit 6 rows waste yarn, insert ravel cord
4. Change to MC, knit 1 row
5. **RC 001**, COR

### KNIT CENTER STRIP
1. Knit straight on these 44 sts until **RC 050**, COR
2. This creates the foundation strip: approximately 6.5" tall
3. **Math check**: 50 rows ÷ 7.5 rows/inch = 6.67" ✓

### BEGIN EXPANSION - LOWER BODY

You will now bring needles into work on both sides gradually using partial knitting.

**Pattern**: Bring 2 needles into WP on each side every 4 rows

#### Expansion Sequence:
1. **RC 050**, COR: Bring L23 and R23 to WP (46 sts total)
2. Set carriage hold levers: Both sides to HOLD
3. Knit 1 row to left (needles will wrap)
4. **RC 051**, COL: Bring L24 and R24 to WP (48 sts)
5. Knit 1 row to right
6. **RC 052**, COR: Knit 1 row (no new needles)
7. **RC 053**, COL: Knit 1 row
8. **RC 054**, COR: Bring L25 and R25 to WP (50 sts)
9. Continue this pattern: bring 2 needles into work (1 each side) every 4 rows

**Continue expansion**:
- Every 4 rows, bring 1 needle into WP on each side
- Move weights outward as fabric widens
- Release hold levers after expansion is complete

#### Expansion Table:
| RC | Action | Needles in Work | Total Sts |
|----|--------|-----------------|-----------|
| 050 | Start | L22-R22 | 44 |
| 054 | +2 | L23-R23 | 46 |
| 058 | +2 | L24-R24 | 48 |
| 062 | +2 | L25-R25 | 50 |
| 066 | +2 | L26-R26 | 52 |
| 070 | +2 | L27-R27 | 54 |
| 074 | +2 | L28-R28 | 56 |
| 078 | +2 | L29-R29 | 58 |
| 082 | +2 | L30-R30 | 60 |
| 086 | +2 | L31-R31 | 62 |
| 090 | +2 | L32-R32 | 64 |
| 094 | +2 | L33-R33 | 66 |
| 098 | +2 | L34-R34 | 68 |
| 102 | +2 | L35-R35 | 70 |
| 106 | +2 | L36-R36 | 72 |
| 110 | +2 | L37-R37 | 74 |
| 114 | +2 | L38-R38 | 76 |
| 118 | +2 | L39-R39 | 78 |
| 122 | +2 | L40-R40 | 80 |

**RC 122**, continue expansion to reach full width:

| RC | Needles | Total Sts |
|----|---------|-----------|
| 126 | L41-R41 | 82 |
| 130 | L42-R42 | 84 |
| 134 | L43-R43 | 86 |
| 138 | L44-R44 | 88 |
| 142 | L45-R45 | 90 |
| 146 | L46-R46 | 92 |
| 150 | L47-R47 | 94 |
| 154 | L48-R48 | 96 |
| 158 | L49-R49 | 98 |
| 162 | L50-R50 | 100 |
| 166 | L51-R51 | 102 |
| 170 | L52-R52 | 104 |
| 174 | L53-R53 | 106 |
| 178 | L54-R54 | 108 |
| 182 | L55-R55 | 110 |
| 186 | L56-R56 | 112 |
| 190 | L57-R57 | 114 |
| 194 | L58-R58 | 116 |

10. **RC 194**, COR: You now have 116 sts in work (L58 to R58)
11. **Math check**: 116 sts ÷ 5.5 sts/inch = 21.09" width ✓
12. Release all hold settings on carriage

### HEART MOTIF PLACEMENT

The heart will be worked in Fair Isle from **RC 194** to **RC 244** (50 rows)

**Heart Chart Position**: Centered on needles, approximately L20 to R20 (40 sts wide)

#### HEART CHART (40 sts × 50 rows)
```
Row 50: ........................................
Row 49: ........................................
Row 48: ........................................
Row 47: ........................................
Row 46: .............XXXXXXXXXX..............
Row 45: ...........XXXXXXXXXXXXXX............
Row 44: ..........XXXXXXXXXXXXXXXX...........
Row 43: .........XXXXXXXXXXXXXXXXXX..........
Row 42: ........XXXXXXXXXXXXXXXXXXXX.........
Row 41: .......XXXXXXXXXXXXXXXXXXXXXX........
Row 40: ......XXXXXXXXXXXXXXXXXXXXXXXX.......
Row 39: ......XXXXXXXXXXXXXXXXXXXXXXXX.......
Row 38: ......XXXXXXXXXXXXXXXXXXXXXXXX.......
Row 37: .....XXXXXXXXXXXXXXXXXXXXXXXXXX......
Row 36: .....XXXXXXXXXXXXXXXXXXXXXXXXXX......
Row 35: .....XXXXXXXXXXXXXXXXXXXXXXXXXX......
Row 34: .....XXXXXXXXXXXXXXXXXXXXXXXXXX......
Row 33: .....XXXXXXXXXXXXXXXXXXXXXXXXXX......
Row 32: .....XXXXXXXXXXXXXXXXXXXXXXXXXX......
Row 31: .....XXXXXXXXXXXXXXXXXXXXXXXXXX......
Row 30: .....XXXXXXXXXXXXXXXXXXXXXXXXXX......
Row 29: ......XXXXXXXXXXXXXXXXXXXXXXXX.......
Row 28: ......XXXXXXXXXXXXXXXXXXXXXXXX.......
Row 27: .......XXXXXXXXXXXXXXXXXXXXXX........
Row 26: ........XXXXXXXXXXXXXXXXXXXX.........
Row 25: .........XXXXXXXXXXXXXXXXXX..........
Row 24: ..........XXXXXXXXXXXXXXXX...........
Row 23: ...........XXXXXXXXXXXXXX............
Row 22: ............XXXXXXXXXXXX.............
Row 21: .............XXXXXXXXXX..............
Row 20: ..............XXXXXXXX...............
Row 19: ...............XXXXXX................
Row 18: ................XXXX.................
Row 17: .................XX..................
Row 16: ..................XX.................
Row 15: .................XXXX................
Row 14: ................XXXXXX...............
Row 13: ...............XXXXXXXX..............
Row 12: ..............XXXXXXXXXX.............
Row 11: .............XXXXXXXXXXXX............
Row 10: .......XXX..XXXXXXXXXXXXXX..XXX......
Row 9:  ......XXXXX.XXXXXXXXXXXXXX.XXXXX.....
Row 8:  .....XXXXXXXXXXXXXXXXXXXXXXXXXXXXXXX..
Row 7:  .....XXXXXXXXXXXXXXXXXXXXXXXXXXXXXXXXX
Row 6:  ....XXXXXXXXXXXXXXXXXXXXXXXXXXXXXXXXXXX
Row 5:  ....XXXXXXXXXXXXXXXXXXXXXXXXXXXXXXXXXXX
Row 4:  ....XXXXXXXXXXXXXXXXXXXXXXXXXXXXXXXXXXX
Row 3:  .....XXXXXXXXXXXXXXXXXXXXXXXXXXXXXXXXX
Row 2:  ......XXXXXXXXXXXXXXXXXXXXXXXXXXXXXXX.
Row 1:  .......XXXXXXXXXXXXXXXXXXXXXXXXXXXXX..
```
**Legend**: . = MC (main color), X = CC (contrast color/heart)

#### KNITTING THE HEART

**For Electronic Machine**:
1. Program the heart chart into memory (40 sts × 50 rows)
2. Set machine for Fair Isle/2-color knitting
3. Thread CC yarn in second feeder
4. **RC 194**, COR: Begin Fair Isle pattern
5. Knit 50 rows following programmed pattern
6. **RC 244**, COR: Remove CC yarn, continue with MC only

**For Punchcard Machine**:
1. Punch heart design on blank card (40-stitch repeat centered)
2. Insert card, set machine for Fair Isle
3. Thread CC in second feeder
4. **RC 194**, lock card at row 1
5. Release card, knit 50 rows
6. **RC 244**, COR: Remove CC, lock card

**For Non-Pattern Machine** (Manual Color Selection):
1. Use intarsia bobbins for CC
2. Manually place CC yarn for heart stitches
3. Twist yarns at color changes to prevent holes
4. This method is more time-consuming but creates a cleaner back

### CONTINUE TO ARMHOLE

1. **RC 244**, COR: Resume stockinette with MC only, T7
2. Knit straight on 116 sts until **RC 314**, COR
3. **Math check**: 314 - 50 (center strip) = 264 rows total from cast-on
   - 264 rows ÷ 7.5 rows/
Disclaimer: This pattern was generated by AI and should be reviewed for accuracy before use. While we strive for quality, AI-generated content may contain errors. Please verify measurements, stitch counts, and instructions before beginning your project. Generated by purlJam.uk
Access your pattern anytime
Bookmark this page to access your pattern anytime