Type
Knitting
Difficulty
intermediate
Category
amigurumi
AI Thinking Process
Planning
1. **Design Strategy**: A beginner-friendly finger-knit Winnie the Pooh inspired bear using super chunky yellow yarn. Finger knitting eliminates needles, making it accessible. The bear is constructed from simple finger-knitted tubes/strips gathered into shapes.
2. **Construction Plan**: Finger-knit flat strips/tubes for head, body, arms, legs, ears; gather edges to form rounded shapes, stuff, and seam together. Add a small red finger-knitted shirt panel.
3. **Quality Assurance**:
- Finger knitting produces loose fabric — must double yarn or use very chunky to prevent stuffing show-through.
- Gathering ends tightly to form spheres requires firm tension on drawstring.
- Symmetrical limb placement before seaming.
4. **Final Calculations**: Super chunky yarn (~6-8mm equivalent), tension approx 2 sts × 3 rows per 5cm finger-knitted. Head: 8 sts × 10 rows ≈ 20cm × 16cm strip → gathered ball ~12cm. Body: 10 sts × 12 rows. Arms/legs: 4 sts × 8 rows. Ears: 3 sts × 3 rows. Finished bear ~25-30cm tall.
Verification
1. **Completeness**: Materials, tension, all body parts, assembly, finishing — all included.
2. **Consistency**: Stitch counts scaled to chunky finger-knit tension; dimensions match a ~28cm toy.
3. **Constraints**: Beginner-level finger knitting (no needles), Pooh-inspired (yellow + red shirt), UK terminology and metric measurements used.
4. **Safety**: For young children, embroider features rather than using safety eyes; noted in pattern.
Pattern
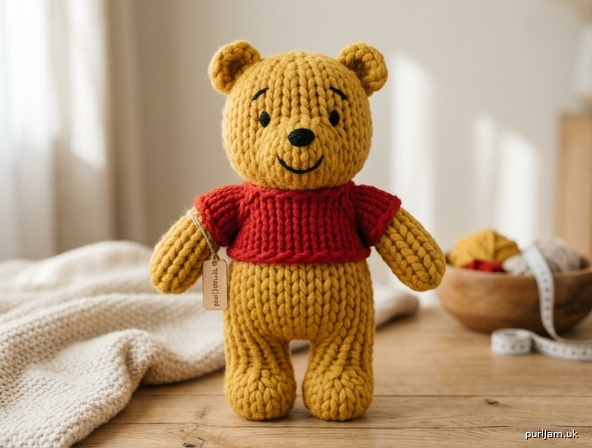
# Chunky Finger-Knit Winnie the Pooh Bear

**A beginner-friendly, no-needles soft toy** — knitted entirely with your fingers in super chunky yarn. Perfect first project for new makers, and a lovely handmade gift. Finished bear stands approximately **28 cm (11 in)** tall.

---

## Skill Level
**Beginner** — if you can make a slip knot and pull loops through loops, you can make this bear.

---

## Finished Measurements
- Height: approx. **28 cm (11 in)**
- Width across body: approx. **15 cm (6 in)**
- Head circumference: approx. **30 cm (12 in)**

---

## Materials

| Item | Quantity / Detail |
|---|---|
| Super chunky yarn, mustard/golden yellow | approx. **150 g** (e.g. 6–8 mm recommended needle size on label) |
| Super chunky yarn, red | approx. **40 g** for the shirt |
| Black yarn (DK) or black embroidery thread | small amount for nose, eyes, mouth |
| Polyester fibrefill stuffing | approx. **120–150 g** |
| Tapestry needle (large eye, blunt) | 1 |
| Fabric scissors | 1 |
| Stitch markers or scrap yarn | a few, for marking placement |

> **Safety note:** For babies and toddlers under 3, **embroider all facial features** rather than using safety eyes or buttons.

---

## Tension (Gauge)

Worked in finger knitting with super chunky yarn held single:
- **2 stitches × 3 rows = 5 cm (2 in)** in finger-knitted stocking-stitch-style fabric.

> Tension is approximate — finger knitting is naturally loose. Aim for **firm, even loops**. If your fabric is very loose, hold two strands of yarn together throughout to prevent stuffing showing through.

---

## Abbreviations & Technique Notes

- **st(s)** — stitch(es) (loop on finger)
- **CO** — cast on (place loops on fingers)
- **BO** — bind off / cast off
- **RS / WS** — right side / wrong side

### Finger Knitting Refresher
1. **Cast on:** Make a slip knot on your index finger. Weave the working yarn front-to-back-to-front across your 4 fingers (index, middle, ring, little) to create one loop on each finger = **4 sts**. For wider pieces, work back across again to add more loops or use both hands.
2. **Knit a row:** Lay the working yarn across the front of all fingers. Pull the bottom loop on each finger up and over the working yarn and off the finger. You now have new loops = 1 row complete.
3. **Bind off:** Knit 2 sts onto the same finger by lifting the lower over the upper. Move the remaining loop to the next finger and repeat across. Cut yarn, pull tail through final loop and tighten.

> **Tip:** To make wider pieces (more than 4 sts), use fingers on both hands, or use a chunky knitting loom — the stitch counts below assume each "stitch" is one finger loop.

---

## Pattern

All pieces are worked flat as rectangles, then **gathered and seamed** into 3D shapes. Leave a **30 cm tail** at both cast-on and cast-off for seaming.

### 1. Head (make 1) — yellow

- CO **8 sts** (use both hands, 4 fingers each).
- Work in finger-knit rows for **10 rows**.
- BO loosely, leaving long tail.

✅ *Math check: 8 sts ÷ 2 sts/5 cm = 20 cm wide; 10 rows ÷ 3 rows/5 cm ≈ 16.5 cm tall. Gathered into a ball gives circumference ≈ 30 cm. ✓*

### 2. Body (make 1) — yellow

- CO **10 sts**.
- Work **12 rows**.
- BO loosely, leaving long tail.

✅ *Math check: 10 sts → ~25 cm wide; 12 rows → ~20 cm tall. Rolls into a body ~15 cm wide × ~14 cm tall once stuffed. ✓*

### 3. Arms (make 2) — yellow

- CO **4 sts**.
- Work **8 rows**.
- BO, leaving long tail.

✅ *Each arm: ~10 cm × ~13 cm flat → tube ~5 cm wide × ~13 cm long. ✓*

### 4. Legs (make 2) — yellow

- CO **4 sts**.
- Work **9 rows**.
- BO, leaving long tail.

### 5. Ears (make 2) — yellow

- CO **3 sts**.
- Work **3 rows**.
- BO, leaving long tail.

✅ *Each ear: ~7.5 cm × ~5 cm — small rounded patch. ✓*

### 6. Pooh's Red Shirt (make 1) — red

- CO **10 sts**.
- Work **5 rows**.
- BO, leaving long tail.

✅ *Wraps around upper body ~25 cm circumference × ~8 cm tall — covers chest like a cropped shirt. ✓*

---

## Assembly

Work each step in order. Use the long tails and a tapestry needle. **Mattress stitch** along edges where possible, but on chunky yarn a simple **whip stitch** also works beautifully.

### Step 1 — Form the Head
1. With WS facing, fold the head rectangle in half so short edges meet. Seam the short edges together to form a tube.
2. Thread the cast-on tail through the loops along one open end and **pull tightly** to close — this is the top of the head. Knot securely on the inside.
3. Stuff firmly with fibrefill until rounded and full.
4. Thread the cast-off tail along the remaining open end, gather and pull to close partially (leave a small opening for attaching to the body). Set aside.

### Step 2 — Form the Body
1. Roll the body rectangle into a tube, seam the long edge.
2. Gather one end (bottom) tightly and close.
3. Stuff firmly.
4. Gather the top edge slightly — leave open enough to attach the head.

### Step 3 — Form Arms and Legs
1. For each limb, fold the rectangle in half lengthways, seam the long edge to form a tube.
2. Gather one end (the hand/foot end) and close.
3. Stuff lightly — Pooh's limbs should be soft and bendy.
4. Leave the top open for attaching.

### Step 4 — Attach Ears
1. Pinch each ear rectangle to form a small cup/curve.
2. Sew to the top of the head, about 4 cm apart, curving forward slightly.

### Step 5 — Attach Head to Body
- Position the gathered base of the head over the gathered top of the body.
- Stitch all the way around twice for security. Hide tail inside the body.

### Step 6 — Attach Arms and Legs
- **Arms:** sew to the upper sides of the body, about 2 cm below the neck. Ensure they are **symmetrical** — measure from the centre seam.
- **Legs:** sew to the bottom front of the body, about 4 cm apart, so Pooh can sit.

### Step 7 — Add the Red Shirt
1. Wrap the red rectangle around the upper body like a tube top, just under the arms.
2. Seam the short edges together at the back.
3. Tack the top and bottom edges to the body with a few stitches in red yarn so it stays in place.

### Step 8 — Embroider the Face
Using black yarn or embroidery thread:
- **Eyes:** two small French knots or satin-stitch ovals, about 3 cm apart, centred on the face.
- **Nose:** a small oval of satin stitch, just below and between the eyes.
- **Mouth:** a shallow "V" or smile line, 1.5 cm below the nose.

> **Tip:** Pin the features in place with scrap yarn first to check positioning before stitching.

---

## Finishing

1. Weave in **all** ends securely on the inside of the body or head — never leave loose ends on a toy.
2. Give the bear a gentle squish to redistribute stuffing evenly.
3. Optional: lightly steam the surface (hover only, do not press) to relax the finger-knit fabric.

---

## Care Instructions

- Hand wash in cool water with mild detergent.
- Squeeze gently — do **not** wring.
- Reshape and dry flat, away from direct heat.

---

## Designer's Notes

Finger knitting produces a wonderfully chunky, rustic texture that suits a storybook bear beautifully. Don't worry about uneven loops — the gathering and stuffing hides any irregularities, and the slightly wonky charm is part of the appeal. If you'd like a taller Pooh, simply add 2 more rows to the body and 1 more row to each limb.

**Happy knitting — and remember, "a hug is always the right size."** 🍯
Disclaimer: This pattern was generated by AI and should be reviewed for accuracy before use. While we strive for quality, AI-generated content may contain errors. Please verify measurements, stitch counts, and instructions before beginning your project. Generated by purlJam.uk
Access your pattern anytime
Bookmark this page to access your pattern anytime