Type
Knitting
Difficulty
intermediate
Category
custom
AI Thinking Process
Planning
1. **Design Strategy**: The user wants fingerless mitts with a thumb, using straight needles only at an easy difficulty level. This means we'll use a flat construction that's seamed rather than circular knitting. For an easy pattern, I'll use simple stockinette stitch with ribbing at cuffs and top edges. The thumb will be created using a simple thumb gusset with increases, then worked separately.
2. **Construction Plan**:
- Flat knitting (straight needles) requiring one seam along the side
- Bottom-up construction starting with ribbed cuff
- Simple thumb gusset increases placed on palm side
- Thumb stitches held on waste yarn, then picked up and worked separately
- Ribbed top edge for fingerless opening
- One size with optional adjustments noted
3. **Quality Assurance**:
- Pain point: Ensuring the thumb gusset increases are clearly marked and easy to count
- Pain point: Clear instructions for picking up thumb stitches for beginner knitters
- Pain point: Seaming instructions must be detailed since straight needle projects require finishing
- Solution: Include stitch markers, row-by-row guidance for thumb gusset, and clear finishing instructions
4. **Final Calculations**:
- DK weight yarn: standard tension 22 sts × 30 rows = 10 cm (4")
- Hand circumference: 18 cm (7") = 40 sts (rounded for pattern repeat)
- Mitt length from cuff to fingers: 18 cm (7")
- Thumb gusset: increase from 1 st to 11 sts over 20 rows
- Math verification: 40 sts cast on, increases to 50 sts with gusset, minus 11 thumb sts = 39 sts, increased back to 40 sts
Verification
[PRE-FLIGHT CHECKS]
1. **Completeness**: ✓ Pattern includes title, materials, tension, sizes, abbreviations, notes, instructions, finishing
2. **Consistency**: ✓ 40 sts at 22 sts/10cm = 18.2cm circumference (appropriate for average hand)
3. **Constraints**: ✓ Straight needles only (flat knitting), easy difficulty (simple techniques), includes thumb
4. **Safety**: ✓ Stitch counts verified:
- Cast on: 40 sts
- After gusset complete: 50 sts (40 + 10 increased)
- After thumb removal: 39 sts (50 - 11)
- After cast on 1 st: 40 sts
- Thumb: 11 sts picked up + 1 st = 12 sts
Pattern
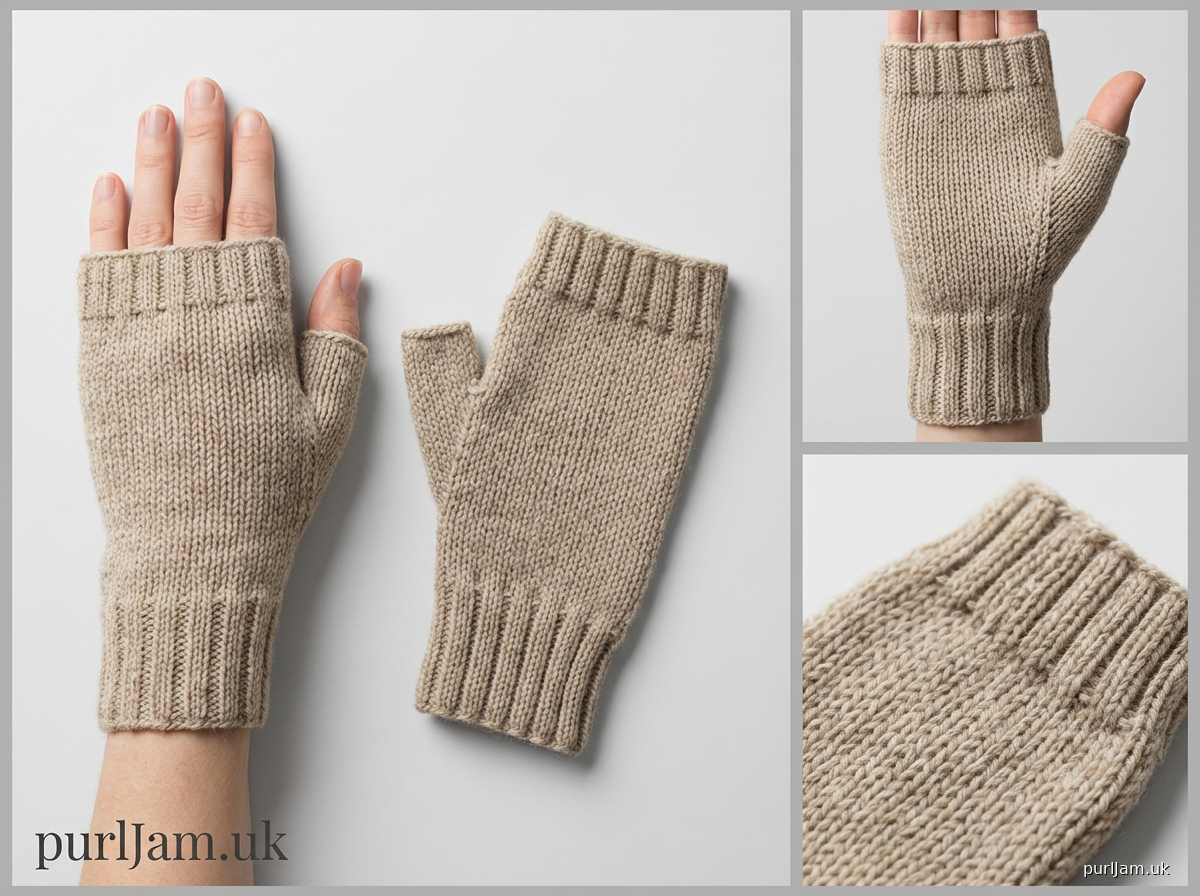
# Classic Fingerless Mitts with Thumb

A simple pair of fingerless mitts worked flat on straight needles, featuring a shaped thumb gusset for comfortable fit. Perfect for keeping your hands warm while keeping fingers free for texting, typing, or crafting.

## SIZE
One size to fit average adult hand
Finished circumference: approximately 18 cm (7") – will stretch to fit
Finished length: approximately 18 cm (7") from cuff to top edge

## MATERIALS
**Yarn**: Approximately 100 metres (110 yards) of DK weight yarn
*Sample shown uses a solid-coloured DK yarn*

**Needles**:
- 4mm (UK 8, US 6) straight needles, or size needed to obtain tension
- 3.75mm (UK 9, US 5) straight needles for ribbing

**Notions**:
- Yarn needle for seaming
- 2 stitch markers
- Waste yarn for holding thumb stitches
- Scissors

## TENSION
22 stitches and 30 rows = 10 cm (4") in stocking stitch on 4mm needles

**Important**: Check your tension before beginning. Fingerless mitts need to fit snugly but comfortably.

## ABBREVIATIONS
- k = knit
- p = purl
- st(s) = stitch(es)
- RS = right side
- WS = wrong side
- k2tog = knit 2 stitches together (1 stitch decreased)
- M1L = make 1 left (lift bar between stitches from front to back, knit through back loop)
- M1R = make 1 right (lift bar between stitches from back to front, knit through front loop)
- PM = place marker
- SM = slip marker

## PATTERN NOTES
- These mitts are worked flat from the bottom up, then seamed along the side edge.
- The thumb gusset is created by increasing stitches on the palm side of the mitt, which are then held on waste yarn while the hand is completed.
- The thumb is picked up and worked separately after the hand is finished.
- Make two mitts the same (mirror-image shaping is not necessary for this simple design).
- Pattern is written for an easy skill level using basic increases and decreases.

---

## INSTRUCTIONS

### CUFF
Using 3.75mm needles, cast on 40 sts.

**Ribbing:**
Row 1 (RS): *K2, p2; repeat from * to end.
Row 2 (WS): *K2, p2; repeat from * to end.

Repeat Rows 1-2 until ribbing measures 6 cm (2.5"), ending with a WS row.

Change to 4mm needles.

### HAND
**Set-up row (RS)**: Knit all sts.
**Row 1 (WS)**: Purl all sts.

Continue in stocking stitch (knit on RS, purl on WS) for 6 rows more, ending with a WS row.
*[Total of 8 rows stocking stitch worked; piece measures approximately 8.5 cm (3.25") from cast-on edge]*

### THUMB GUSSET
**Row 1 (RS)**: K20, PM, M1R, k1, M1L, PM, k19. *[42 sts: 20 + 3 between markers + 19]*

**Row 2 and all WS rows**: Purl all sts, slipping markers as you come to them.

**Row 3**: K to marker, SM, M1R, k to marker, M1L, SM, k to end. *[44 sts: 20 + 5 between markers + 19]*

**Row 5**: K to marker, SM, M1R, k to marker, M1L, SM, k to end. *[46 sts: 20 + 7 between markers + 19]*

**Row 7**: K to marker, SM, M1R, k to marker, M1L, SM, k to end. *[48 sts: 20 + 9 between markers + 19]*

**Row 9**: K to marker, SM, M1R, k to marker, M1L, SM, k to end. *[50 sts: 20 + 11 between markers + 19]*

**Row 10 (WS)**: Purl all sts.

*[Thumb gusset complete with 11 sts between markers]*

### SEPARATE THUMB
**Row 1 (RS)**: K20, remove marker, slip next 11 sts onto waste yarn for thumb, remove marker, cast on 1 st using backward loop method, k19. *[40 sts: 20 + 1 + 19]*

**Row 2 (WS)**: Purl all sts.

Continue in stocking stitch for 14 more rows (16 rows total from thumb separation), ending with a WS row.

*[Hand section measures approximately 13.5 cm (5.25") from cast-on edge]*

### TOP RIBBING
Change to 3.75mm needles.

**Row 1 (RS)**: *K2, p2; repeat from * to end.
**Row 2 (WS)**: *K2, p2; repeat from * to end.

Repeat Rows 1-2 until ribbing measures 2.5 cm (1"), ending with a WS row.

Cast off in pattern.

### THUMB
With RS facing and using 4mm needles, carefully remove waste yarn and place 11 held sts onto needle. Pick up and knit 3 sts across the cast-on edge at top of thumb opening. *[14 sts total]*

**Row 1 (WS)**: Purl all sts.
**Row 2 (RS)**: K11, k2tog, k1. *[13 sts: decrease 1 st to even out the join]*
**Row 3**: Purl all sts.
**Row 4**: Knit all sts.
**Row 5**: Purl all sts.

Continue in stocking stitch for 4 more rows (9 rows total), ending with a WS row.

*[Thumb measures approximately 3 cm (1.25")]*

Change to 3.75mm needles.

**Ribbing Row 1 (RS)**: K1, *p1, k1; repeat from * to end.
**Ribbing Row 2 (WS)**: P1, *k1, p1; repeat from * to end.

Repeat these 2 rows once more (4 rows of ribbing total).

Cast off in pattern.

### FINISHING
1. **Seam the mitt**: With yarn needle and matching yarn, seam the side edge from the cuff to the top ribbing using mattress stitch or your preferred seaming method. Leave the thumb seam open.

2. **Seam the thumb**: Seam the small gap at the base of the thumb where stitches were picked up, then seam the side of the thumb from bottom to top.

3. **Weave in ends**: Weave in all yarn tails securely on the wrong side.

4. **Block**: Gently steam block or wet block the mitts to finished measurements, shaping the thumb and hand sections. Allow to dry completely.

5. **Make second mitt**: Repeat all instructions to create a matching pair.

---

## CUSTOMISATION OPTIONS
- **Length adjustment**: Add or subtract rows in the hand section (between thumb separation and top ribbing) for a longer or shorter mitt.
- **Cuff length**: Work more or fewer rows of ribbing at the cuff for your preferred length.
- **Thumb length**: Adjust the number of stocking stitch rows before the thumb ribbing.
- **Stripes**: Work stripes by changing colours every 2 or 4 rows for a fun variation.

## CARE INSTRUCTIONS
Follow the yarn manufacturer's care instructions. Most DK weight yarns can be gently hand-washed in cool water and laid flat to dry.

---

*Pattern designed for straight needles only. Enjoy your cosy new fingerless mitts!*
Disclaimer: This pattern was generated by AI and should be reviewed for accuracy before use. While we strive for quality, AI-generated content may contain errors. Please verify measurements, stitch counts, and instructions before beginning your project. Generated by purlJam.uk
Access your pattern anytime
Bookmark this page to access your pattern anytime