Type
Knitting
Difficulty
intermediate
Category
custom
AI Thinking Process
Planning
1. **Design Strategy**: Creating simple fingerless mitts without thumbs for straight needles only at easy difficulty level. This will be a flat-knit tube that seams up the side, leaving openings for thumb naturally. Using basic stockinette stitch with ribbing at cuff and top edge for a clean, professional finish. DK weight yarn is perfect for warm but not bulky mitts.
2. **Construction Plan**: Flat knitting from cuff upward on straight needles. Cast on, work ribbed cuff, transition to stockinette stitch body with simple shaping for hand, add ribbed edge at fingers, bind off, and seam leaving thumb gap. This avoids any thumb gusset complexity while maintaining functionality.
3. **Quality Assurance**: Must ensure seam placement is clearly indicated, thumb opening is adequately sized and positioned, measurements accommodate average hand sizes with multiple size options, and stitch counts remain even for clean ribbing patterns.
4. **Final Calculations**:
- DK tension: 22 sts × 28 rows = 10 cm in stockinette
- Small: 15 cm circumference = 33 sts (round to 32 for rib divisibility by 4)
- Medium: 18 cm circumference = 40 sts
- Large: 20 cm circumference = 44 sts
- Length: 18-20 cm total, with 5 cm cuff, 8-9 cm to thumb, 2 cm thumb opening, 3-4 cm above thumb
Verification
[PRE-FLIGHT CHECKS]
1. **Completeness**: Pattern will include title, description, materials, tension/gauge, sizes, abbreviations, pattern notes, full instructions, and finishing - ✓
2. **Consistency**: Stitch counts verified against 22 sts/10 cm gauge for S/M/L sizes; all row counts calculated for 28 rows/10 cm - ✓
3. **Constraints**: Uses ONLY straight needles, no thumb construction, easy difficulty with basic techniques only - ✓
4. **Safety**: All math will be shown inline with verification; ribbing patterns divisible by 4; seam instructions clear - ✓
Pattern
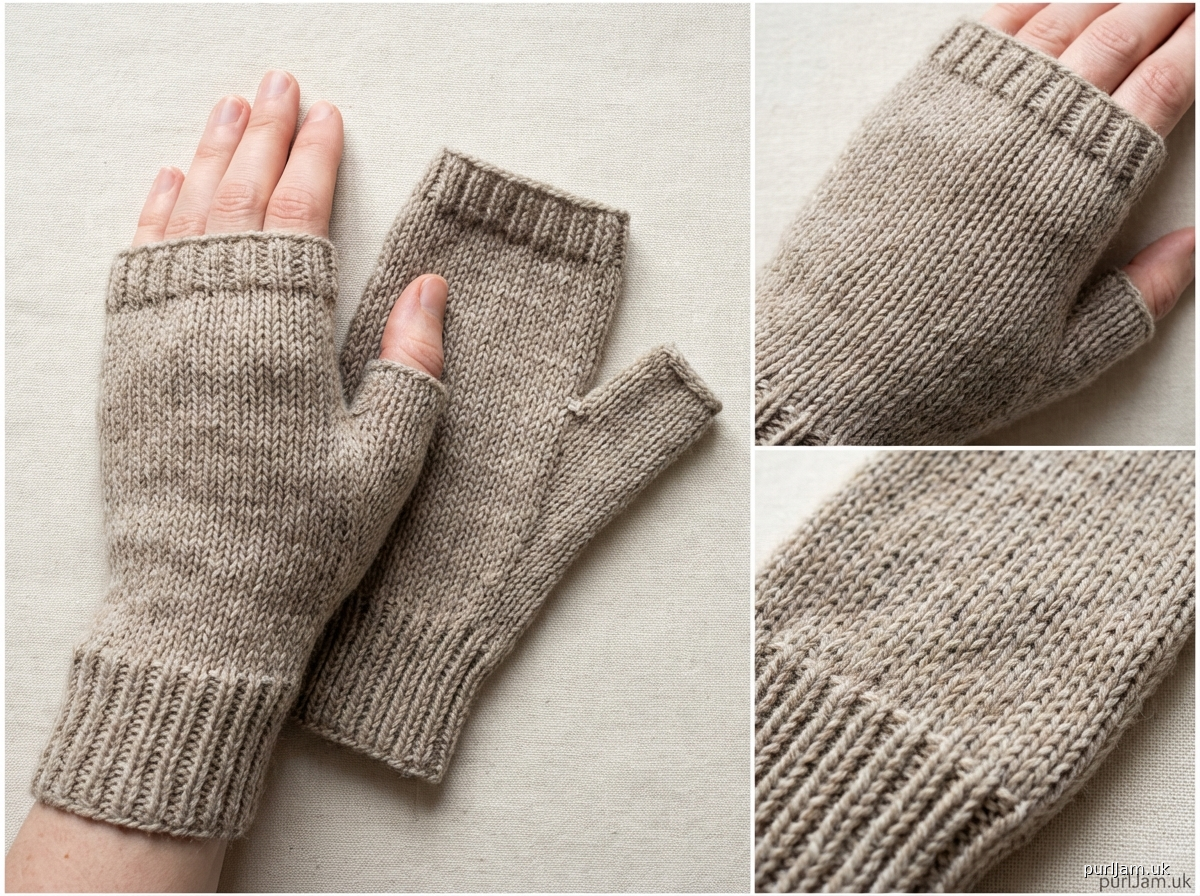
# Simple Fingerless Mitts
### Easy-to-Knit Hand Warmers on Straight Needles

These cosy fingerless mitts are perfect for keeping your hands warm while leaving your fingers free for texting, typing, or crafting. Knitted flat on straight needles and seamed up the side, they're an ideal project for confident beginners ready to make their first pair of hand warmers.

---

## MATERIALS

**Yarn:** DK weight yarn, approximately 100 (120, 140) metres total for the pair
*Sample knitted in standard DK wool/acrylic blend*

**Needles:** 4mm straight needles (or size needed to obtain correct tension)

**Notions:**
- Tapestry needle for seaming
- Stitch markers (optional, but helpful)
- Scissors

---

## TENSION (GAUGE)

**22 stitches × 28 rows = 10 cm (4") in stocking stitch** after blocking

*Tension is important for proper fit. Take time to check your tension and adjust needle size if necessary.*

---

## SIZES

**Small (Medium, Large)**

**Finished Measurements:**
- **Hand circumference:** 14.5 (18, 20) cm / 5.75 (7, 8)"
- **Length:** 18 (19, 20) cm / 7 (7.5, 8)" from cuff to top edge

*To choose your size, measure around your hand at the widest part (across knuckles). Select the size closest to your measurement or slightly smaller for a snug fit.*

---

## ABBREVIATIONS

- **k** = knit
- **p** = purl
- **st(s)** = stitch(es)
- **RS** = right side
- **WS** = wrong side
- **k2, p2 rib** = knit 2 stitches, purl 2 stitches, repeated across row
- **st st** = stocking stitch (knit on RS, purl on WS)

---

## PATTERN NOTES

**Construction:** These mitts are knitted flat from the bottom up, then seamed along the side edge with a gap left for the thumb opening.

**Seaming:** The seam runs along the palm side of the hand (so it's less visible when wearing). The thumb opening is positioned approximately 5.5-6.5 cm up from the cuff edge.

**Yarn Amounts:** The yardage given allows for one complete pair of mitts with a small amount left over.

**Ribbing:** The pattern uses k2, p2 ribbing. The cast-on number is divisible by 4 to ensure the ribbing pattern works correctly.

---

## INSTRUCTIONS

### RIGHT MITT

**Cast On**
Using 4mm needles, cast on 32 (40, 44) sts.

**Cuff**
Row 1 (RS): *K2, p2; repeat from * to end of row. [32 (40, 44) sts]
Row 2 (WS): *K2, p2; repeat from * to end of row.

Repeat Rows 1-2 until cuff measures 5 cm (2") from cast-on edge, ending with a WS row.
*This should be approximately 14 rows.*

**Hand Section**
Row 1 (RS): Knit all sts. [32 (40, 44) sts]
Row 2 (WS): Purl all sts.

Continue in stocking stitch (knit on RS, purl on WS) until piece measures 13 (14, 15) cm / 5 (5.5, 6)" from cast-on edge, ending with a WS row.
*This should be approximately 22-28 rows of stocking stitch.*

**Verification:** At this point, you should have 32 (40, 44) sts on your needle and your piece should measure 13 (14, 15) cm from the cast-on edge.

**Finger Edge Ribbing**
Row 1 (RS): *K2, p2; repeat from * to end of row. [32 (40, 44) sts]
Row 2 (WS): *K2, p2; repeat from * to end of row.

Repeat Rows 1-2 until ribbing measures 3 cm (1.25") from start of finger edge ribbing, ending with a WS row.
*This should be approximately 8 rows.*

**Total length should now be 16 (17, 18) cm.**

Continue in k2, p2 rib for an additional 2 (2, 2) cm / 0.75 (0.75, 0.75)", ending with a WS row.
*This adds approximately 6 more rows, for 14 rows of top ribbing total.*

**Final length should be 18 (19, 20) cm / 7 (7.5, 8)".**

Cast off in pattern (knit the knit stitches and purl the purl stitches as you bind off).

---

### LEFT MITT

Work exactly as for Right Mitt. The mitts are symmetrical, and the seam placement will determine which is right and which is left.

---

## FINISHING

**Blocking**
Gently steam or wet block each mitt to measurements, being careful not to stretch the ribbing. Lay flat to dry.

**Seaming**
1. Thread a tapestry needle with a length of yarn approximately 60 cm (24") long.

2. Place the mitt with RS facing you and fold it in half lengthways so the side edges meet.

3. Starting at the **cuff edge** (cast-on edge), use mattress stitch or whip stitch to seam the side edges together.

4. **Seam for approximately 5.5 (6, 6.5) cm / 2.25 (2.5, 2.5)"** up from the cuff edge, then **STOP**. Secure the yarn temporarily or leave the needle threaded.

   *Mathematical check: 5.5 (6, 6.5) cm × 28 rows per 10 cm = approximately 15 (17, 18) rows. Count your rows to verify you're in the correct position.*

5. **Leave a gap of 5 (5, 5) cm / 2 (2, 2)" unseamed.** This is your thumb opening.

   *This gap should span approximately 14 rows.*

6. **Resume seaming** from the top of the thumb gap to the top edge of the mitt (cast-off edge). Secure and weave in the end.

   *You'll be seaming approximately 7.5 (8, 8.5) cm / 3 (3.25, 3.5)" for this upper section.*

7. Weave in the cast-on tail at the cuff edge.

**Seaming Summary for Verification:**
- **Bottom seam:** 5.5 (6, 6.5) cm
- **Thumb gap:** 5 cm (unseamed)
- **Top seam:** 7.5 (8, 8.5) cm
- **Total:** 18 (19, 20) cm ✓

**Determining Right vs Left**
Try on each mitt. The seam should run along your palm side (the side of your hand where your thumb is). If the thumb opening feels too high or too low, you can carefully unpick the seaming and adjust the position of the gap by 1-2 cm as needed.

**Final Touches**
Weave in all remaining ends securely. Give the mitts a final light press with a damp cloth if needed.

---

## WEARING YOUR MITTS

Slide each mitt onto your hand with the seam facing your palm. Your thumb should naturally sit in the opening. The ribbed cuff should sit comfortably at your wrist, and the ribbed top edge should end just below your knuckles.

If you find the thumb opening is slightly too high or low for your hand shape, this can be easily adjusted before seaming your second mitt, or by unpicking and re-seaming the first.

---

## PATTERN NOTES FOR MODIFICATION

**Lengthening or Shortening:**
- To make the mitts longer or shorter, add or remove rows in the stocking stitch section between the cuff and finger edge ribbing.
- Remember: 28 rows = 10 cm, so approximately 3 rows = 1 cm

**Adjusting Thumb Placement:**
The thumb opening is positioned to begin at approximately 5.5-6.5 cm from the cuff. If you have particularly long or short hands, adjust this measurement before seaming:
- For longer hands: start the gap 1-2 cm higher
- For shorter hands: start the gap 1 cm lower

**Colour Work:**
These simple mitts are an excellent canvas for stripes or simple colourwork patterns in the stocking stitch section.

---

*Pattern designed for easy construction on straight needles. Perfect for gift-giving or as a first garment project.*

**© 2024 Custom Knitting Pattern**
Disclaimer: This pattern was generated by AI and should be reviewed for accuracy before use. While we strive for quality, AI-generated content may contain errors. Please verify measurements, stitch counts, and instructions before beginning your project. Generated by purlJam.uk
Access your pattern anytime
Bookmark this page to access your pattern anytime