Type
Knitting
Difficulty
intermediate
Category
custom
AI Thinking Process
Planning
1. **Design Strategy**: The user wants a beanie hat with brim using straight needles only at an easy difficulty level in DK weight yarn. This means I need to design a flat-knitted hat that will be seamed. The brim suggests a folded ribbed edge for warmth and style. I'll use basic stitches (knit, purl, simple decreases) appropriate for easy level. The construction will be flat piece seamed up the back.
2. **Construction Plan**: I'll design this hat to be knitted flat from brim to crown, working bottom-up. The brim will be a folded ribbed section (k2, p2 rib for stretch and texture). The body will be in stocking stitch for simplicity. Crown shaping will use evenly spaced decreases across rows to create a rounded top. Finally, the knitter will seam the back and gather the crown. This approach is perfect for straight needles and easy skill level.
3. **Quality Assurance**: Key considerations:
- Ensure stitch count is divisible by 4 for k2p2 rib and by appropriate number for crown decreases
- Provide clear seaming instructions since many beginners struggle with seams
- Include tips for smooth decreases and gathering
- Make sure brim fold instructions are clear
- Verify all decrease rounds result in correct stitch counts
4. **Final Calculations**:
- DK weight standard tension: 22 sts × 28 rows = 10 cm in stocking stitch on 4mm needles
- For adult medium: head circumference ~56 cm (need ~51 cm finished for negative ease)
- 51 cm × 2.2 sts/cm = 112.2 sts → round to 112 sts (divisible by 4 and 8 for decreases)
- Brim: 6 cm folded = 12 cm total knitting
- Body: 14 cm before crown shaping
- Crown: approximately 8-10 cm of decreases
- Total height: approximately 22-24 cm
Verification
[PRE-FLIGHT CHECKS]
1. **Completeness**: ✓ Will include title, description, materials, tension, sizes, abbreviations, pattern notes, full instructions, and finishing
2. **Consistency**: ✓ 112 sts at 22 sts/10cm = 50.9cm circumference (perfect for 56cm head with negative ease). All decrease rounds calculated to reduce evenly.
3. **Constraints**: ✓ Straight needles only, easy difficulty (basic stitches only), DK weight, includes brim as requested
4. **Safety**: ✓ Math verified:
- Brim: 112 sts maintained
- Body: 112 sts maintained
- Crown: 112 → 98 → 84 → 70 → 56 → 42 → 28 → 14 → 7 sts (all divisions work correctly)
Pattern
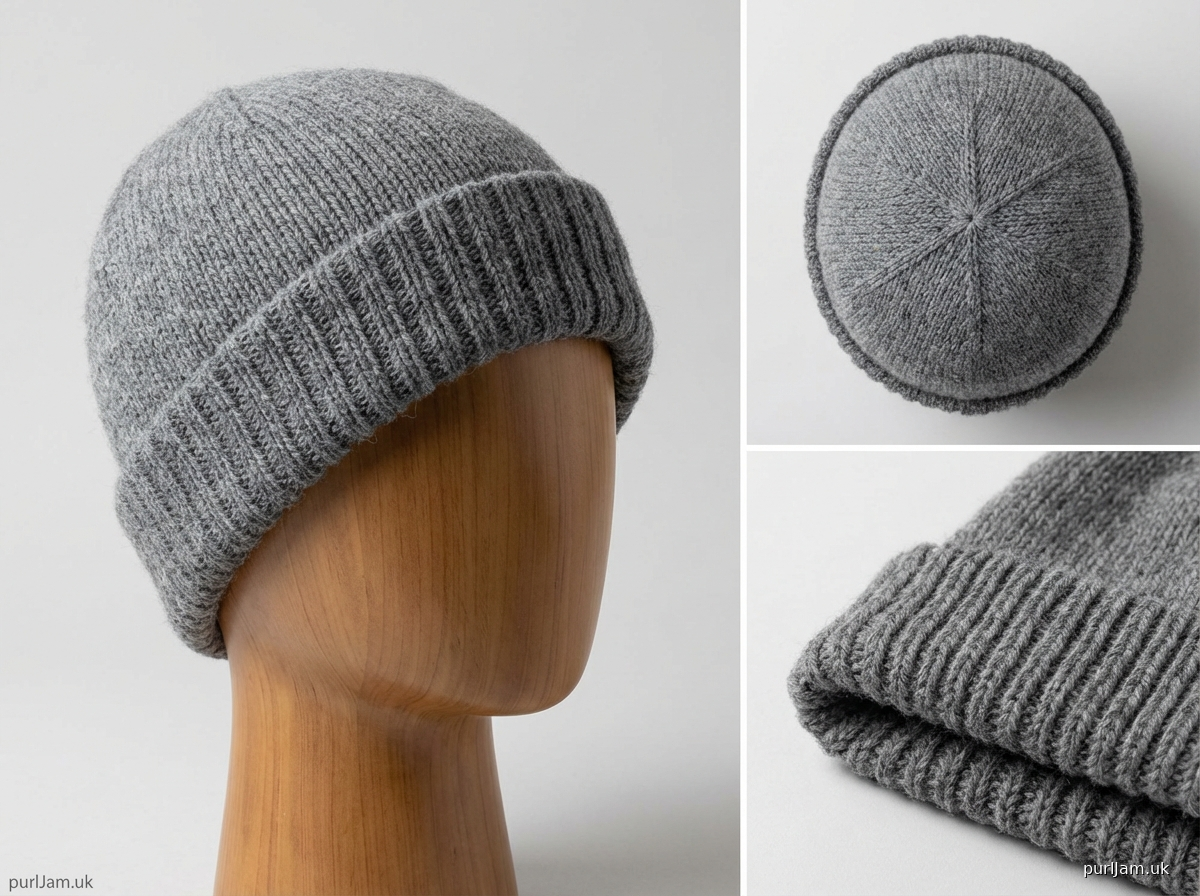
# Classic Folded Brim Beanie
## A Simple Straight-Needle Hat Pattern

This cosy beanie features a stylish folded brim and is knitted flat on straight needles, making it perfect for knitters who prefer not to work in the round. The ribbed brim provides excellent stretch and warmth, whilst the shaped crown creates a flattering fit.

---

## MATERIALS

**Yarn:** DK weight yarn (8-ply), approximately 100-120 metres
- Sample shown uses a standard DK wool or wool-blend yarn

**Needles:**
- 4mm (UK 8, US 6) straight needles for main pattern
- 3.75mm (UK 9, US 5) straight needles for brim

**Notions:**
- Tapestry needle for seaming
- Stitch markers (optional, but helpful)
- Scissors

---

## TENSION

22 stitches and 28 rows = 10 cm (4 inches) in stocking stitch on 4mm needles

**This tension is critical for proper fit.** Please knit a tension swatch and adjust needle size if necessary:
- Too many stitches per 10 cm? Use larger needles
- Too few stitches per 10 cm? Use smaller needles

---

## SIZES

One size to fit average adult head circumference of 54-58 cm (21-23 inches)

**Finished Measurements:**
- Circumference: 51 cm (20 inches) unstretched
- Height: 22 cm (8.5 inches) with brim folded

---

## ABBREVIATIONS

- **k** = knit
- **p** = purl
- **k2tog** = knit 2 stitches together (right-leaning decrease)
- **p2tog** = purl 2 stitches together
- **RS** = right side
- **WS** = wrong side
- **st(s)** = stitch(es)
- **cm** = centimetres

---

## PATTERN NOTES

- This hat is knitted flat from bottom to top, then seamed up the back
- The brim is worked in rib and folded to the inside for double thickness
- Crown shaping is worked with simple decreases evenly spaced across the row
- The stitch count (112 sts) is divisible by 4 for the ribbing and by 14 for the crown shaping
- All WS (wrong side) rows in the body are purled unless otherwise stated
- When seaming, use mattress stitch for an invisible seam on the right side

---

## INSTRUCTIONS

### BRIM

Using 3.75mm needles, cast on **112 sts** using the long-tail cast-on method (or your preferred stretchy cast-on).

**Row 1 (RS):** *K2, p2; repeat from * to end of row. [112 sts]

**Row 2 (WS):** *P2, k2; repeat from * to end of row. [112 sts]

**Repeat Rows 1-2** until brim measures **12 cm** (4.75 inches) from cast-on edge, ending with a WS row.

*You should have approximately 34 rows of ribbing.*

---

### BODY

Change to 4mm needles.

**Next Row (RS):** Knit all sts. [112 sts]

**Next Row (WS):** Purl all sts. [112 sts]

Continue in **stocking stitch** (knit on RS rows, purl on WS rows) until body measures **14 cm** (5.5 inches) from the point where you changed to 4mm needles, ending with a WS row.

*This is approximately 39 rows of stocking stitch. The total length from cast-on edge should be approximately 26 cm.*

**Stitch Check:** You should have 112 sts on your needle.

---

### CROWN SHAPING

The crown is shaped with decreases every RS row. Read through all crown shaping instructions before beginning.

**Decrease Round 1 (RS):** *K12, k2tog; repeat from * to end of row. [98 sts remain]
- Math check: (112 ÷ 14 = 8 repeats) × (12 + 1 decrease) = 98 sts ✓

**Row 2 and all WS rows:** Purl all sts.

**Decrease Round 3 (RS):** *K11, k2tog; repeat from * to end of row. [84 sts remain]
- Math check: 8 repeats × (11 + 1 decrease) = 84 sts ✓

**Decrease Round 5 (RS):** *K10, k2tog; repeat from * to end of row. [70 sts remain]
- Math check: 8 repeats × (10 + 1 decrease) = 70 sts ✓

**Decrease Round 7 (RS):** *K9, k2tog; repeat from * to end of row. [56 sts remain]
- Math check: 8 repeats × (9 + 1 decrease) = 56 sts ✓

**Decrease Round 9 (RS):** *K8, k2tog; repeat from * to end of row. [42 sts remain]
- Math check: 8 repeats × (8 + 1 decrease) = 42 sts ✓

**Decrease Round 11 (RS):** *K7, k2tog; repeat from * to end of row. [28 sts remain]
- Math check: 8 repeats × (7 + 1 decrease) = 28 sts ✓

**Decrease Round 13 (RS):** *K5, k2tog; repeat from * to end of row. [14 sts remain]
- Math check: 8 repeats × (5 + 1 decrease) = 14 sts ✓

**Decrease Round 15 (RS):** *K2tog; repeat from * to end of row. [7 sts remain]
- Math check: 14 sts ÷ 2 = 7 sts ✓

**Row 16 (WS):** Purl all sts.

Do not cast off. Cut yarn leaving a 60 cm (24 inch) tail.

---

## FINISHING

### Closing the Crown

Thread the yarn tail onto a tapestry needle. Pass the needle through all 7 remaining stitches, slipping them off the knitting needle as you go. Pull tight to close the crown opening. Do not cut yarn - you will use this tail to seam the hat.

### Seaming the Hat

With RS facing you, use the yarn tail still attached at the crown (or join a new length of yarn if needed) and mattress stitch to seam the hat from crown to brim.

**Mattress Stitch Seaming:**
1. Lay the hat flat with RS facing you
2. Working from crown towards brim, pick up the bars between stitches on each side
3. Pull snug every few stitches to hide the seam
4. When you reach the brim, continue seaming through the ribbing
5. Secure the yarn and weave in the end

### Folding the Brim

Fold the brim to the inside of the hat along the line where you changed needle sizes (where ribbing meets stocking stitch). The brim should create a 6 cm (2.5 inch) folded edge.

**Optional:** You may loosely tack the folded brim in place at the seam and at 2-3 other points around the circumference to prevent it from rolling, but this is not necessary if the brim naturally stays in place.

### Weaving in Ends

Weave in all remaining yarn ends securely on the WS of the fabric. Trim excess yarn.

---

## CARE INSTRUCTIONS

Block gently if desired by dampening and shaping over a plate or balloon of appropriate size. Allow to dry completely.

Wash according to yarn label instructions. For most DK weight wool or wool-blend yarns, hand wash in cool water and lay flat to dry.

---

## CUSTOMISATION TIPS

**For a slouchy fit:** Before starting crown shaping, work an additional 5-8 cm in stocking stitch.

**For a different size:**
- Smaller: Cast on 104 sts (divisible by 4 and 8)
- Larger: Cast on 120 sts (divisible by 4 and 8)
- Adjust decrease rounds accordingly to maintain the decrease pattern

**For a striped hat:** Change colours every 4-6 rows in the body section, carrying unused yarn up the side that will become the seam.

**For a pompom:** Attach a handmade or purchased pompom to the crown after finishing.

---

## SKILL DEVELOPMENT

This pattern teaches:
- Working ribbing for stretch fabric
- Creating flat fabric in stocking stitch
- Shaping with decreases
- Seaming knitted pieces
- Following a decrease sequence

---

**Pattern Design & Technical Editing:** Created for straight-needle knitting
**Difficulty Level:** Easy
**Pattern © 2024**

Enjoy your new beanie! This classic style works up quickly and makes an excellent gift or personal accessory.
Disclaimer: This pattern was generated by AI and should be reviewed for accuracy before use. While we strive for quality, AI-generated content may contain errors. Please verify measurements, stitch counts, and instructions before beginning your project. Generated by purlJam.uk
Access your pattern anytime
Bookmark this page to access your pattern anytime