Type
Knitting
Difficulty
intermediate
Category
amigurumi
AI Thinking Process
Planning
Verification
Pattern
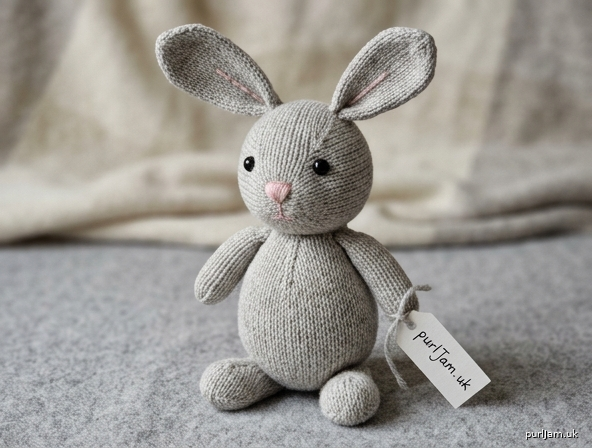
Clover the Bunny — Beginner Knitted Amigurumi
A soft, seamless little rabbit worked in the round in worsted-weight yarn. All pieces are simple tubes with easy increases and decreases — perfect for your first toy. Finished height approximately 9 in (23 cm) including ears.
Skill Level
Beginner
Finished Measurements
- Height (including ears): approx. 9 in (23 cm)
- Body height: approx. 3.5 in (9 cm)
- Head diameter: approx. 3 in (7.5 cm)
Gauge
20 sts × 28 rows = 4 in (10 cm) in stockinette stitch worked in the round, after light blocking.
Gauge note: Exact gauge is not critical for toys — what matters is a tight, even fabric that will not let stuffing peek through. Use a needle 1–2 sizes smaller than your yarn label suggests. Worsted weight usually recommends US 7–8 (4.5–5 mm); we use US 6 (4 mm) for a dense fabric.
Materials
- Yarn: Worsted weight (Category 4), approx. 120 yd (110 m) in main color (gray, cream, or your favorite). A small scrap of contrast yarn or embroidery floss for the nose.
- Needles: US 6 (4 mm) — set of DPNs or one long circular for Magic Loop.
- Notions:
- Polyester fiberfill stuffing — approx. 1.5–2 oz (40–55 g) total.
- Two 9 mm safety eyes (or black embroidery floss to stitch eyes).
- Tapestry needle.
- Stitch marker.
- Optional: small amount of pink floss for embroidered nose and inner ears.
Abbreviations (US)
- k – knit
- kfb – knit into front and back of stitch (1 increase)
- k2tog – knit two together (1 decrease)
- st(s) – stitch(es)
- rnd(s) – round(s)
- MC – main color
Setup tip: To begin each piece, cast on 6 sts and distribute over your DPNs or Magic Loop, join to work in the round, and place a marker to track the start of the round. Snug up the first stitch on each needle change to avoid gaps (ladders).
HEAD
Cast on 6 sts. Join in the round.
- Rnd 1: kfb in every st → 12 sts (6 increases → 6 + 6 = 12 ✓)
- Rnd 2: (k1, kfb) around → 18 sts (6 increases → 12 + 6 = 18 ✓)
- Rnd 3: (k2, kfb) around → 24 sts (6 increases → 18 + 6 = 24 ✓)
- Rnd 4: (k3, kfb) around → 30 sts (6 increases → 24 + 6 = 30 ✓)
- Rnd 5: (k4, kfb) around → 36 sts (6 increases → 30 + 6 = 36 ✓)
- Rnds 6–14: knit all sts (9 rnds even) → 36 sts
Insert safety eyes now between Rnds 8 and 10, about 6–7 sts apart, before you begin decreasing. (Once you start closing, you cannot reach inside.)
- Rnd 15: (k4, k2tog) around → 30 sts (6 decreases → 36 − 6 = 30 ✓)
- Rnd 16: (k3, k2tog) around → 24 sts (24 ✓)
- Rnd 17: (k2, k2tog) around → 18 sts (18 ✓)
Stuff the head firmly now through the opening.
- Rnd 18: (k1, k2tog) around → 12 sts (12 ✓)
- Rnd 19: k2tog around → 6 sts (6 ✓)
Add more stuffing if needed. Cut yarn leaving a 10 in (25 cm) tail, thread through remaining 6 sts, pull tight to close. Set aside.
BODY
Cast on 6 sts. Join in the round.
- Rnd 1: kfb in every st → 12 sts (12 ✓)
- Rnd 2: (k1, kfb) around → 18 sts (18 ✓)
- Rnd 3: (k2, kfb) around → 24 sts (24 ✓)
- Rnd 4: (k3, kfb) around → 30 sts (30 ✓)
- Rnds 5–16: knit all sts (12 rnds even) → 30 sts
- Rnd 17: (k3, k2tog) around → 24 sts (30 − 6 = 24 ✓)
- Rnd 18: (k2, k2tog) around → 18 sts (18 ✓)
Stuff the body firmly now.
- Rnd 19: (k1, k2tog) around → 12 sts (12 ✓)
Cut yarn leaving a 12 in (30 cm) tail. Thread through remaining 12 sts but do not pull fully closed yet — leave the opening slightly open so you can add stuffing when attaching the head. Set aside.
EARS (make 2)
Cast on 6 sts. Join in the round.
- Rnd 1: (k2, kfb) around → 8 sts (2 increases → 6 + 2 = 8 ✓)
- Rnd 2: (k3, kfb) around → 10 sts (10 ✓)
- Rnd 3: (k4, kfb) around → 12 sts (12 ✓)
- Rnds 4–16: knit all sts (13 rnds even) → 12 sts
- Rnd 17: (k4, k2tog) around → 10 sts (12 − 2 = 10 ✓)
- Rnd 18: knit → 10 sts
Do not stuff the ears — they should stay flat and floppy. Cut yarn leaving a 10 in (25 cm) tail. Thread through remaining 10 sts, pull to gather gently, and flatten the ear. Set aside.
ARMS (make 2)
Cast on 6 sts. Join in the round.
- Rnd 1: (k2, kfb) around → 8 sts (8 ✓)
- Rnd 2: (k3, kfb) around → 10 sts (10 ✓)
- Rnds 3–14: knit all sts (12 rnds even) → 10 sts
Lightly stuff the lower half of each arm only (leave the top soft for seaming). Cut yarn leaving a 10 in (25 cm) tail. Thread through remaining 10 sts, pull to close. Set aside.
LEGS (make 2)
Cast on 6 sts. Join in the round.
- Rnd 1: kfb in every st → 12 sts (12 ✓)
- Rnds 2–4: knit all sts (3 rnds even) → 12 sts
- Rnd 5: (k4, k2tog) around → 10 sts (12 − 2 = 10 ✓)
- Rnds 6–14: knit all sts (9 rnds even) → 10 sts
Stuff each leg firmly. Cut yarn leaving a 10 in (25 cm) tail. Thread through remaining 10 sts, pull to close. Set aside.
ASSEMBLY
Work in this order for a balanced, upright bunny. Use mattress stitch and the long tails left on each piece.
-
Head to body: Position the head on top of the body opening. Add a little more stuffing into the body/neck junction if needed, then mattress-stitch the head firmly to the body all the way around the neck. Make sure the eyes face forward.
-
Ears: Pin both ears to the top of the head about 1 in (2.5 cm) apart. Check symmetry from the front before stitching. Sew the gathered base of each ear securely to the head, letting them flop naturally.
-
Arms: Pin the arms to each side of the upper body, level with each other, about 0.5 in (1.3 cm) below the neck seam. Stitch the open top edge of each arm to the body.
-
Legs: Pin both legs to the front-bottom of the body so the bunny can sit. Make sure they are level and symmetrically spaced. Stitch the gathered ends firmly in place.
-
Face:
- Nose: Using pink floss, embroider a small triangle or "V" nose centered below and between the eyes. Add a short vertical straight stitch below the nose for the mouth.
- Inner ears (optional): Work a few long straight stitches in pink floss down the center of each ear front.
- If you did not use safety eyes, embroider two eyes with black floss using satin stitch or French knots.
-
Weave in ends: Bring all remaining tails to the inside of the body or head, run them back and forth through the stuffing, and trim close. Never knot on the surface where it could work loose.
Care
Surface-wash gently or spot-clean only. If the toy is for a baby or young child, embroider the eyes and nose instead of using safety eyes, and stitch all pieces on extra securely.
Enjoy your new bunny! 🐰
Disclaimer: This pattern was generated by AI and should be reviewed for accuracy before use. While we strive for quality, AI-generated content may contain errors. Please verify measurements, stitch counts, and instructions before beginning your project. Generated by purlJam.uk
Access your pattern anytime
Bookmark this page to access your pattern anytime