Type
Knitting
Difficulty
beginner
Category
pullover
AI Thinking Process
Planning
Verification
Pattern
CONTINUA BOXED PULLOVER
A Beginner Drop-Shoulder Jumper in Firm Worsted Cotton-Wool
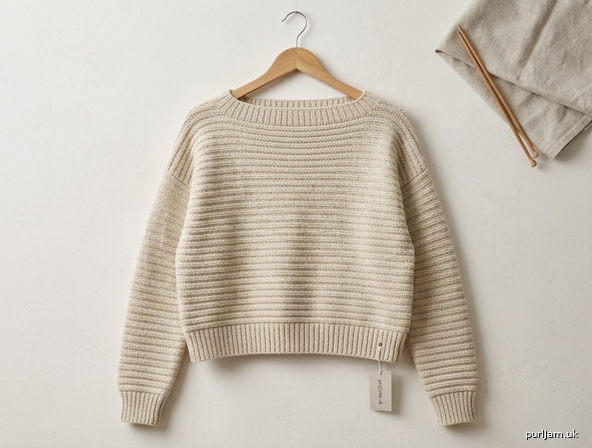
A relaxed, boxy cropped pullover with long sleeves and a wide boatneck. Front and Back are plain rectangles worked in a simple Broken Rib so the texture matches at the side seams and over the shoulder joins—reading as one pattern that moves from front to back. Knit firmly for a dense, stable fabric in thick cotton-wool yarn. Drop-shoulder construction means no armhole shaping and no sleeve caps.
SIZES
S (M, L, XL, 2XL)
To fit bust: 32–34 (36–38, 40–42, 44–46, 48–50)" / 81–86 (91–97, 102–107, 112–117, 122–127) cm
Finished measurements
- Bust circumference: 40 (44, 48, 52, 56)" / 102 (112, 122, 132, 142) cm (approx 6–8" / 15–20 cm positive ease)
- Back width: 20 (22, 24, 26, 28)" / 51 (56, 61, 66, 71) cm
- Total length (shoulder to hem): 18 (18.5, 19, 19.5, 20)" / 46 (47, 48.5, 49.5, 51) cm
- Armhole depth: 9 (9.5, 10, 10.5, 11)" / 23 (24, 25.5, 26.5, 28) cm
- Sleeve length (underarm to cuff): 17 (17.5, 18, 18, 18.5)" / 43 (44.5, 45.5, 45.5, 47) cm
- Upper sleeve circumference: approx 18.5 (19.25, 20.75, 21.5, 22.5)" / 47 (49, 53, 55, 57) cm
Sample shown in size M. Choose size by finished bust (boxy fit).
YARN
Worsted weight cotton-wool blend (or similar worsted), suitable for a firm fabric
Approx 150–180 yd / 137–165 m per 100 g ball
Yardage: 980 (1100, 1220, 1360, 1500) yd / 900 (1005, 1115, 1245, 1370) m
Example: 6 (7, 7, 8, 9) balls of a 180 yd / 100 g cotton-wool worsted.
NEEDLES
- US 6 / 4 mm straight or circular needles (ribbing)
- US 7 / 4.5 mm straight or circular needles (body and sleeves)
- US 6 / 4 mm circular needle, 24" / 60 cm (neckband)
- Spare US 7 / 4.5 mm needle for 3-needle bind-off (optional)
Adjust needle size to obtain firm gauge. Cotton-wool should feel dense, not loose or drapey.
GAUGE
20 stitches and 28 rows = 4" / 10 cm over Stockinette stitch on larger needles, after blocking, knit firmly.
Broken Rib gauges close to St st at this firm tension; always swatch in Broken Rib as well and confirm 20 sts = 4" / 10 cm width.
Tight/firm knit is intentional for thick cotton-wool—fabric should hold a boxy shape.
NOTIONS
- Stitch markers
- Stitch holders or waste yarn
- Tapestry needle
- Measuring tape
- Blocking mats and pins (optional but recommended)
ABBREVIATIONS (US)
- BO — bind off
- CO — cast on
- k — knit
- p — purl
- pm — place marker
- rep — repeat
- RS — right side
- st(s) — stitch(es)
- St st — stockinette stitch (knit RS, purl WS)
- WS — wrong side
- wyib — with yarn in back
- wyif — with yarn in front
PATTERN STITCHES
1×1 Rib (even number of sts) Every row: *K1, p1; rep from * to end.
Broken Rib (even number of sts) — used for body and sleeves so texture continues front to back
- Row 1 (RS): Knit.
- Row 2 (WS): *K1, p1; rep from * to end.
Rep Rows 1–2 for pattern.
When pieces are seamed at sides and shoulders, match RS knit rows to RS knit rows so the rib “steps” align and the pattern reads continuously from front over the shoulder to the back.
NOTES
- Drop-shoulder, boxy, beginner construction: Front and Back are rectangles (no armhole indentation).
- Boatneck: outer shoulder stitches are joined; center stitches form the neck opening (no neck shaping rows).
- Work firmly. Cotton-wool blooms slightly; firm gauge keeps the jumper structured.
- Slip the first stitch of every row purlwise wyif for a neat selvedge (optional; included in counts as a regular st for seaming).
- Schematic measurements are finished blocked sizes.
- Inline checks (✓) confirm stitch arithmetic.
BACK
With smaller needles, CO 100 (110, 120, 130, 140) sts.
Work 1×1 Rib until piece measures 2" / 5 cm from CO edge, ending after a WS row.
Change to larger needles.
Set-up for Broken Rib (RS): Knit 1 row (counts as Broken Rib Row 1).
Continue in Broken Rib until piece measures 18 (18.5, 19, 19.5, 20)" / 46 (47, 48.5, 49.5, 51) cm from CO edge, ending after a WS row (Broken Rib Row 2).
Place shoulder and neck sts
Do not bind off. Place sts on holder or spare needle as follows:
- Right shoulder (as worn): 18 (20, 22, 25, 27) sts
- Center neck: 64 (70, 76, 80, 86) sts
- Left shoulder: 18 (20, 22, 25, 27) sts
Check: 18 + 64 + 18 = 100; 20 + 70 + 20 = 110; 22 + 76 + 22 = 120; 25 + 80 + 25 = 130; 27 + 86 + 27 = 140 ✓
Break yarn, leaving a long tail for seaming or 3-needle BO if preferred later.
FRONT
Work exactly as for Back until piece measures same length as Back, ending after the same WS Broken Rib row so pattern will match at shoulders.
Place sts on holder identically:
18 (20, 22, 25, 27) shoulder, 64 (70, 76, 80, 86) neck, 18 (20, 22, 25, 27) shoulder.
JOIN SHOULDERS
Turn Front and Back so RS face together (or WS together for a decorative ridge—standard is RS together for seam inside).
Join left shoulders: with larger needle, work 3-needle bind-off across 18 (20, 22, 25, 27) shoulder sts, matching stitch for stitch so Broken Rib columns continue from Front to Back over the seam.
Repeat for right shoulders.
Place remaining center neck sts of Front and Back on separate holders for neckband.
Pattern continuity: Because both pieces ended on the same pattern row and shoulders are joined st-for-st, the Broken Rib moves unbroken from front to back across each shoulder.
SLEEVES (make 2)
Armhole edge: On each side of body, the armhole is the top 9 (9.5, 10, 10.5, 11)" / 23 (24, 25.5, 26.5, 28) cm of the side edge (leave this open when seaming sides later).
With larger needles, RS facing, beginning at bottom of armhole opening (where side seam will end), pick up and knit 46 (48, 52, 54, 56) sts evenly along armhole edge to shoulder seam, then continue down the other side of the same armhole if working one piece—OR pick up along Front armhole edge only then Back (total still 46 (48, 52, 54, 56) sts for the full armhole).
Recommended even pick-up: approx 2 sts every 3 rows along the selvedge (armhole rows ≈ 63 (66, 70, 73, 77); 2/3 of that ≈ 42–51, adjust to exact count) ✓.
Next row (WS): Work Broken Rib Row 2 across all sleeve sts (*K1, p1; rep from *).
If st count is even, rib lands cleanly ✓.
Work in Broken Rib as established, and at the same time shape sleeve:
Decrease row (RS): K1, ssk, work in pattern to last 3 sts, k2tog, k1. (2 sts dec)
Work 5 (5, 5, 4, 4) rows even in Broken Rib.
Rep Decrease row every 6th (6th, 6th, 5th, 5th) row 3 (3, 4, 4, 4) more times, then every 8th (8th, 6th, 6th, 6th) row 0 (1, 1, 2, 3) time(s).
Total decrease rows: 4 (5, 6, 7, 8)
Sts remaining: 46 − 8 = 38; 48 − 10 = 38; 52 − 12 = 40; 54 − 14 = 40; 56 − 16 = 40 — adjust final pair of decs if needed so you end with 38 (40, 42, 44, 46) sts for cuff (work 1 extra dec row or 1 fewer on your size to hit target).
Final cuff counts used below: 38 (40, 42, 44, 46) sts ✓
Continue even in Broken Rib until sleeve measures 15 (15.5, 16, 16, 16.5)" / 38 (39.5, 40.5, 40.5, 42) cm from pick-up, ending after a WS row.
Change to smaller needles.
Work 1×1 Rib for 2" / 5 cm.
BO loosely in rib.
Work second sleeve the same way.
FINISHING
Side and sleeve seams
With RS together (or mattress stitch from RS), sew each side seam from hem rib to underarm (bottom of armhole).
Continue seaming each sleeve underarm from cuff to underarm join in one continuous seam if preferred.
Match Broken Rib rows at side seams so horizontal texture lines align and the pattern reads around the body.
Neckband
With smaller circular needle and RS facing, beginning at left shoulder seam:
- Pick up and knit 3 sts down left front neck edge (from shoulder to holder),
- Knit across 64 (70, 76, 80, 86) front neck sts from holder,
- Pick up and knit 3 sts up right front neck edge,
- Pick up and knit 3 sts down right back neck edge,
- Knit across 64 (70, 76, 80, 86) back neck sts from holder,
- Pick up and knit 3 sts up left back neck edge.
Total: 140 (152, 164, 172, 184) sts ✓ (64+64+12 = 140; 70+70+12 = 152; etc.)
Pm for beginning of round. Join to work in the round.
Work 1×1 Rib (*K1, p1; rep from * to end) for 1" / 2.5 cm.
BO loosely in rib.
Boatneck should sit wide and flat; if it flares, use a smaller needle or a tighter BO.
Weave and block
Weave in all ends.
Block flat to finished measurements, pinning boxy rectangle shape. Do not overstretch cotton-wool; smooth to measurements and allow to dry fully. Broken Rib will open slightly and the front-to-back pattern lines will settle evenly across the shoulders.
SCHEMATIC (key measurements)
        |← 20 (22, 24, 26, 28)" →|
     ┌─────────────────────────────┐  ← boatneck opening ~13–17"
     |  sh 18-27 sts   neck   sh   |  shoulder seams (outer only)
     |                             |
     |         FRONT / BACK        |  total length
     |         Broken Rib          |  18 (18.5, 19, 19.5, 20)"
     |                             |
     └─────────────────────────────┘
        ↑ side seam    ↑ armhole 9–11" open for sleeve pick-up

     Sleeve: pick-up edge = armhole depth
     taper to cuff; length 17 (17.5, 18, 18, 18.5)"
BEGINNER TIPS
- Mark RS with a removable marker; Broken Rib Row 1 is the plain knit side.
- Count rows in the armhole section of Front and Back so both armholes are the same length before picking up sleeves.
- When joining shoulders, line up the k1 columns of the WS rib so the texture steps match over the seam—this is what makes the pattern “move” from front to back.
- Mattress stitch on the plain-knit (RS) columns gives the cleanest side seams for this stitch pattern.
- If your row gauge differs, match length in inches, not row counts.
CUSTOMIZATION (optional)
- Less cropped: Add 2–4" / 5–10 cm length before placing shoulder sts; keep armhole depth the same or deepen by ½" if desired.
- Three-quarter sleeves: Work sleeves to 12 (12.5, 13, 13, 13.5)" / 30.5 (32, 33, 33, 34) cm before cuff rib.
- Stripes: Change color on RS knit rows only; carry or cut yarn. Match stripe sequences on Front and Back for continuous bands around the body and over shoulders.
End of pattern.
Wear with the boatneck relaxed on the collarbones and the dropped shoulders sitting mid-upper arm. The Broken Rib should flow unbroken from front, over each shoulder seam, and down the back.
Disclaimer: This pattern was generated by AI and should be reviewed for accuracy before use. While we strive for quality, AI-generated content may contain errors. Please verify measurements, stitch counts, charts, and instructions before beginning your project. Generated by purlJam.uk
Love this pattern?
Save this pattern to your free PurlJam libraryAccess your pattern anytime
Bookmark this page to access your pattern anytime