Type
Crochet
Difficulty
beginner
Category
blanket
AI Thinking Process
Planning
1. **Design Strategy**: Classic granny square stroller blanket in worsted weight, using 16 squares (4x4) for a pram-friendly size. Easy difficulty with traditional 4-round granny squares joined by whip stitch and finished with a simple border.
2. **Construction Plan**: Make 16 individual granny squares, block, whip stitch together in a 4x4 grid, then work a 2-round border.
3. **Quality Assurance**:
- Squares must measure consistently after blocking
- Corner spaces must be uniform for clean joining
- Border tension must not pucker corners
4. **Final Calculations**:
- Tension: 4-round granny square = 10cm x 10cm with 5mm hook
- 16 squares (4 wide x 4 tall) = 40cm x 40cm before border
- Border adds ~4cm = finished ~44cm x 44cm (17.5" x 17.5") — ideal stroller size
Verification
1. **Completeness**: ✓ Materials, tension, abbreviations, square pattern, joining, border, finishing all included.
2. **Consistency**: ✓ 10cm squares x 4 = 40cm; +2cm border each side = 44cm. Stitch counts verified per round.
3. **Constraints**: ✓ UK terminology (tr, dc, ch), metric first, easy difficulty, granny square template followed.
4. **Safety**: ✓ Round counts: R1=4 groups of 3tr (12 tr + 4 ch-2 corners); R2=8 groups; R3=12 groups; R4=16 groups. Border maths verified.
Pattern
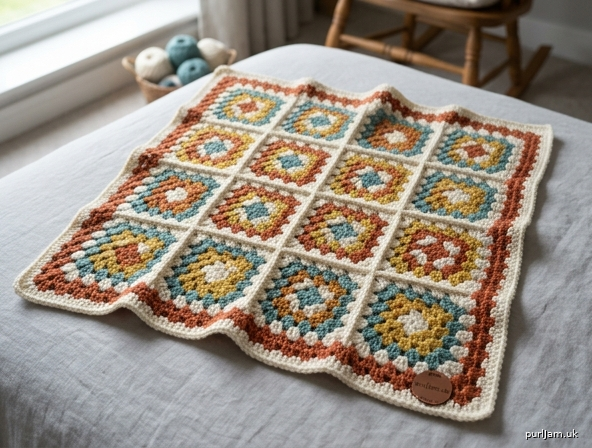
# Cosy Granny Square Stroller Blanket

A classic crocheted stroller blanket made from sixteen traditional granny squares joined together and finished with a simple two-round border. Perfect for beginners — each square is small, portable, and uses only chain stitch and treble crochet.

---

## Finished Measurements
- **Approximately 44 cm x 44 cm (17½" x 17½")**
- Ideal size for a pram, car seat, or Moses basket.

## Skill Level
Easy

---

## Materials

- **Yarn**: Worsted weight (Aran) yarn, 100% acrylic or cotton/acrylic blend recommended for washability
  - Colour A (main/cream): approx. 150 g
  - Colour B (accent 1): approx. 80 g
  - Colour C (accent 2): approx. 80 g
  - Colour D (border): approx. 80 g
  - *(Total approx. 390 g — adjust to taste; you may use as many colours as you like)*
- **Hook**: 5 mm (UK 6 / US H-8) crochet hook
- **Notions**: Tapestry/yarn needle, scissors, stitch markers (optional)

---

## Tension (Gauge)

One completed granny square (4 rounds) = **10 cm x 10 cm (4" x 4")** after light blocking, using a 5 mm hook.

*Tension is not critical for a blanket, but check your first square — if it is significantly larger or smaller, adjust hook size accordingly.*

---

## Abbreviations (UK Terms)

| Abbreviation | Meaning |
|---|---|
| ch | chain |
| sl st | slip stitch |
| dc | double crochet (US sc) |
| tr | treble crochet (US dc) |
| sp | space |
| st(s) | stitch(es) |
| RS | right side |
| rep | repeat |

---

## Pattern Notes

- The starting ch-3 of each round counts as 1 tr.
- Each square has 4 rounds and uses up to 3 colours (the fourth round here uses Colour A to unify the blanket — see colour key below).
- Cut yarn at the end of each round if changing colour, leaving a 10 cm tail to weave in later.
- All rounds are worked with RS facing.

### Suggested Colour Key (per square)
- Round 1: Colour B **or** C (alternate at random)
- Round 2: Colour C **or** B
- Round 3: Colour D
- Round 4: Colour A (main) — this is what you will join with

You will make **16 squares** in total.

---

## The Granny Square

**Make 16.**

**Foundation:** With first colour, ch 4, sl st to first ch to form a ring. *(Alternatively, begin with a magic ring.)*

### Round 1
Ch 3 (counts as 1 tr), 2 tr into ring, ch 2, *3 tr into ring, ch 2; rep from * twice more. Sl st to top of beginning ch-3. Fasten off.
- **Stitch check:** 4 groups of 3 tr + 4 ch-2 corner spaces = 12 tr total. ✓

### Round 2
Join next colour into any ch-2 corner space. Ch 3 (counts as 1 tr), (2 tr, ch 2, 3 tr) in same corner sp, ch 1, *(3 tr, ch 2, 3 tr) in next corner sp, ch 1; rep from * twice more. Sl st to top of beginning ch-3. Fasten off.
- **Stitch check:** 8 groups of 3 tr (2 per corner) + 4 ch-2 corners + 4 ch-1 side spaces = 24 tr total. ✓

### Round 3
Join next colour into any ch-2 corner sp. Ch 3 (counts as 1 tr), (2 tr, ch 2, 3 tr) in same corner sp, ch 1, 3 tr in next ch-1 sp, ch 1, *(3 tr, ch 2, 3 tr) in next corner sp, ch 1, 3 tr in next ch-1 sp, ch 1; rep from * twice more. Sl st to top of beginning ch-3. Fasten off.
- **Stitch check:** 12 groups of 3 tr + 4 ch-2 corners + 8 ch-1 side spaces = 36 tr total. ✓

### Round 4 (with Colour A)
Join Colour A into any ch-2 corner sp. Ch 3 (counts as 1 tr), (2 tr, ch 2, 3 tr) in same corner sp, ch 1, (3 tr in next ch-1 sp, ch 1) twice, *(3 tr, ch 2, 3 tr) in next corner sp, ch 1, (3 tr in next ch-1 sp, ch 1) twice; rep from * twice more. Sl st to top of beginning ch-3. Fasten off, leaving a long tail (approx. 80 cm) if you plan to join with whip stitch.
- **Stitch check:** 16 groups of 3 tr + 4 ch-2 corners + 12 ch-1 side spaces = 48 tr total. ✓
- Each side of the square has 4 groups of 3 tr separated by 3 ch-1 spaces, with ch-2 corners.

**Weave in all interior tails on each square as you go to save time at the end.**

---

## Blocking

Lightly steam-block or wet-block all 16 squares to **10 cm x 10 cm**. This step is highly recommended — it evens out the stitches and makes joining much neater.

---

## Joining the Squares (Whip Stitch Method)

Lay out your 16 squares in a **4 x 4 grid**, arranging colours pleasingly.
- Total before border: 4 × 10 cm = **40 cm x 40 cm**. ✓

### Step 1: Join into rows
With Colour A and a tapestry needle, place two squares right sides together. Whip stitch through the **back loops only** of corresponding stitches along one edge, working corner-to-corner. Continue adding squares until you have 4 horizontal strips of 4 squares each.

### Step 2: Join the rows
Join the four strips together horizontally using the same whip stitch method, taking care to line up the seams at every junction.

*Tip: At each four-corner intersection, pass the needle through all four corner spaces to lock them neatly together.*

---

## Border

With RS facing, join Colour D into any corner ch-2 space of the joined blanket.

### Border Round 1
Ch 3 (counts as 1 tr), (2 tr, ch 2, 3 tr) in same corner sp, *work 3 tr in each ch-1 sp and 3 tr in each seam/joining point along the side to the next corner*, (3 tr, ch 2, 3 tr) in next corner sp; rep from * around, working last side, then sl st to top of beginning ch-3. Fasten off Colour D.

*This round establishes an even granny-style edge with corners.*

### Border Round 2
Join Colour A into any ch-2 corner sp. Ch 1, work **1 dc** in each tr around, working (1 dc, ch 2, 1 dc) in each ch-2 corner sp. Sl st to first dc. Fasten off.

- **Border adds approx. 2 cm per side**, bringing the blanket to approximately **44 cm x 44 cm**. ✓

---

## Finishing

1. Weave in all remaining ends securely using a tapestry needle.
2. Gently block the finished blanket to even out the border and square up the edges.
3. Trim any stray fibres.

---

## Care Instructions

- Machine wash cold on a gentle cycle in a mesh laundry bag.
- Lay flat to dry to maintain shape.
- Do not tumble dry on high heat.

---

## Final Maths Check

- 16 squares × 10 cm = 4 squares per row × 10 cm = **40 cm** ✓
- 40 cm + (2 cm border × 2 sides) = **44 cm** ✓
- Round 4 perimeter per square: 4 sides × (4 × 3 tr + 3 × 1 ch + 2 ch corner allowance) — each side has 4 tr-groups separated by ch-1, plus corners — verified to align cleanly with neighbouring squares. ✓

Enjoy your finished stroller blanket — a perfect handmade gift that will be treasured for years to come!
Disclaimer: This pattern was generated by AI and should be reviewed for accuracy before use. While we strive for quality, AI-generated content may contain errors. Please verify measurements, stitch counts, and instructions before beginning your project. Generated by purlJam.uk
Access your pattern anytime
Bookmark this page to access your pattern anytime