Type
Crochet
Difficulty
intermediate
Category
bag
AI Thinking Process
Planning
Verification
Pattern
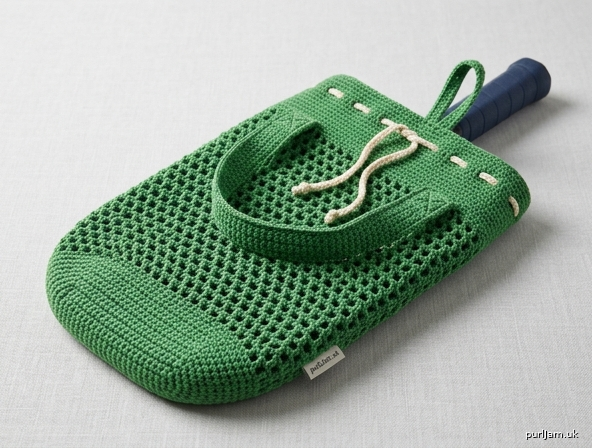
Court Mesh Pickleball Paddle Cover
A fitted, breathable sleeve for a standard pickleball paddle. The cover is worked in the round from a closed oval tip, then in dense filet mesh so it stretches over a range of paddle sizes. A solid top band with a drawstring keeps the paddle from sliding out; two short sturdy handles let you grab and go, and a hanging loop parks it in a locker or on a bag hook.
Skill level: Intermediate
Skills used: Oval worked in the round, maintaining a stitch count, filet mesh in the round, sewing on handles with a box-and-X reinforcement.
Finished measurements
Cover (laid flat, unstretched): 9¼" (23.5 cm) wide × 17" (43 cm) long
Fits: Standard paddles up to about 8¼" (21 cm) wide × 16½" (42 cm) long and about ⅝" (1.6 cm) thick. Mesh eases a little extra width. For an elongated paddle, add mesh rounds before the top band.
Handles: Two, each 1¾" (4.5 cm) wide × 12" (30.5 cm) long (about 9" / 23 cm of free length after sewing down).
Materials
Yarn: Worsted weight (#4 Medium), 100% cotton, 300 yd (275 m) total. Cotton is recommended: it holds shape, breathes, and does not snag paddle edges the way acrylic can.
Suggested yarns (2 skeins of most worsted cottons):
- Lion Brand 24/7 Cotton (186 yd / 170 m per skein) — 2 skeins
- Knit Picks / WeCrochet Dishie (190 yd / 174 m per skein) — 2 skeins
- Lily Sugar’n Cream (120 yd / 110 m per skein) — 3 skeins
Color ideas: Court green, optic yellow, navy, or natural. Optional contrast: use a leftover 40 yd (37 m) for handles, loop, and drawstring.
Hook: US H-8 (5 mm), or size needed to obtain gauge
Notions:
- Yarn needle
- Stitch marker
- 2 locking stitch markers (handle placement)
- Scissors
Gauge
Solid sc, in the round: 14 sc and 16 rnds = 4" (10 cm)
Filet mesh: 7 (dc, ch 1) repeats and 8 rnds = 4" (10 cm), unstretched
Work a 5" (12.5 cm) sc swatch, measure the inner 4" (10 cm), and change hook size if needed. A slightly firm sc fabric is better than a loose one — the mesh supplies the stretch.
Abbreviations (US terms)
- beg — beginning
- ch — chain
- dc — double crochet
- rep — repeat
- rnd(s) — round(s)
- rsc — reverse single crochet (crab stitch)
- RS — right side
- sc — single crochet
- sk — skip
- sl st — slip stitch
- sp(s) — space(s)
- st(s) — stitch(es)
- WS — wrong side
Notes
- US crochet terms throughout. RS faces you; do not turn at the end of rounds.
- Rnds 1–6 are worked in a spiral. Place a marker in the first st of every rnd and move it up.
- Mesh and top band are worked in joined rnds. Join with a sl st to the first st (or to the 3rd ch of the beg ch-4). Do not turn.
- Beginning ch-1 of an sc rnd does not count as a stitch. Beginning ch-4 of a mesh rnd does count as dc + ch 1.
- Keep ch-1 spaces relaxed so the tube does not taper. After 3 mesh rnds, laid-flat width should still read about 9–9½" (23–24 cm). If it cinches, go up one hook size for the mesh only.
- Counts in parentheses are the stitch total at the end of the rnd. Check them.
- Weave every end on the WS and trim flush. A paddle edge will catch any bump on the inside.
Cover
Oval base
With MC, ch 31.
Rnd 1: Work 3 sc in 2nd ch from hook, sc in next 28 ch, 3 sc in last ch; rotate to work in the unused loops along the opposite side of the foundation ch, sc in next 28 ch. Do not join. (3 + 28 + 3 + 28 = 62 sc ✓)
Place a marker in the first sc of the next rnd; move it up as you go.
Rnd 2: 2 sc in first st, sc in next st, 2 sc in next st, sc in next 28 sts, 2 sc in next st, sc in next st, 2 sc in next st, sc in next 28 sts. (4 increases → 62 + 4 = 66 sc ✓)
The oval should measure about 8¾–9" (22–23 cm) long and ¾" (2 cm) wide.
Solid lower body
Rnds 3–6: Sc in each st around. (66 sc ✓)
Piece measures about 1½" (4 cm) from the beginning. (6 sc rnds ÷ 16 rnds per 4" = 1.5" ✓)
Mesh body
Even the spiral: sl st in next st.
Rnd 7 (set-up): Ch 4 (counts as dc + ch 1), sk next st, *dc in next st, ch 1, sk next st; rep from * around, join with sl st in 3rd ch of beg ch-4. (33 dc + 33 ch-1 sps = 66 sts ✓)
Rnd 8: Sl st in first ch-1 sp, ch 4 (counts as dc in same sp + ch 1), *dc in next ch-1 sp, ch 1; rep from * around, join with sl st in 3rd ch of beg ch-4. (33 dc + 33 ch-1 sps ✓)
Rep Rnd 8 until the piece measures 15" (38 cm) from the beginning, unstretched. Do not fasten off.
(About 26–28 mesh rnds at 8 mesh rnds = 4"; measure rather than count, because dc height varies.)
Solid top band and drawstring channel
Rnd 1 (conversion): Ch 1, sc in each dc and in each ch-1 sp around, join. (33 dc + 33 sps = 66 sc ✓)
Rnds 2–3: Ch 1, sc in each st around, join. (66 sc ✓)
Rnd 4 (eyelets): Ch 1, *sc in next 2 sts, ch 1, sk next st; rep from * around, join. (22 repeats × 3 sts = 66; 44 sc + 22 ch-1 sps ✓)
Rnds 5–7: Ch 1, sc in each sc and in each ch-1 sp around, join. (66 sc ✓)
Rnd 8: Ch 1, sc in each st around, join. (66 sc ✓)
(8 sc rnds ÷ 16 rnds per 4" = 2"; 15" + 2" = 17" total length ✓)
Optional finishing rnd (intermediate polish): Ch 1, rsc in each st around, join. Fasten off.
If you skip crab stitch, fasten off after Rnd 8.
Weave in ends on the WS.
Drawstring
Ch 110 (about 32" / 81 cm). Sl st in 2nd ch from hook and in each ch across. Fasten off, leaving a 6" (15 cm) tail at each end. Weave tails into the cord.
Starting at one side fold (this will be the hanging-loop side), weave the cord through the Rnd 4 eyelets all the way around. Tie an overhand knot at each end of the cord, or leave the ends plain.
Handles (make 2)
Handles are worked flat in rows, then edged so they wear like small tote straps.
Ch 7.
Row 1: Sc in 2nd ch from hook and in each ch across, turn. (6 sc ✓)
Rows 2–48: Ch 1, sc in each st across, turn. (6 sc ✓)
(48 rows ÷ 16 rows per 4" = 12" ✓; 6 sc ÷ 3.5 sc per inch ≈ 1¾" wide ✓)
Edging: Ch 1, sc evenly around the entire rectangle, working 3 sc in each corner so the strap lies flat. Join to first sc. Fasten off, leaving a 24" (61 cm) tail for sewing.
Hanging loop
Ch 22.
Sl st in 2nd ch from hook and in each ch across. Fasten off, leaving a 12" (30.5 cm) tail. Fold in half to form a 3" (7.5 cm) loop.
Finishing
Block the cover lightly with steam, hovering the iron — do not press the mesh flat or pull it wide. Let dry.
Lay the cover flat with the join running along one side fold. The opening is 9¼" (23.5 cm) across.
Hanging loop: On the same side fold where the drawstring ends meet, sew both loop ends to the inside of the top band, just below the eyelet rnd, with several firm stitches through both layers of the band. The loop should stand above the opening.
Handles: Place one handle on the front and one on the back.
- Each handle end sits 1" (2.5 cm) below the top edge and 1½" (4 cm) in from the side fold.
- About 1½" (4 cm) of strap is sewn down at each end; about 9" (23 cm) of strap is free.
- With the long tail (or matching yarn), sew a 1" (2.5 cm) box at each handle end, through the handle and the top band only (do not sew the front of the cover to the back). Then stitch an X inside the box. Weave in the tail on the WS.
Cinch the drawstring after the paddle is in. The mesh will hug the face of the paddle; the solid tip protects the bottom edge.
Customizing the fit
- Longer paddle (up to 17" / 43 cm): Work mesh until the piece measures 16" (40.5 cm) from the beginning, then work the 2" (5 cm) top band (finished length 18" / 46 cm).
- Wider paddle: After Rnd 2, work one extra increase rnd: 2 sc in 1 st at the center of each curved end (2 increases → 66 + 2 = 68). Filet mesh needs an even count, so increase 2 more sts evenly on Rnd 3 to 70, then skip the (dc, ch 1, sk 1) pattern and work dc in next st, ch 1, sk next st on 70 sts (35 dc + 35 ch-1 ✓). Eyelets become sc 3, ch 1, sk 1 around (not a multiple of 3 at 70); use sc 3, ch 1, sk 1 14 times, then sc in last 2 sts, join, and pick up 1 sc in each st and sp on the next rnd.
- Snugger cover: Use US G-6 (4 mm) for Rnds 1–6 only; switch back to H-8 (5 mm) for mesh.
Care
Machine wash cold, gentle cycle. Reshape and lay flat to dry. Do not tumble-dry high — cotton will shrink and the mesh will tighten. Re-block lightly if needed.
Disclaimer: This pattern was generated by AI and should be reviewed for accuracy before use. While we strive for quality, AI-generated content may contain errors. Please verify measurements, stitch counts, charts, and instructions before beginning your project. Generated by purlJam.uk
Love this pattern?
Save this pattern to your free PurlJam libraryAccess your pattern anytime
Bookmark this page to access your pattern anytime