Type
Crochet
Difficulty
intermediate
Category
bag
AI Thinking Process
Planning
Verification
Pattern
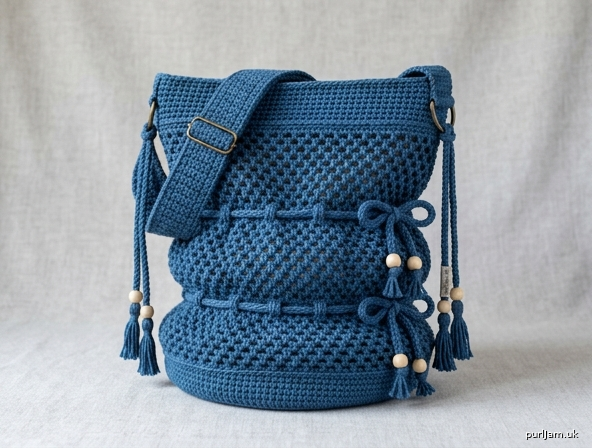
Scrunchie Mesh Market Tote
with Adjustable Strap and Gathering Cords
A round market tote worked from the bottom up in stretchy mesh, then ruched with attached cords so the body sits in stacked scrunchie gathers. One wide adjustable strap (shoulder or crossbody) replaces fixed handles. Cotton yarn keeps the base sturdy and the mesh crisp.
Skill level: Intermediate
Finished measurements
One size
- Base diameter: 10 in (25.5 cm)
- Circumference at base: about 31½ in (80 cm)
- Height, ungathered: 16 in (40.5 cm)
- Height, gathered (typical): 11–13 in (28–33 cm)
- Strap: 2¼ in × 48 in (5.5 × 122 cm), adjustable
- Comfortable strap drop: about 18–24 in (45.5–61 cm) depending on slider setting
Materials
Yarn: Worsted weight (category 4) cotton or cotton blend, 600 yd (550 m)
Sample: 4 skeins of a 150–186 yd (137–170 m) worsted cotton in one color, plus a small amount of contrast for cords if desired.
Hook: US H/8 (5.0 mm), or size needed to obtain gauge
Notions
- Stitch marker
- Yarn needle
- Scissors and measuring tape
- Two 1½ in (38 mm) D-rings or rectangle rings
- One 1½ in (38 mm) metal strap slider (triglide)
- Optional: 6 wooden beads with large holes (for cord ends), 2 swivel clasps
Recommended: Cotton. It holds the base, shows mesh clearly, and keeps scrunchie gathers from collapsing.
Gauge
14 sc and 16 rnds = 4 in (10 cm) in single crochet, worked in the round.
Mesh reference: 8 (dc, ch 2) repeats = about 5 in (12.5 cm); 6 mesh rnds = about 4½ in (11.5 cm). Mesh is looser than the base on purpose.
Check the base: after Rnd 20 the circle should measure 10 in (25.5 cm) across. Adjust hook size if needed before starting the body.
Abbreviations (US)
- BLO — back loop only
- ch — chain
- dc — double crochet
- rep — repeat
- rnd(s) — round(s)
- sc — single crochet
- sk — skip
- sl st — slip stitch
- sp(s) — space(s)
- st(s) — stitch(es)
Pattern notes
- The base is worked in joined rounds. Join with a sl st to the first sc and ch 1 at the start of each sc rnd; the ch 1 does not count as a stitch. Turn is not used.
- Move a stitch marker up on the first st of each base rnd so increases stay even.
- Mesh rounds are joined. The beginning ch 5 counts as dc + ch 2.
- The mesh body is slightly fuller than the base. That extra width is what creates the scrunchie ruching when the cords are cinched.
- Do not over-tighten gathering cords if you plan to carry heavy items; leave more ease for a working market tote, and cinch harder for the styled Pinterest look.
- Strap hardware is strongly recommended. A crocheted-loop alternative is given at the end of the strap section.
Bag
Base
Work a flat circle in sc.
Rnd 1: Make a magic ring, 6 sc in ring, join. (6 sc)
Rnd 2: Ch 1, 2 sc in each st around, join. (12 sc) (6 increases → 6 + 6 = 12 ✓)
Rnd 3: Ch 1, *1 sc in next st, 2 sc in next st; rep from * around, join. (18 sc) (6 increases → 12 + 6 = 18 ✓)
Rnd 4: Ch 1, *1 sc in each of next 2 sts, 2 sc in next st; rep from * around, join. (24 sc) (6 increases → 18 + 6 = 24 ✓)
Rnd 5: Ch 1, *1 sc in each of next 3 sts, 2 sc in next st; rep from * around, join. (30 sc) (6 increases → 24 + 6 = 30 ✓)
Rnd 6: Ch 1, *1 sc in each of next 4 sts, 2 sc in next st; rep from * around, join. (36 sc) (6 increases → 30 + 6 = 36 ✓)
Rnds 7–20: Continue increasing 6 sts evenly each rnd, working 1 additional sc between increases each rnd. Join and ch 1 at the start of every rnd.
Stitch counts by rnd (each rnd 6 increases ✓):
- Rnd 7: 42 sc
- Rnd 8: 48 sc
- Rnd 9: 54 sc
- Rnd 10: 60 sc
- Rnd 11: 66 sc
- Rnd 12: 72 sc
- Rnd 13: 78 sc
- Rnd 14: 84 sc
- Rnd 15: 90 sc
- Rnd 16: 96 sc
- Rnd 17: 102 sc
- Rnd 18: 108 sc
- Rnd 19: 114 sc
- Rnd 20: *1 sc in each of next 18 sts, 2 sc in next st; rep from * around, join. (120 sc) (6 increases → 114 + 6 = 120 ✓)
The circle should measure 10 in (25.5 cm) in diameter. If it cups, go up a hook size for the remaining base rnds; if it ruffles, go down a hook size.
Rnd 21 (edge): Ch 1, sc in each st around, join. (120 sc)
Do not fasten off.
Mesh body
The mesh uses every third stitch of the 120-st base (120 / 3 = 40 mesh spaces ✓).
Mesh Rnd 1: Ch 5 (counts as dc + ch 2), sk first 2 sts, *dc in next st, ch 2, sk 2 sts; rep from * around, sl st in 3rd ch of beginning ch-5. (40 dc, 40 ch-2 sps ✓)
Mesh Rnd 2: Sl st into first ch-2 sp, ch 5 (counts as dc + ch 2), *dc in next ch-2 sp, ch 2; rep from * around, sl st in 3rd ch of beginning ch-5. (40 dc, 40 ch-2 sps ✓)
Mesh Rnds 3–18: Repeat Mesh Rnd 2. (16 more rnds → 18 mesh rnds total ✓)
Place a removable marker in Mesh Rnds 6, 12, and 18. These are the three gathering-cord paths.
Mesh fabric will measure about 13½ in (34.5 cm) tall and will be wider than the base.
Top band
Band Rnd 1: Ch 1, *3 sc in next ch-2 sp; rep from * around, join to first sc. (120 sc) (40 sps × 3 sc = 120 ✓)
Band Rnds 2–7: Ch 1, sc in each st around, join. (120 sc)
Band Rnd 8 (ridge): Ch 1, sc BLO in each st around, join. (120 sc)
Fasten off. Weave in ends.
Mark two strap points on opposite sides of the top band (60 sts apart on a 120-st round ✓). At each mark, count 6 sts centered on the mark (12 sts total for two attachment windows).
Adjustable strap
Strap
Leave a 12 in (30.5 cm) tail at the start for sewing.
Ch 9.
Row 1: Sc in 2nd ch from hook and in each ch across, turn. (8 sc)
Row 2: Ch 1, sc in each st across, turn. (8 sc)
Repeat Row 2 until the strap measures 48 in (122 cm). At 4 sc rows per inch, that is 192 rows (48 × 4 = 192 ✓).
Fasten off, leaving a 12 in (30.5 cm) tail.
The 8-st width is about 2¼ in (5.5 cm) at gauge — sized for 1½ in (38 mm) hardware.
Attach D-rings
At each marked strap point, fold the top band over a D-ring for ¾ in (2 cm) to the inside and sew through both layers with yarn, wrapping the ring snugly. Repeat on the opposite side. Rings sit opposite each other.
Thread the slider (locks under weight)
- Sew one short end of the strap around the left D-ring. Stitch the raw end to the wrong side of the strap for 1 in (2.5 cm).
- Take the free end. Pass it up through the left slot of the slider, over the center bar, and down through the right slot.
- Pass that same free end through the right D-ring, from outside toward the bag.
- Bring the free end back to the slider and pass it up through the empty slot, under the strap already on the center bar, and down through the remaining slot.
- Fold the raw end 1 in (2.5 cm) to the wrong side and sew it down against the strap, just below the slider. The slider should now travel to shorten or lengthen the drop.
Pull the slider toward the sewn left end to shorten; toward the right D-ring to lengthen.
No-hardware option: Instead of D-rings, sew each strap end directly to the top band over a 2 in (5 cm) window. Make a slider keeper: ch 9, work 8 sc for 8 rows, fold into a loop around both layers of the doubled strap, and seam the short ends. This holds by friction and is less secure than a metal triglide.
Cords
All cords are attached to the bag. Use main color or a contrast color.
Gathering cords (make 3)
These create the scrunchie ruching.
For each cord: Ch until the chain measures 40 in (101.5 cm) without stretching (about 160–180 ch). Sl st in the back bump of the 2nd ch from the hook and in each ch to the end. Fasten off, leaving tails for tassels.
You should have 3 cords of equal length.
Decorative hanging cords (make 2)
These attach at the strap rings.
For each cord: Ch until the chain measures 14 in (35.5 cm). Sl st in the back bump of each ch across. Fasten off.
Tassels (make 8)
Make 6 for the gathering-cord ends and 2 for the hanging cords.
Cut a 4 in (10 cm) piece of cardboard. Wrap yarn 20 times around the cardboard. Tie the wraps tightly at one edge with a 10 in (25.5 cm) strand (this becomes the hanging neck). Cut the opposite edge. Tie a second strand ½ in (1.3 cm) below the neck to form the tassel head. Trim ends even. Tassel length is about 3½ in (9 cm).
Join one tassel to each cord end, hiding the join inside the tassel neck. Optional: slide a bead onto the cord above each tassel and knot to hold it.
Assembly — scrunchie gathers
Work with the bag standing, top band up.
Cord 1 (lower scrunchie): Starting at the side, halfway between the two D-rings, weave one 40 in (101.5 cm) cord in and out of the ch-2 spaces of Mesh Rnd 6. Go all the way around (40 spaces). Pull until the mesh gathers into a soft ring, like a scrunchie. Tie a bow or a square knot at the starting side. Do not pull so tight that the base warps.
Cord 2 (middle scrunchie): Repeat through Mesh Rnd 12. Cinch to match Cord 1. Tie off at the same side so bows stack.
Cord 3 (upper scrunchie): Repeat through Mesh Rnd 18, just below the top band. Cinch slightly less than the lower cords so the rim stays open. Tie off.
The three cords divide the mesh into stacked, gathered rings. Loosen any cord for more capacity; tighten for a shorter, puffier bag.
Attach hanging cords: Fold each 14 in (35.5 cm) cord in half. Lark’s-head it onto a D-ring (or through the strap sewing window). Let both tasseled ends hang 5–6 in (12.5–15 cm) below the ring. Repeat on the other ring. These are the cords attached at the strap.
Weave in every remaining end. Steam-block the base only, if needed; do not flatten the gathered mesh.
Finishing and wear
- Fill the bag and adjust the three bows until the scrunches look even.
- Slide the strap shorter for shoulder wear, longer for crossbody.
- For groceries or a heavy load, loosen the gathering cords so the mesh can stretch (that is what the market mesh is for), then re-cinch for the styled look.
- Optional: sew a 10 in (25.5 cm) fabric circle to the inside of the base only. Do not line the mesh, or the scrunchie gathers will not show.
Care: Hand wash cold, reshape the base, and dry flat. Retie the cords after washing.
Quick stitch-count recap
| Section | Count | Check |
|---|---|---|
| Base Rnd 20 | 120 sc | 6 × 20 = 120 ✓ |
| Mesh | 40 sps × 18 rnds | 120 / 3 = 40 ✓ |
| Top Band Rnd 1 | 120 sc | 40 × 3 = 120 ✓ |
| Strap | 8 sc × 48 in | 8 sts ≈ 2¼ in; 192 rows ✓ |
| Gathering cords | 3 × 40 in | Mesh Rnds 6, 12, 18 |
Disclaimer: This pattern was generated by AI and should be reviewed for accuracy before use. While we strive for quality, AI-generated content may contain errors. Please verify measurements, stitch counts, charts, and instructions before beginning your project. Generated by purlJam.uk
Love this pattern?
Save this pattern to your free PurlJam libraryAccess your pattern anytime
Bookmark this page to access your pattern anytime