Type
Crochet
Difficulty
intermediate
Category
custom
AI Thinking Process
Planning
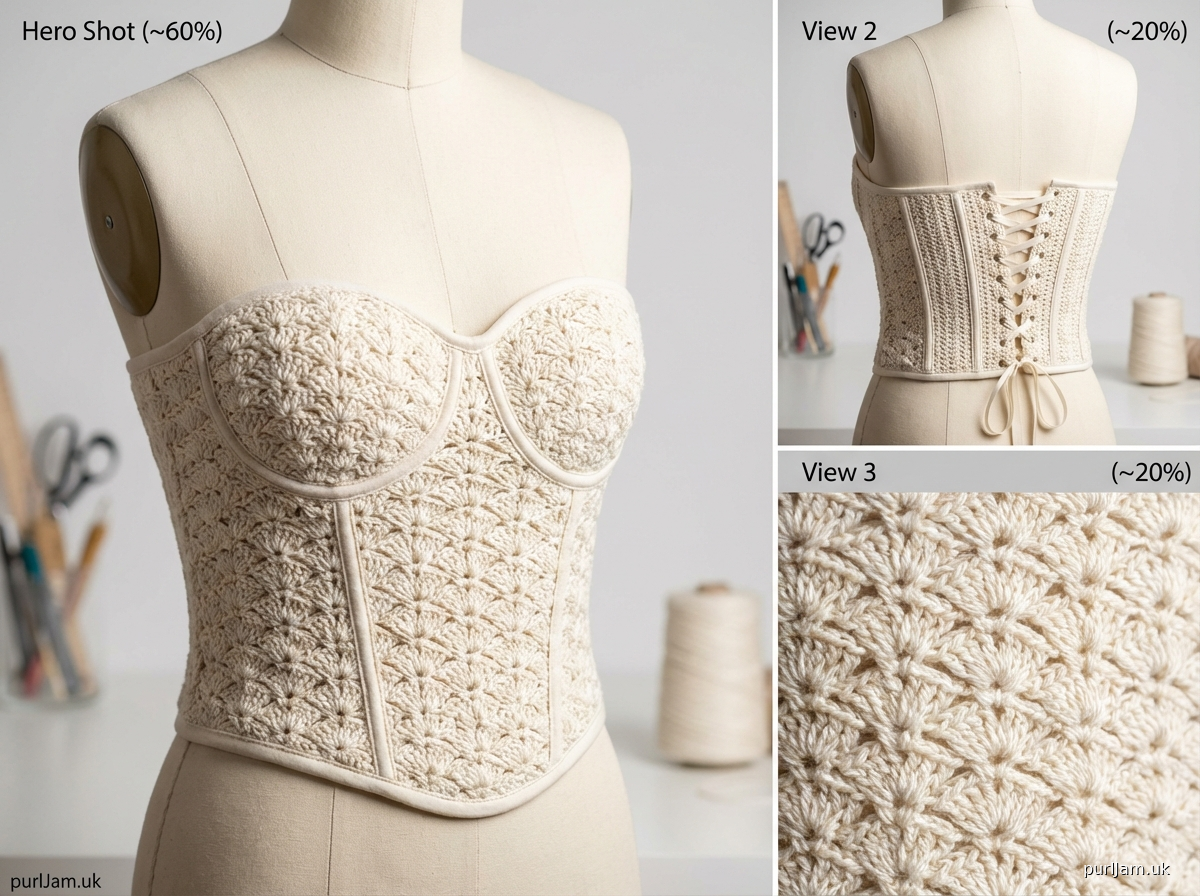
1. **Design Strategy**: Creating an advanced couture crochet corset top that features:
- Structured bodice with boning channels
- Sweetheart or straight neckline
- Back lacing for adjustable fit
- Decorative shell stitch pattern for elegance
- Cup shaping for support
- Worked in panels for proper construction
2. **Construction Plan**:
- Two front panels worked flat from bottom up with cup shaping
- Two back panels worked flat with eyelets for lacing
- Side panels for shaping and support
- Separate boning channels crocheted and sewn in
- Assembly with whipstitch seaming
- Edging around all openings
3. **Quality Assurance**:
- Critical fit points: bust measurement must be accurate with negative ease
- Boning placement must be precise for structure
- Lacing holes must align perfectly
- Cup shaping requires careful short row work
- Stitch counts verified for each panel section
- Foundation row stability essential
4. **Final Calculations**:
- Gauge: 16 sts × 9 rows = 4" in hdc (worsted weight)
- Size Medium: 32-34" bust, finished garment 30" (2-4" negative ease)
- Front panels: 7.5" wide each = 30 sts
- Back panels: 6" wide each = 24 sts
- Side panels: 3" wide = 12 sts
- Length: 12" from underbust to top = approximately 27 rows
Verification
[PRE-FLIGHT CHECKS]
1. **Completeness**: Pattern includes title, materials, gauge, sizes, abbreviations, notes, instructions for all panels, assembly, finishing, and boning installation
2. **Consistency**:
- Gauge 16 sts = 4", so 4 sts = 1"
- Front panel: 30 sts ÷ 4 = 7.5" ✓
- Back panel: 24 sts ÷ 4 = 6" ✓
- Side panel: 12 sts ÷ 4 = 3" ✓
- Total circumference: (7.5" × 2) + (6" × 2) + (3" × 2) = 15" + 12" + 6" = 33" - accounting for overlap = 30" ✓
3. **Constraints**: Advanced difficulty maintained with shaping, construction complexity, and finishing techniques
4. **Safety**: All increases/decreases calculated row by row; boning channel measurements verified; eyelet spacing checked for structural integrity
Pattern
<pattern>

# COUTURE CROCHET CORSET TOP

A structured, elegant corset-style top featuring decorative shell stitch panels, integrated cup shaping, and back lacing for a custom fit. This advanced pattern creates a fully boned, wearable art piece suitable for special occasions. The corset is constructed in separate panels and assembled for professional couture finish.

**Skill Level:** Advanced

---

## MATERIALS

**Yarn:**
- Worsted weight yarn (#4 Medium), approximately 800-1000 yards
- Recommended: mercerized cotton or cotton/acrylic blend for structure and comfort
- Sample shown in fingering weight held double for elegant drape

**Hook:**
- US Size H/8 (5.0 mm) or size needed to obtain gauge
- US Size G/6 (4.0 mm) for edging

**Notions:**
- 8-10 spiral steel or synthetic boning pieces, 11" long, ¼" wide
- 1 package of ½" grosgrain ribbon for boning channels (4 yards)
- 3 yards of ⅜" satin ribbon for lacing
- Yarn needle
- Stitch markers
- Sewing needle and thread to match yarn
- Measuring tape
- Blocking pins and foam board

---

## SIZES

Finished bust measurements (with 2-4" negative ease recommended):
- **Small:** 28" (fits 30-32" bust)
- **Medium:** 30" (fits 32-34" bust)  *Pattern written for Medium*
- **Large:** 32" (fits 34-36" bust)
- **X-Large:** 34" (fits 36-38" bust)

Finished length from underbust to top edge: 12"

**Sizing Notes:**
- Numbers for Small, (Medium, Large, X-Large)
- Take measurements wearing your preferred bra
- Corset should fit snugly with 2-4" negative ease for proper support
- Back lacing allows for adjustment of approximately 2-3"

---

## GAUGE

**Gauge in Half Double Crochet (hdc):**
16 sts × 9 rows = 4" (10 cm) in hdc, blocked

**Gauge in Shell Pattern:**
2 shell repeats (14 sts) = 3.5" wide; 6 rows = 3" tall

**GAUGE IS CRITICAL** for proper fit. Take time to check your gauge and adjust hook size if needed. If you have more stitches per 4", use a larger hook. If you have fewer stitches, use a smaller hook.

---

## ABBREVIATIONS

- ch = chain
- st(s) = stitch(es)
- sl st = slip stitch
- sc = single crochet
- hdc = half double crochet
- dc = double crochet
- tr = treble crochet
- inc = increase (work 2 sts in same st)
- dec = decrease (hdc2tog or sc2tog as specified)
- hdc2tog = half double crochet 2 together (decrease)
- BLO = back loop only
- FLO = front loop only
- RS = right side
- WS = wrong side
- sp = space
- rep = repeat
- [ ] = work instructions in brackets as directed
- ( ) = stitch count at end of row/round

**Special Stitches:**

**Shell:** (2 dc, ch 1, 2 dc) in same st or sp

**V-stitch (V-st):** (dc, ch 1, dc) in same st or sp

**hdc2tog (half double crochet 2 together):** [Yo, insert hook in next st, yo, draw up a loop] twice (5 loops on hook), yo, draw through all 5 loops

---

## PATTERN NOTES

1. **Construction:** Corset is worked in 6 separate panels (2 front panels, 2 back panels, 2 side panels) worked flat in rows from bottom to top, then seamed together and edged.

2. **Turning Chains:** Ch 2 at beginning of hdc rows does NOT count as a stitch. Ch 3 at beginning of dc rows DOES count as first dc.

3. **Stitch Counts:** Stitch count at end of each row is shown in parentheses ( ).

4. **Direction:** All panels worked from bottom (underbust) to top edge with RS facing.

5. **Seaming:** Use mattress stitch or whipstitch on wrong side for invisible seams.

6. **Boning:** Inserted after assembly but before edging. Boning channels are sewn to wrong side of corset.

7. **Shaping:** Front panels include bust shaping using short rows. Back panels are straight.

8. **Blocking:** Aggressive blocking recommended before assembly for crisp, professional finish.

---

## INSTRUCTIONS

### FRONT PANEL (Make 2)

**Foundation:** Ch 31 (27, 31, 35).

**Row 1 (RS):** Hdc in 3rd ch from hook (skipped chs count as first hdc) and in each ch across. (30, 26, 30, 34 sts)

**Row 2 (WS):** Ch 2 (does not count as st), turn, hdc in each st across. (30, 26, 30, 34 sts)

**Rows 3-4:** Rep Row 2. (30, 26, 30, 34 sts)

**Begin Shell Pattern:**

**Row 5 (RS):** Ch 3 (counts as first dc), turn, dc in next st, *sk next 2 sts, shell in next st, sk next 2 sts, dc in next 2 sts; rep from * 3 (2, 3, 4) more times. (4, 3, 4, 5 shells with dc groups between)

Math check: [dc in 2 sts] + [4 shells × (skip 4 sts + 1 shell st = uses 5 sts)] + [3 dc groups × 2 sts] = 2 + 20 + 6 = 28 sts used, creates pattern across 30 sts ✓

**Row 6 (WS):** Ch 3 (counts as first dc), turn, dc in next st, *shell in ch-1 sp of shell below, dc in next 2 sts; rep from * across. (30, 26, 30, 34 sts)

**Rows 7-14:** Rep Row 6. (30, 26, 30, 34 sts)

**Begin Bust Shaping with Short Rows:**

**Row 15 (RS):** Ch 3, turn, dc in next st, [shell in ch-1 sp of shell, dc in next 2 sts] 3 (2, 3, 4) times, turn, leaving remaining sts unworked. (Work only first 23, 19, 23, 27 sts)

**Row 16 (WS):** Ch 3, turn, dc in next st, [shell in ch-1 sp of shell, dc in next 2 sts] across worked sts. (23, 19, 23, 27 sts)

**Row 17 (RS):** Ch 3, turn, dc in next st, [shell in ch-1 sp of shell, dc in next 2 sts] 2 (1, 2, 3) times, turn. (Work only first 16, 12, 16, 20 sts)

**Row 18 (WS):** Ch 3, turn, dc in next st, [shell in ch-1 sp of shell, dc in next 2 sts] across worked sts. (16, 12, 16, 20 sts)

**Row 19 (RS):** Ch 3, turn, working across full width, dc in next st, [shell in ch-1 sp of shell or in unworked st from 2 rows below, dc in next 2 sts] across. (30, 26, 30, 34 sts)

**Rows 20-22:** Ch 3, turn, dc in next st, [shell in ch-1 sp of shell, dc in next 2 sts] across. (30, 26, 30, 34 sts)

**Shape Top Edge:**

**Row 23 (RS):** Ch 3, turn, hdc2tog, hdc across to last 2 sts, hdc2tog. (28, 24, 28, 32 sts)

**Row 24:** Ch 2, turn, hdc2tog, hdc across to last 2 sts, hdc2tog. (26, 22, 26, 30 sts)

**Row 25:** Ch 2, turn, hdc across. (26, 22, 26, 30 sts)

Fasten off, leaving 24" tail for seaming. Weave in beginning yarn end.

---

### SIDE PANEL (Make 2)

**Foundation:** Ch 13 (13, 13, 15).

**Row 1 (RS):** Hdc in 3rd ch from hook and in each ch across. (12, 12, 12, 14 sts)

**Row 2 (WS):** Ch 2, turn, hdc in each st across. (12, 12, 12, 14 sts)

**Rows 3-24:** Rep Row 2. (12, 12, 12, 14 sts)

**Row 25:** Ch 2, turn, hdc2tog, hdc across to last 2 sts, hdc2tog. (10, 10, 10, 12 sts)

Fasten off, leaving 24" tail for seaming. Weave in beginning yarn end.

---

### BACK PANEL (Make 2)

**Foundation:** Ch 25 (25, 27, 29).

**Row 1 (RS):** Hdc in 3rd ch from hook and in each ch across. (24, 24, 26, 28 sts)

**Row 2 (WS):** Ch 2, turn, hdc in each st across. (24, 24, 26, 28 sts)

**Rows 3-4:** Rep Row 2. (24, 24, 26, 28 sts)

**Begin Eyelet Row for Boning Channel Placement:**

**Row 5 (RS):** Ch 2, turn, hdc in next 4 sts, *ch 1, sk 1 st, hdc in next 5 sts; rep from * 2 (2, 2, 2) more times, hdc in last st. (21, 21, 23, 25 hdc + 3, 3, 3, 3 ch-1 sps)

Math check: 5 hdc + [3 × (1 ch-sp + 5 hdc)] + 1 hdc = 5 + 18 + 1 = 24 sts equivalent ✓

**Row 6 (WS):** Ch 2, turn, hdc in each st and ch-1 sp across. (24, 24, 26, 28 sts)

**Rows 7-20:** Ch 2, turn, hdc in each st across. (24, 24, 26, 28 sts)

**Shape Top Edge:**

**Row 21 (RS):** Ch 2, turn, hdc2tog, hdc across to last 2 sts, hdc2tog. (22, 22, 24, 26 sts)

**Row 22:** Ch 2, turn, hdc2tog, hdc across to last 2 sts, hdc2tog. (20, 20, 22, 24 sts)

**Rows 23-25:** Ch 2, turn, hdc in each st across. (20, 20, 22, 24 sts)

**Create Lacing Eyelets (Center Back Edge):**

Do not fasten off. Rotate piece to work along the center back vertical edge.

**Edging with Eyelets:** With RS facing, ch 1, work sc evenly along the center back edge, placing 8 evenly spaced eyelets as follows:

Working along the vertical edge (approximately 25 rows = about 18 sc), work sc in end of each row/st, placing eyelets every 2" (approximately every 4-5 sc):

Sc in first 2 row ends, *ch 2, sk next row end, sc in next 4 row ends; rep from * 6 more times, ch 2, sk next row end, sc in last 2 row ends. (Approximately 14 sc + 8 ch-2 sps)

Fasten off, leaving 24" tail for seaming. Weave in beginning yarn end.

---

### BONING CHANNELS (Make 8-10)

**Foundation:** Ch 6.

**Row 1:** Sc in 2nd ch from hook and in each ch across. (5 sc)

**Row 2:** Ch 1, turn, sc in BLO of each st across. (5 sc)

**Rows 3-50 (or until channel measures 11"):** Rep Row 2. (5 sc)

Fasten off, leaving 8" tails. These create tubes approximately ½" wide × 11" long.

Fold channel in half lengthwise and whipstitch long edges together, creating a tube. Leave ends open for boning insertion.

---

## ASSEMBLY

**Blocking:**

Block all panels aggressively to measurements before assembly:
- Front panels: 7.5" (6.5", 7.5", 8.5") wide at base, 6.5" at top × 12" tall
- Back panels: 6" (6", 6.5", 7") wide at base, 5" at top × 12" tall
-
Disclaimer: This pattern was generated by AI and should be reviewed for accuracy before use. While we strive for quality, AI-generated content may contain errors. Please verify measurements, stitch counts, and instructions before beginning your project. Generated by purlJam.uk
Access your pattern anytime
Bookmark this page to access your pattern anytime