Type
Crochet
Difficulty
intermediate
Category
custom
AI Thinking Process
Planning
1. **Design Strategy**: A square coaster worked flat in rows of UK double crochet (dc) using tapestry crochet/intarsia colour-change technique to depict a cow-print cat face. Worsted yarn, 4 mm hook, ~10 cm finished square.
2. **Construction Plan**: Worked flat in rows from bottom to top, following an attached 20x20 colour chart, with a single-round dc border for tidy edges.
3. **Quality Assurance**:
- Carry yarn loosely behind work to avoid puckering
- Maintain even tension at colour changes (complete last yo of previous stitch with new colour)
- Count stitches every row — easy to lose edge stitches in tapestry crochet
4. **Final Calculations**: Tension: 18 dc x 20 rows = 10 cm in dc. Chart 20 sts wide x 20 rows tall → ~11 cm x 10 cm before border. Foundation chain: 21 ch (20 dc + 1 turning ch that does not count). Border adds ~1 cm on each side → final ~12 cm square.
Verification
1. **Completeness**: All required sections included (materials, tension, abbreviations, notes, instructions, chart reference, finishing). ✓
2. **Consistency**: 20 sts × (10 cm / 18 sts per 10 cm) = 11.1 cm wide; 20 rows × (10 cm / 20 rows) = 10 cm tall. With border ≈ 12 cm square. ✓
3. **Constraints**: Square coaster ✓, cow cat motif via attached chart ✓, UK terminology ✓, metric first ✓, no inline chart duplication ✓.
4. **Safety**: Stitch counts verified: each row 20 dc; border round = 20+20+20+20 + 4 corner ch-1 sp = 80 dc + 4 corners. ✓
Pattern
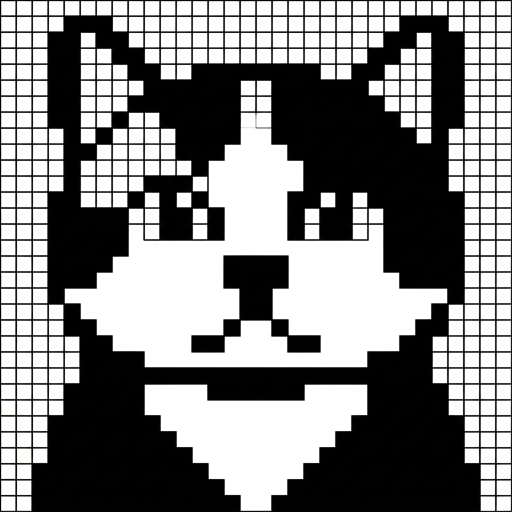
# Cow Cat Square Coaster

A charming square coaster featuring a black-and-white cow-print cat face, worked flat in UK double crochet using simple tapestry/colourwork techniques. The finished coaster is sturdy, absorbent, and just the right size for a mug. Perfect for an intermediate crocheter looking to practise colour changes.

---

## Finished Measurements
Approximately **12 cm × 12 cm** (4¾" × 4¾") including border.

---

## Materials

- **Yarn**: Worsted weight (Aran) 100% cotton, approximately:
  - **MC (White / cream)** — 20 m
  - **CC1 (Black)** — 15 m
  - **CC2 (Pink)** — 1 m (nose/inner ears)
- **Hook**: 4 mm (UK 8 / US G-6) crochet hook
- **Notions**: Tapestry needle, scissors, stitch markers (optional), bobbins for colour management (optional)

---

## Tension (Gauge)

**18 dc × 20 rows = 10 cm square** in UK double crochet using 4 mm hook.

Take time to check your tension — a tight tension makes a denser coaster (good!), but it should still measure close to 10 cm over 18 sts.

---

## Abbreviations (UK Terms)

- **ch** — chain
- **dc** — double crochet (= US single crochet)
- **sl st** — slip stitch
- **st(s)** — stitch(es)
- **MC** — main colour (white)
- **CC1** — contrast colour 1 (black)
- **CC2** — contrast colour 2 (pink)
- **RS / WS** — right side / wrong side
- **rep** — repeat

---

## Pattern Notes

- Worked flat in rows, then a single border round is added.
- The turning ch-1 at the start of each row **does not count as a stitch**.
- Work the first dc into the first stitch of the row, and the last dc into the last stitch.
- Stitch counts are given at the end of each row in brackets — always 20 sts across the main motif.
- **Colour changes**: On the stitch *before* a colour change, work the dc until 2 loops remain on the hook, then yarn over with the new colour and pull through both loops to complete the stitch. This places the new colour neatly on the next stitch.
- Carry unused colours loosely along the back of the work (WS) over short distances (≤ 4 sts). For longer floats, use small bobbins or cut and rejoin.
- The motif is symmetrical horizontally — work confidently and trust the chart.

---

## Attached Stitch Chart

A separate **colour chart panel** is attached to this pattern. **Use the attached chart** for the visual grid — it is not reproduced here in text form.

**Chart placement:**
- The chart is used for **Rows 1–20** of the coaster main square (between the foundation row and the border round).
- The chart is **20 stitches wide × 20 rows tall** — each square = 1 dc.

**How to read the chart:**
- The chart is read **from the bottom up**.
- **Row 1 (RS)**: read the chart from **right to left**.
- **Row 2 (WS)**: read the chart from **left to right**.
- Continue alternating direction every row through Row 20.
- **Colour key** (shown on the attached chart):
  - White square = MC (white)
  - Black square = CC1 (black)
  - Pink square = CC2 (pink) — used only for the nose and inner ears (a few stitches on Rows 9–12, refer to chart)

**Colour-change handling:**
- Change colour on the last yarn over of the stitch *before* the new colour begins.
- Keep floats on the WS; do not pull tight.
- CC2 (pink) appears in a small isolated area — you may use a short length (~1 m) on a bobbin or cut and weave in ends.

---

## Instructions

### Foundation
With **MC**, ch **21**.

### Row 1 (RS)
1 dc in 2nd ch from hook, 1 dc in each ch across, changing to chart colours as indicated on the attached chart from stitch 1. Turn. **(20 sts)**

> Tip: If you find it easier, work Row 1 entirely in MC, then begin colour changes on Row 2. The chart's first row is mostly MC anyway.

### Rows 2–20
Ch 1 (does not count), 1 dc in each of the 20 sts across, following the **attached chart** for colour placement (read right-to-left on RS rows, left-to-right on WS rows). Turn. **(20 sts each row)**

After Row 20, fasten off CC1 and CC2, leaving MC attached for the border. Weave in CC1 and CC2 ends on the WS.

---

### Border Round (RS facing)

With MC and RS facing, ch 1 (does not count).

1. Work **20 dc** evenly across the top edge (1 dc in each st of Row 20).
2. **Corner**: (1 dc, ch 1, 1 dc) in the corner stitch.
3. Work **20 dc** evenly down the side edge (approximately 1 dc per row — adjust by working 1 dc in every row-end).
4. **Corner**: (1 dc, ch 1, 1 dc) in the corner.
5. Work **20 dc** across the bottom edge (1 dc in each unworked loop of the foundation chain).
6. **Corner**: (1 dc, ch 1, 1 dc) in the corner.
7. Work **20 dc** evenly up the second side edge.
8. **Corner**: (1 dc, ch 1, 1 dc) in the starting corner.
9. Join with a sl st to the first dc of the round.

**Total border count**: 80 dc + 4 corner ch-1 spaces (with 2 dc at each corner, the corners contain 8 dc + 4 ch-1 sps). ✓

Fasten off, leaving a 15 cm tail.

---

## Finishing

1. **Weave in all ends** securely on the WS using a tapestry needle. Take particular care around colour-change points.
2. **Block the coaster**: Lightly spray with water and pin out to a 12 cm square on a blocking mat. Allow to dry completely. Blocking evens out the tapestry stitches and squares up the edges beautifully.
3. Optional: For extra body, lightly steam-press on the WS (cotton tolerates heat well — avoid acrylic).

---

## Tips & Troubleshooting

- **Stitches leaning?** Tapestry crochet can pull slightly diagonally. Blocking corrects this.
- **Floats showing through?** Choose colours of similar tonal value, or work with smaller bobbins instead of carrying.
- **Edges uneven?** Make sure you're working into the very first and very last stitch of each row — easy to miss when concentrating on colour changes.
- **Want a set?** Make 4–6 for a coordinated set. The pattern uses very little yarn per coaster.

Enjoy your charming cow cat coaster! 🐄🐱
Disclaimer: This pattern was generated by AI and should be reviewed for accuracy before use. While we strive for quality, AI-generated content may contain errors. Please verify measurements, stitch counts, and instructions before beginning your project. Generated by purlJam.uk
Access your pattern anytime
Bookmark this page to access your pattern anytime