Type
Knitting
Difficulty
intermediate
Category
custom
AI Thinking Process
Planning
Verification
Pattern
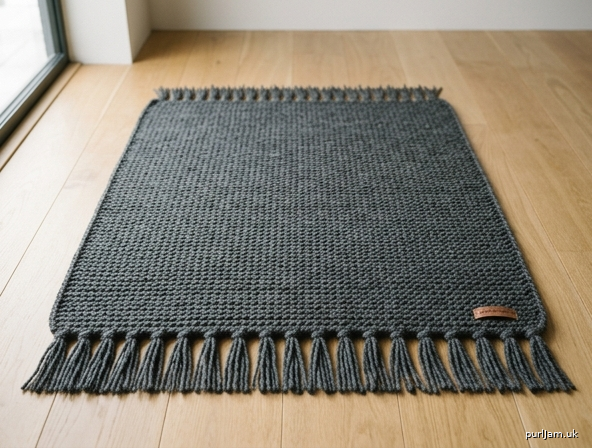
Cozy Garter Floor Rug
A simple, sturdy rectangular floor rug worked entirely in garter stitch. Perfect for beginners: no shaping, no purling required if you knit every row, and a reversible fabric that lies flat. Finished size is at least 24 × 28 inches — ideal as a bedside mat, hearth rug, or play-area accent.
Materials
- Yarn: Worsted weight (category 4), approximately 900 yards (823 m).
Choose a durable, washable fiber (cotton, cotton blend, superwash wool, or acrylic). Darker or heathered colors hide wear well.
Example: 5 skeins of a 180–200 yd worsted, or equivalent. - Needles: US 8 (5 mm) straight or circular needles (circular recommended for the wide cast-on; 24–32" / 60–80 cm cable is comfortable).
Use the size needed to obtain gauge. - Notions:
- Tapestry needle
- Scissors
- Measuring tape
- Optional: sturdy cardboard or book ~5–6" wide for cutting fringe; non-slip rug pad or rug-backing spray for safety on hard floors
- Optional stitch marker to mark the right side (garter looks similar on both sides)
Gauge
18 stitches and 36 rows = 4" × 4" (10 × 10 cm) in garter stitch, blocked.
(Garter stitch = knit every row.)
Check your gauge.
Cast on 22–24 stitches, work 40 rows in garter, bind off, wet-block, and measure the center 4".
- Too few stitches per 4" (fabric too loose): go down a needle size.
- Too many stitches per 4" (fabric too tight): go up a needle size.
A firm, dense fabric is best for a floor rug.
Finished Size
24" wide × 28" long (61 × 71 cm), not including optional fringe.
Size is easily adjusted: add or remove stitches in multiples of 2 for width; work more or fewer rows for length.
Abbreviations (US)
- BO – bind off
- CO – cast on
- k – knit
- RS – right side
- st(s) – stitch(es)
- WS – wrong side
Pattern Notes
- The entire rug is worked flat in garter stitch (knit every row). Both sides look the same; you may place a marker on the first row to track the “public” side if desired.
- Slip the first stitch of every row purlwise with yarn in front for a neat chain edge (optional but recommended), then bring yarn to back and knit the rest of the row.
- Weave in ends as you go if working stripes.
- For a thicker, heavier rug you may hold two strands of worsted together; if you do, swatch carefully and expect to use roughly twice the yardage and a larger needle (often US 10½ / 6.5 mm) to keep a flexible fabric. Instructions below assume one strand.
- Safety: Place a non-slip pad underneath or apply rug backing before using on hard floors.
Instructions
Rug Body
Using US 8 (5 mm) needles and worsted yarn, CO 108 stitches.
(Math check: 108 sts ÷ 18 sts per 4" = 6 units × 4" = 24" width ✓)
Row 1 (RS): Knit all stitches.
Row 2 (WS): Knit all stitches.
Repeat Rows 1–2 (i.e., knit every row) until the piece measures 28" (71 cm) from the cast-on edge, or until you have worked 252 rows total.
(Math check: 252 rows ÷ 36 rows per 4" = 7 units × 4" = 28" length ✓)
End after a WS row so the next row is a RS row for bind-off (optional preference only).
Next row: BO all stitches knitwise. Cut yarn, leaving a 6–8" (15–20 cm) tail.
Optional Simple Stripes (Beginner Variation)
Work in 4" (36-row) or 2" (18-row) stripes, changing colors at the start of a RS row. Carry unused yarn loosely up the side only if stripes are narrow; otherwise cut and weave in ends for a cleaner edge. Total row count remains 252 so length stays 28".
Finishing
- Weave in all ends securely with a tapestry needle on the WS (or on both sides, since garter is reversible). For floor use, weave ends in opposite directions and trim close after blocking so they cannot snag.
- Block: Soak the rug in lukewarm water with a little wool wash (or mild soap for cotton/acrylic) for 15–20 minutes. Gently squeeze out water—do not wring. Roll in a towel to remove excess moisture. Lay flat on a blocking surface, pin to exactly 24" × 28" (or your preferred final measurements), and let dry completely. Blocking evens the fabric and sets the size.
- Optional fringe (adds ~3–4" to each short end):
- Cut strands of yarn 10–12" (25–30 cm) long.
- For each fringe bundle, use 3–4 strands. Fold in half.
- With a crochet hook or fingers, pull the folded loop through a stitch along the cast-on or bind-off edge, then pull the cut ends through the loop and tighten (lark’s head knot).
- Space bundles evenly every 1–2 stitches across both short ends.
- Trim ends even.
Fringe uses extra yarn (approximately 50–100 yards); plan accordingly.
- Non-slip finish (strongly recommended):
- Place a commercial non-slip rug pad cut to size underneath, or
- Apply a thin, even layer of rug-backing spray or puffy fabric paint in a grid on the back and let cure fully per product instructions.
- Place on the floor and enjoy. Shake out or spot-clean as needed; follow yarn-care label for fuller washes.
Tips for Success
- Count stitches every 20–30 rows until the width feels automatic—108 is easy to lose track of on a wide piece.
- If your row gauge differs, simply knit to the measured length of 28" rather than counting exactly 252 rows.
- Want a larger rug? Add stitches in multiples of 2 (each 2 sts ≈ ½") and/or extra rows (each 9 rows ≈ 1"). Recalculate yardage upward roughly in proportion to area.
- Cotton worsted makes a great washable kitchen or bath mat; wool or wool-blend feels cozier by the bed.
Inline validation summary
- Cast-on: 108 sts → 24" at 18 sts/4" ✓
- Length: 252 rows → 28" at 36 rows/4" ✓
- No shaping; stitch count remains 108 until bind-off ✓
Your beginner garter floor rug is complete. Happy knitting!
Disclaimer: This pattern was generated by AI and should be reviewed for accuracy before use. While we strive for quality, AI-generated content may contain errors. Please verify measurements, stitch counts, charts, and instructions before beginning your project. Generated by purlJam.uk
Love this pattern?
Save this pattern to your free PurlJam libraryAccess your pattern anytime
Bookmark this page to access your pattern anytime