Type
Knitting
Difficulty
intermediate
Category
custom
AI Thinking Process
Planning
Verification
Pattern
Cozy Garter Hooded Scarf
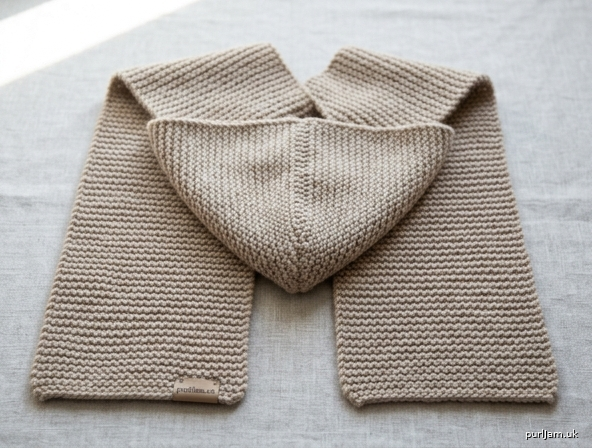
A soft, beginner-friendly hooded scarf (sometimes called a scoodie) worked entirely in garter stitch. The long rectangle is folded and seamed at the center to create a simple hood; the two ends become the scarf tails that hang in front. Perfect first garment-style project—only the knit stitch is used.
Materials
- Worsted weight yarn: 700 yards (640 m)
- US 8 (5 mm) straight or circular needles
- Yarn needle
- 2 stitch markers (optional, for marking hood section)
- Scissors
Gauge
16 sts and 32 rows = 4" (10 cm) in garter stitch (knit every row), after blocking. Gauge is important for the finished width and hood fit. Adjust needle size if necessary to obtain gauge.
Sizes
One size (adult) Finished measurements (after seaming):
- Scarf width / hood depth: 10" (25.5 cm)
- Each scarf tail: 24" (61 cm)
- Hood height (neck to top): 12" (30.5 cm)
- Total length before seaming: 72" (183 cm)
Abbreviations
- BO: bind off
- CO: cast on
- k: knit
- st(s): stitch(es)
- RS: right side
- WS: wrong side
Pattern Notes
- The entire scarf is worked flat in garter stitch (knit every row). Both sides look the same.
- Use the long-tail cast-on or any stretchy cast-on you prefer.
- Measurements are taken from the cast-on edge with the piece lying flat; do not stretch.
- The hood is formed in finishing by folding the center section and seaming one selvedge only. The opposite selvedge becomes the face opening.
- To lengthen or shorten the tails, simply work more or fewer inches before and after the hood section; keep the hood section 24" for proper height.
- Inline validation: 40 sts ÷ 4 sts/in = 10" width ✓; 24" + 24" + 24" = 72" total length ✓; hood section folded in half = 12" height ✓.
Instructions
Scarf CO 40 sts.
Work in garter stitch (k every row) until the piece measures 24" (61 cm) from the cast-on edge.
Place a removable marker at each end of the row (or simply make a note of the measurement)—this marks the start of the hood section.
Continue in garter stitch until the piece measures 48" (122 cm) from the cast-on edge (hood section is now 24" / 61 cm long). (24" tail + 24" hood = 48" ✓)
Place markers (or note the measurement) to mark the end of the hood section.
Continue in garter stitch until the piece measures 72" (183 cm) from the cast-on edge. (48" + 24" second tail = 72" ✓)
BO all sts knitwise. Cut yarn, leaving a 24" (61 cm) tail for seaming.
Finishing
Weave in the cast-on tail and any other ends (reserve the long BO tail for seaming).
Block the rectangle gently to measurements if desired: 10" × 72" (25.5 × 183 cm). Garter stitch relaxes nicely with a light steam or wet block.
Form the hood
- Lay the scarf flat on a table with RS facing up if you can distinguish one (garter is reversible, so either side works).
- Locate the center hood section between the 24" and 48" marks.
- Fold this 24" section in half so the 24" mark meets the 48" mark, bringing WS together (or RS together if you prefer the seam on the inside). The fold is the top of the hood; the matched edges sit at the neckline.
- Using the long yarn tail and yarn needle, seam the two layers of one selvedge together from the fold down to the neckline (a 12" / 30.5 cm seam). Use mattress stitch for a flat join or whipstitch for simplicity. This seam becomes the back of the hood.
- Leave the opposite selvedge completely open—this is the face opening.
- The two 24" tails now hang freely from either side of the hood base.
Weave in the remaining seaming tail. Add optional fringe, tassels, or a pom-pom to the scarf ends if desired.
Wear
Place the hood on your head with the seam at the back. Wrap or leave the tails hanging in front. The 10" fabric depth gives comfortable coverage without bulk.
Enjoy your handmade hooded scarf!
Disclaimer: This pattern was generated by AI and should be reviewed for accuracy before use. While we strive for quality, AI-generated content may contain errors. Please verify measurements, stitch counts, and instructions before beginning your project. Generated by purlJam.uk
Love this pattern?
Save this pattern to your free PurlJam libraryAccess your pattern anytime
Bookmark this page to access your pattern anytime