Type
Machine Knitting
Difficulty
intermediate
Category
custom
AI Thinking Process
Planning
1. **Design Strategy**: Creating a Fair Isle scarf with D&D (Dungeons & Dragons) influence requires incorporating iconic gaming motifs such as d20 dice, dragons, swords, or dungeon elements. For a beginner-friendly pattern, I'll design simple geometric motifs that evoke D&D themes without requiring complex color changes. The scarf will use 2-color Fair Isle with repeating motifs to make it manageable on a standard gauge machine.
2. **Construction Plan**:
- Flat panel construction, knitted lengthwise for consistent Fair Isle patterning
- Standard gauge machine (4.5mm)
- Two-color Fair Isle technique using slip stitch or Fair Isle carriage
- Simple geometric d20 die motifs and dragon scale patterns
- Finished dimensions: approximately 8" × 60" (20cm × 152cm) - a classic scarf size
- Worsted weight yarn for good stitch definition and warmth
3. **Quality Assurance**:
- Ensure charts are symmetrical and easy to follow
- Verify stitch counts divide evenly for pattern repeats
- Include clear carriage setting changes for colorwork sections
- Add specific float management instructions to prevent puckering
- Include blocking instructions critical for Fair Isle
4. **Final Calculations**:
- Gauge: 22 sts × 30 rows = 4" (10cm) in Fair Isle at T7
- Width: 8" × 5.5 sts/inch = 44 sts (use 45 for pattern repeat symmetry)
- Length: 60" × 7.5 rows/inch = 450 rows (adjustable)
- Pattern repeat: 15 sts × 20 rows for main motif
Verification
[PRE-FLIGHT CHECKS]
1. **Completeness**: ✓ All required sections planned - materials, gauge, charts, instructions, finishing
2. **Consistency**: ✓ 45 sts ÷ 15-st repeat = 3 full repeats across width; gauge math verified
3. **Constraints**: ✓ Beginner-friendly with 2-color Fair Isle; D&D themed charts included; worsted weight specified
4. **Safety**: ✓ Math checked: 45 sts at 5.5 sts/inch = 8.18" ≈ 8" width; pattern repeats are symmetrical
5. **Colorwork Requirements**: ✓ Multiple charts planned (d20 die, dragon scales, geometric border); color key and reading instructions included
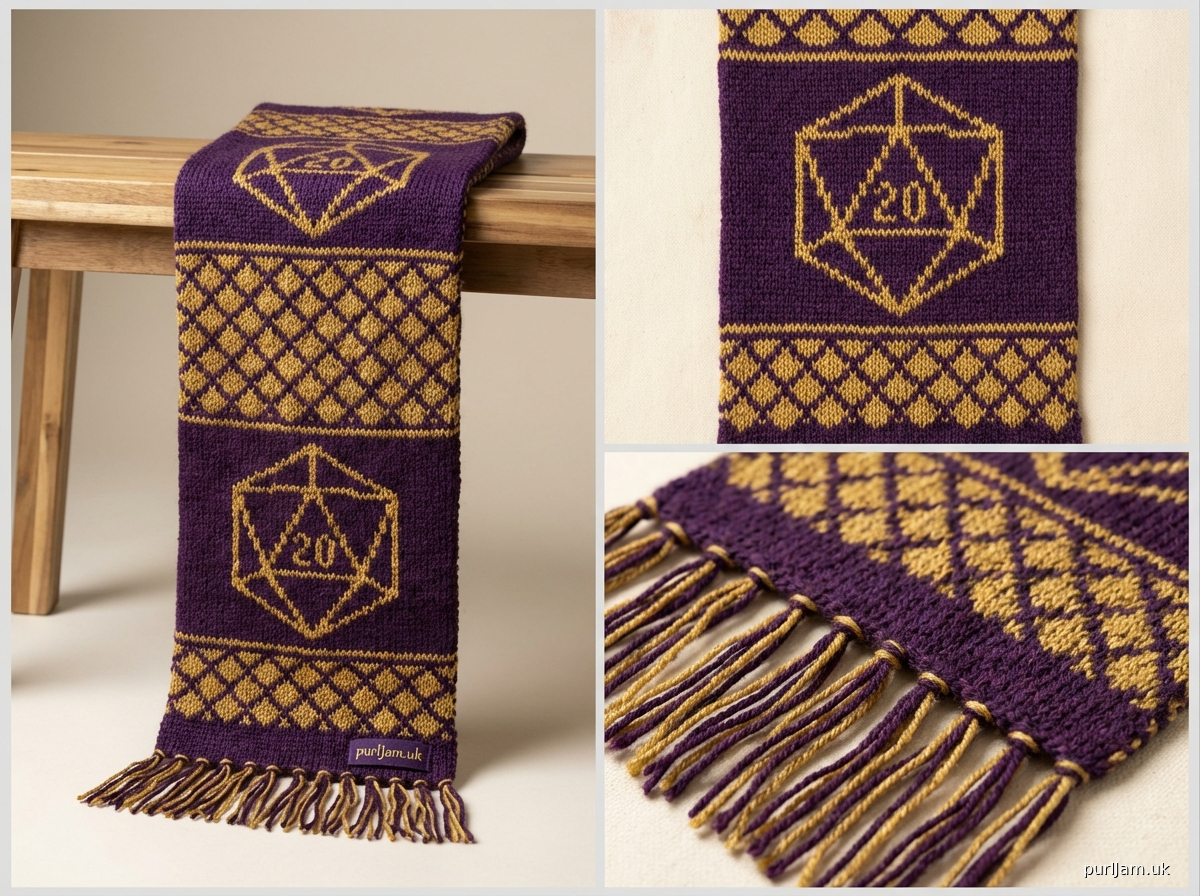
Pattern
<pattern>

# **CRITICAL HIT SCARF**
### A Fair Isle Scarf for Adventurers
*Difficulty: Beginner*

Embark on your knitting quest with this D&D-inspired Fair Isle scarf featuring d20 dice motifs and dragon scale patterns. Perfect for beginner colorwork knitters, this pattern uses simple two-color Fair Isle technique to create a bold accessory worthy of any adventuring party.

---

## **FINISHED MEASUREMENTS**
- Width: 8" (20cm)
- Length: 60" (152cm), adjustable

---

## **MATERIALS**

**Yarn:**
- **Main Color (MC)**: 350 yards worsted weight yarn
  - *Suggested: Deep purple or black for "dungeon darkness"*
- **Contrast Color (CC)**: 250 yards worsted weight yarn
  - *Suggested: Metallic gold or bright red for "dragon treasure" or "critical hit"*

**Notions:**
- Standard gauge knitting machine (4.5mm)
- Waste yarn for cast-on
- Ravel cord
- Cast-on comb and weights
- Transfer tools
- Tapestry needle for finishing
- Blocking pins and mat
- Steamer or spray bottle for blocking

**Machine Compatibility:**
- Standard gauge machines (Brother, Singer, Studio/Silver Reed)
- Suitable for punchcard or electronic machines
- Fair Isle carriage or slip stitch technique
- Does NOT require ribber

---

## **GAUGE/TENSION**
22 sts × 30 rows = 4" (10cm) in Fair Isle pattern at **T7** (Main Tension Dial)

**CRITICAL**: Fair Isle gauge differs from stockinette. Always swatch in pattern with both colors.

*Tension Settings:*
- Main Bed: T7 for both MC and CC
- If using Fair Isle carriage: Set both yarn feeders to T7

---

## **ABBREVIATIONS & TERMS**
- **RC**: Row Counter
- **COL**: Carriage on Left
- **COR**: Carriage on Right
- **MC**: Main Color
- **CC**: Contrast Color
- **T7**: Tension dial set to 7
- **WY**: Waste Yarn
- **HP**: Holding Position (needles out of work)
- **UWP**: Upper Working Position (needles in work)
- **carr**: Carriage

---

## **PATTERN NOTES**

### Fair Isle Method Options:

**OPTION 1: Fair Isle Carriage (Recommended)**
- Thread MC in Feeder 1, CC in Feeder 2
- Set both yarn tensions to T7
- Machine will automatically knit both colors according to needle selection
- Electronic machines: Program charts as written
- Punchcard machines: Punch cards for each chart section

**OPTION 2: Slip Stitch Method (Manual)**
- Use single bed carriage
- Push needles to HP (holding position) for contrast color stitches
- Set slip lever; push selected needles to D position
- More manual but works on all machines

**Float Management:**
- No floats exceed 5 stitches in these charts
- Catch floats longer than 5 sts by twisting yarns
- Keep yarn tension consistent for even floats

**Color Transitions:**
- When changing chart sections, carry both yarns up the side
- Twist yarns every 4-6 rows to prevent long floats at edges
- Secure yarn tails in first/last stitches

---

## **CHARTS & COLORWORK PATTERNS**

### **CHART KEY**
- **□** = MC (Main Color - Background)
- **■** = CC (Contrast Color - Motif)

---

### **CHART A: D20 DIE MOTIF** (15 sts × 20 rows)
*Represents the iconic 20-sided die - every adventurer's favorite!*

```
Row 20: □□□□□■■■□□□□□□□
Row 19: □□□□■■■■■□□□□□□
Row 18: □□□■■□■□■■□□□□□
Row 17: □□■■□□■□□■■□□□□
Row 16: □□■■□■■■□■■□□□□
Row 15: □■■■■■■■■■■■□□□
Row 14: □■■□□□■□□□■■□□□
Row 13: □■■□□■■■□□■■□□□
Row 12: □■■□■■□■■□■■□□□
Row 11: □■■□■□□□■□■■□□□
Row 10: □■■□■■□■■□■■□□□
Row 9:  □■■□□■■■□□■■□□□
Row 8:  □■■□□□■□□□■■□□□
Row 7:  □■■■■■■■■■■■□□□
Row 6:  □□■■□■■■□■■□□□□
Row 5:  □□■■□□■□□■■□□□□
Row 4:  □□□■■□■□■■□□□□□
Row 3:  □□□□■■■■■□□□□□□
Row 2:  □□□□□■■■□□□□□□□
Row 1:  □□□□□□■□□□□□□□□
```
**Repeat**: Work Chart A once across 15 sts

---

### **CHART B: DRAGON SCALES** (15 sts × 12 rows)
*Repeating scales pattern for borders and transitions*

```
Row 12: ■■■□□□■■■□□□■■■
Row 11: ■■■□□□■■■□□□■■■
Row 10: □■■■□□□■■■□□□■■
Row 9:  □□■■■□□□■■■□□□■
Row 8:  □□□■■■□□□■■■□□□
Row 7:  □□□■■■□□□■■■□□□
Row 6:  ■□□□■■■□□□■■■□□
Row 5:  ■■□□□■■■□□□■■■□
Row 4:  ■■■□□□■■■□□□■■■
Row 3:  ■■■□□□■■■□□□■■■
Row 2:  □■■■□□□■■■□□□■■
Row 1:  □□■■■□□□■■■□□□■
```
**Repeat**: Work Chart B once across 15 sts

---

### **CHART C: GEOMETRIC BORDER** (15 sts × 8 rows)
*Simple border pattern for scarf ends*

```
Row 8: ■■■■■■■■■■■■■■■
Row 7: □■■■□□□■□□□■■■□
Row 6: □□■■□□□■□□□■■□□
Row 5: □□□■■□■■■□■■□□□
Row 4: □□□■■□■■■□■■□□□
Row 3: □□■■□□□■□□□■■□□
Row 2: □■■■□□□■□□□■■■□
Row 1: ■■■■■■■■■■■■■■■
```
**Repeat**: Work Chart C once across 15 sts

---

### **HOW TO READ CHARTS**
1. Read RS (odd) rows from RIGHT to LEFT
2. Read WS (even) rows from LEFT to RIGHT
3. Charts show 15 sts; work 3 complete repeats across 45 needle width
4. Row numbers start at bottom (Row 1) and move upward
5. Each chart section is worked continuously before moving to next section

---

## **PATTERN INSTRUCTIONS**

### **SETUP & CAST-ON**

**Machine Setup:**
1. Set main tension dial to **T7**
2. If using Fair Isle carriage, thread MC in Feeder 1, CC in Feeder 2, both at T7
3. Place carriage on left side (COL)

**Cast-On with Waste Yarn:**
1. Using WY and ravel cord, cast on 45 sts using closed edge cast-on method
2. Push needles -22 to +23 to UWP (45 needles total centered on 0)
3. *Math check: 45 sts ÷ 22 sts per 4" = 8.18" width ✓*
4. Hang cast-on comb and weights
5. Knit 8-10 rows WY at T10 to establish fell
6. Knit 1 row ravel cord
7. RC 000

---

### **SCARF BODY**

**SECTION 1: Beginning Border**
- Thread MC as working yarn, RC 000, COR
- Knit 6 rows MC in stockinette
- RC 006

**SECTION 2: First Geometric Border (Chart C)**
- Thread CC into machine (using Fair Isle carriage or manual selection)
- Set up Chart C pattern on machine:
  - *Electronic: Program Chart C, set for 3 repeats across width*
  - *Punchcard: Insert Chart C card, lock on Row 1*
  - *Manual: Select needles according to chart row*

- **RC 006, COR**, begin Chart C:
  - Row 1: Knit COR to COL following chart (all CC stitches)
  - Rows 2-8: Continue following Chart C pattern
  - RC 014
- *Verify: 8 rows worked for Chart C ✓*

**SECTION 3: Dragon Scales Transition (Chart B)**
- **RC 014, COR**, begin Chart B:
  - Rows 1-12: Follow Chart B pattern
  - RC 026
- *Verify: 12 rows worked for Chart B ✓*

**SECTION 4: D20 Die Section (Chart A) - REPEAT**
- **RC 026, COR**, begin Chart A:
  - Rows 1-20: Follow Chart A pattern
  - RC 046

- Knit 4 rows MC only (stockinette)
- RC 050

- **RC 050, COR**, repeat Chart A:
  - Rows 1-20: Follow Chart A pattern
  - RC 070

- Knit 4 rows MC only
- RC 074

- **RC 074, COR**, repeat Chart A:
  - Rows 1-20: Follow Chart A pattern
  - RC 094

**SECTION 5: Center Dragon Scales (Chart B)**
- **RC 094, COR**, begin Chart B:
  - Rows 1-12: Follow Chart B pattern
  - RC 106

**SECTION 6: Stockinette Spacer**
- Knit 40 rows MC only
- RC 146
- *This creates breathing room in the center section*

**SECTION 7: Center D20 Feature (Chart A)**
- **RC 146, COR**, begin Chart A:
  - Rows 1-20: Follow Chart A pattern
  - RC 166

**SECTION 8: Stockinette Spacer**
- Knit 40 rows MC only
- RC 206

**SECTION 9: Dragon Scales Return (Chart B)**
- **RC 206, COR**, begin Chart B:
  - Rows 1-12: Follow Chart B pattern
  - RC 218

**SECTION 10: D20 Die Section (Chart A) - REPEAT**
- **RC 218, COR**, begin Chart A:
  - Rows 1-20: Follow Chart A pattern
  - RC 238

- Knit 4 rows MC only
- RC 242

- **RC 242, COR**, repeat Chart A:
  - Rows 1-20: Follow Chart A pattern
  - RC 262

- Knit 4 rows MC only
- RC 266

- **RC 266, COR**, repeat Chart A:
  - Rows 1-20: Follow Chart A pattern
  - RC 286

**SECTION 11: Final Dragon Scales (Chart B)**
- **RC 286, COR**, begin Chart B:
  - Rows 1-12: Follow Chart B pattern
  - RC 298

**SECTION 12: Ending Geometric Border (Chart C)**
- **RC 298, COR**, begin Chart C:
  - Rows 1-8: Follow Chart C pattern
  - RC 306

**SECTION 13: Final Border**
- Thread MC only
- Knit 6 rows MC in stockinette
- RC 312

---

### **BIND-OFF**

**Latch Tool Bind-Off:**
1. **RC 312, COR**
2. Break yarn leaving 24" (60cm) tail
3. Using latch tool, work chain bind-off:
   - Starting at right edge, bring needle into hook
   - Pull stitch through previous stitch
   - Continue across all 45 sts
4. Pull final stitch tail through and secure

**Alternative - Waste Yarn Bind-Off:**
1. Knit 8 rows WY at T10
2. Remove from machine
3. Steam or wet block entire scarf
4. Carefully unravel waste yarn and graft live stitches or bind off by hand for reversible edge

---

## **FINISHING**

### **Step 1: Remove Waste Yarn**
1. Carefully remove ravel cord from cast-on edge
2. Pick up live stitches with tapestry needle
3. Graft or bind off to match top edge treatment

### **Step 2: Weave in Ends**
1. Thread each yarn tail onto tapestry needle
2. Weave through floats on WS for 2-3 inches
3. Split yarn and weave in opposite direction for security
Disclaimer: This pattern was generated by AI and should be reviewed for accuracy before use. While we strive for quality, AI-generated content may contain errors. Please verify measurements, stitch counts, and instructions before beginning your project. Generated by purlJam.uk
Access your pattern anytime
Bookmark this page to access your pattern anytime