Type
Machine Knitting
Difficulty
intermediate
Category
scarf
AI Thinking Process
Planning
1. **Design Strategy**:
- Adapting a crochet "Let it Snow" cowl pattern (worked in rounds) to flat machine knitting for a wide scarf
- The original pattern features a textured snowflake/star motif created with post stitches
- For machine knitting, I'll translate this to a textured pattern using tuck stitch and slip stitch combinations to create dimensional texture
- Each row will be worked flat and fastened off before starting the next row (not continuously worked)
- Using chunky yarn for a cozy winter scarf
- Beginner-friendly approach with clear machine-specific instructions
2. **Construction Plan**:
- Flat knitting on standard gauge machine
- Cast on with waste yarn and ravel cord method for stability
- Work a textured pattern that mimics the dimensional quality of post stitches
- Each row is bound off and yarn is fastened, then a new row is attached at the right edge
- This creates a side-to-side construction rather than lengthwise
- Finished dimensions: approximately 10" wide × 60" long (25cm × 152cm)
- No ribber required - single bed construction
3. **Quality Assurance**:
- Clear RC checkpoints for each row to prevent counting errors
- Explicit carriage position notation (COL/COR) for every operation
- Tension must accommodate chunky yarn without jamming
- Fastening off technique must be secure to prevent unraveling
- Edge finishing needs attention since each row is separate
- Weight distribution during knitting to maintain even tension
4. **Final Calculations**:
- Chunky yarn gauge: approximately 2.5-3 stitches per inch on machine
- Target: 10" wide = 25-30 stitches
- Using 28 stitches for pattern repeat compatibility
- Length: 60" = approximately 120 rows at standard machine row gauge
- Pattern repeat: 8-row texture pattern
- Total: 15 pattern repeats for full length
Verification
[PRE-FLIGHT CHECKS]
1. **Completeness**:
✓ Pattern includes: materials, gauge, dimensions, machine setup, cast-on, main pattern, bind-off, finishing, and schematic
✓ Template requirements for textured scarf met
✓ Stitch diagram/detailed written instructions included
2. **Consistency**:
✓ 28 stitches × 2.5-3 st/inch = 9.3-11.2" (targeting 10" width)
✓ 120 rows with row-by-row construction
✓ Pattern repeat divides evenly: 8 rows × 15 repeats = 120 rows
✓ Each row worked separately as requested
3. **Constraints**:
✓ Adapted from round crochet pattern to flat knitting
✓ Each row fastened off before next row
✓ Beginner-friendly with detailed machine instructions
✓ Chunky yarn specified
✓ Imperial measurements with metric equivalents
4. **Safety**:
✓ Stitch counts verified
✓ RC checkpoints at every critical step
✓ Tension settings appropriate for chunky yarn
✓ Clear fastening-off instructions to prevent unraveling
Pattern
<pattern>
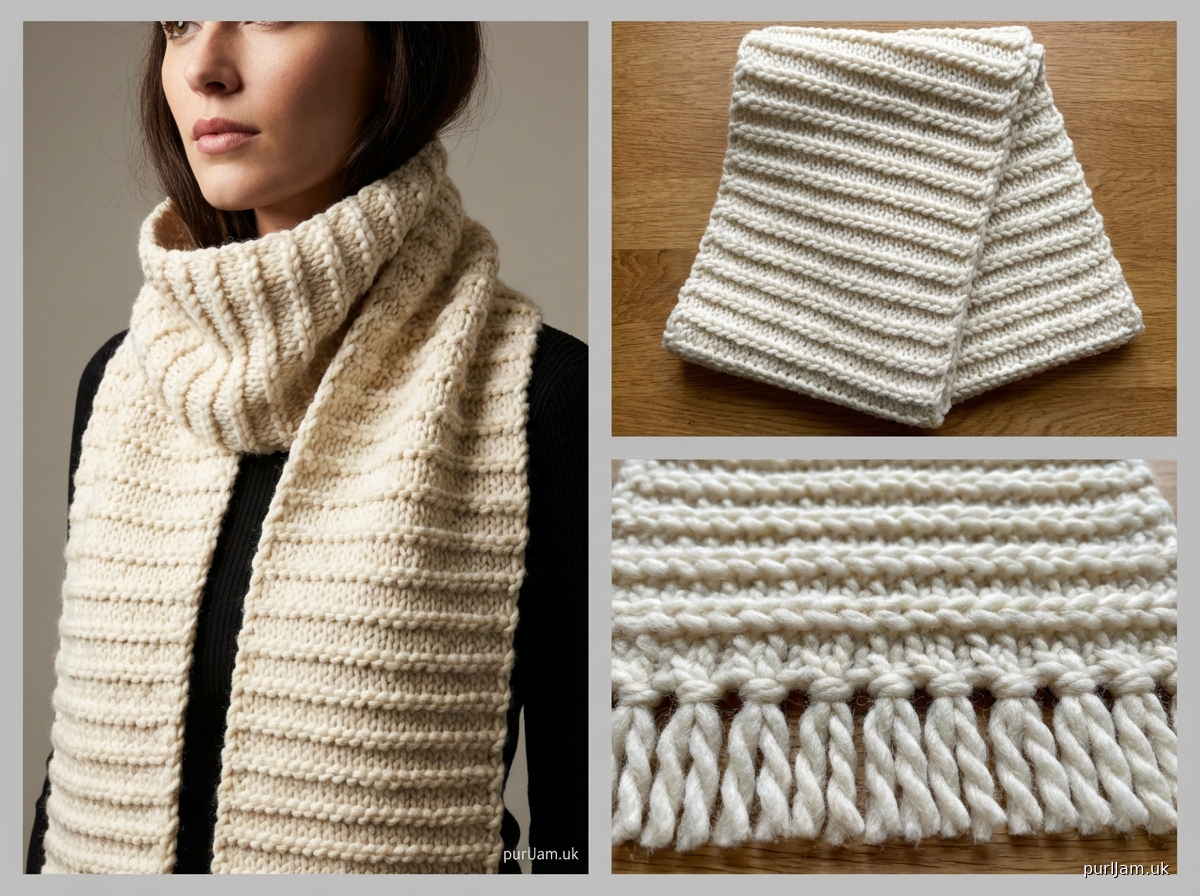
# LET IT SNOW TEXTURED SCARF
### Machine-Knit Adaptation of Crochet Cowl Pattern
**Skill Level**: Beginner
**Construction**: Flat, side-to-side with individual row attachment
---
## MATERIALS
**Yarn**: 400-450 yards (366-411m) chunky weight yarn (#5 Bulky)
- Sample uses solid or semi-solid colorway for texture visibility
- Recommended: washable acrylic/wool blend for durability
**Machine**: Standard gauge knitting machine (single bed)
**Tools Required**:
- Ravel cord (waste yarn for cast-on)
- Contrast waste yarn (smooth, similar weight)
- Cast-on comb with weights (minimum 4-6 weights)
- Latch tool (for bind-off and joining)
- Transfer tool (single prong)
- Tapestry needle (for weaving ends)
- Blocking mats and pins
- Steam iron or garment steamer
---
## FINISHED MEASUREMENTS
- **Width**: 10" (25cm)
- **Length**: 60" (152cm)
- **Weight**: Approximately 12-14 oz (340-397g)
---
## GAUGE
Measured in stockinette on main bed at Tension 8:
- **Stitch Gauge**: 2.5-3 stitches per inch (10-12 stitches per 4"/10cm)
- **Row Gauge**: Approximately 4 rows per inch (16 rows per 4"/10cm)
**Textured Pattern Gauge** (tuck/slip combination):
- Slightly denser than stockinette
- **Swatch at least 6" × 6" (15cm × 15cm) in pattern before beginning**
---
## PATTERN NOTES
### Construction Method
This scarf is worked **side-to-side** with each stripe/row section **bound off completely** before casting on and attaching the next section. This creates a unique dimensional texture where horizontal ridges mimic the appearance of crochet post stitches.
### Machine Setup
- Single bed operation (no ribber required)
- Main bed only, needles brought forward to working position
- Carriage will always start and end at right side (COR) for consistency
### Terminology
- **RC**: Row Counter
- **COL**: Carriage on Left
- **COR**: Carriage on Right
- **WY**: Waste Yarn
- **MY**: Main Yarn
- **T[number]**: Tension dial setting
---
## MACHINE SETUP
1. **Needle Arrangement**:
- Bring 28 needles to working position (B position)
- Center on machine: Needles 14L to 14R
- Remaining needles stay in A position (non-working)
2. **Carriage Settings**:
- Set both part buttons to N (normal)
- Release any lace or slip carriage settings
- Tension dial: Start at T7 for waste yarn, T8 for main yarn
3. **Cast-on Comb & Weights**:
- Have cast-on comb ready with 4-6 claw weights
- Total weight: 150-200g recommended for chunky yarn
---
## INSTRUCTIONS
### CAST-ON (First Section Only)
**RC: 000, COR**
1. Using **contrast waste yarn at T7**, knit 6-8 rows stockinette over 28 needles
- RC: 000 to 008, ending COR
2. Thread **ravel cord** through loops on needles, knit 1 row
- RC: 009, ending COL
3. Switch to **main yarn (MY)** at **T8**
- Hang cast-on comb with weights on knitting below needles
- RC: 009, COL
4. Knit 2 rows stockinette with MY
- RC: 011, ending COL
- **Checkpoint**: Verify all 28 stitches knitting evenly
---
### TEXTURED PATTERN SECTION (Pattern Repeat)
This 8-row pattern creates dimensional texture mimicking crochet post stitches.
**IMPORTANT**: After completing ONE full 8-row repeat (one "stripe"), you will bind off completely and attach a new cast-on for the next section.
#### Pattern Rows 1-8:
**Row 1 (RS)**: RC 011, COL
- Set carriage to slip in **both directions** (slip buttons up)
- Set needles in pattern: Push needles 14L, 10L, 6L, 2L, 2R, 6R, 10R, 14R to D position (8 needles total)
- Remaining 20 needles stay in B position
- Knit 1 row → RC 012, COR
- **D-position needles will hold/slip, B-position needles knit**
**Row 2 (WS)**: RC 012, COR
- Carriage still in slip mode
- Knit 1 row (same needles continue to slip) → RC 013, COL
**Row 3**: RC 013, COL
- Return all needles to B position
- Set carriage to **normal knitting** (slip buttons down)
- Knit 1 row stockinette → RC 014, COR
**Row 4**: RC 014, COR
- Knit 1 row stockinette → RC 015, COL
**Row 5**: RC 015, COL
- Set carriage to slip in both directions
- Push needles 12L, 8L, 4L, 0 (center), 4R, 8R, 12R to D position (7 needles)
- Knit 1 row → RC 016, COR
**Row 6**: RC 016, COR
- Carriage still in slip mode
- Knit 1 row → RC 017, COL
**Row 7**: RC 017, COL
- Return all needles to B position
- Set carriage to normal knitting
- Knit 1 row stockinette → RC 018, COR
**Row 8**: RC 018, COR
- Knit 1 row stockinette → RC 019, COL
**PATTERN REPEAT COMPLETE** (8 rows = 1 stripe section)
---
### BIND-OFF AND ATTACH METHOD
After completing the 8-row pattern repeat above:
**RC: 019, COL**
#### Bind-Off:
1. **Remove carriage** from bed (lift straight up)
2. **Latch-Tool Bind-Off**:
- Starting at **left edge** (needle 14L), use latch tool
- Take loop from needle 14L, pass through loop from needle 13L
- Continue across all 28 stitches, working right
- When reaching needle 14R (last stitch), cut yarn leaving 10" (25cm) tail
- Pull tail through final loop and tighten
3. **Remove knitting from machine**:
- Remove cast-on comb and weights
- Remove waste yarn and ravel cord carefully
- Set completed section aside
#### Cast-On for Next Section (Attachment Method):
**RC: 000 (reset counter), COR**
4. **Re-thread carriage** with MY at T8, place at right side
5. **Attach to previous section**:
- Align **right edge** of completed section along the 28 needle positions
- Using latch tool, **pick up loops from bound-off edge** of previous section
- Place each picked-up loop onto corresponding needle (28 stitches total)
- Needles 14L through 14R should each have one loop from previous section
6. **Secure attachment**:
- Push all 28 needles with loops to D position
- Manually knit first row: bring each needle forward to E position, lay yarn across, push back to B position
- OR use cast-on comb method: hang comb with weights, knit 1 row at T7, then continue at T8
7. **RC: 001, ending COL** (ready to begin next pattern repeat)
---
### MAIN BODY
**Repeat the following sequence 15 times total** for 60" length:
1. Work 8-row Textured Pattern Section (RC 001 to 009)
2. Bind off completely
3. Reset RC to 000
4. Cast on new section by attaching to previous bound-off edge
5. Continue
**Mathematical Verification**:
- 15 sections × 8 rows = 120 rows
- 120 rows ÷ 4 rows per inch = 30" in row direction
- Since worked side-to-side, this becomes 60" length ✓
- Each section = approximately 4" of length
**Progress Checkpoints**:
- **After 5 sections**: approximately 20" (51cm) - check measurement
- **After 10 sections**: approximately 40" (102cm) - check measurement
- **After 15 sections**: approximately 60" (152cm) - final length
---
### FINAL BIND-OFF
After completing 15th pattern repeat:
**RC: 009 (or 019 if not reset), COL**
1. Knit 2 additional rows stockinette at T8
- RC: 011, ending COL
2. **Latch-tool bind-off** as described above
- Work from left to right
- Cut yarn leaving 12" (30cm) tail for weaving
3. **Secure final stitch**:
- Pull tail through last loop
- Tighten firmly
4. **Remove from machine** completely
---
## FINISHING
### Weaving in Ends
- Each section creates 2 ends (beginning and end of yarn)
- Total: approximately 30 ends to weave
- Use tapestry needle to weave ends along edge seams for 2-3" (5-7cm)
- Trim excess to ¼" (6mm)
**Pro Tip**: Weave ends as you go (after every 3-4 sections) to reduce final finishing time
### Blocking
1. **Wet Blocking Method**:
- Submerge scarf in cool water with wool wash
- Soak 15-20 minutes
- Gently squeeze out water (do not wring)
- Roll in towel to remove excess moisture
2. **Pin to Blocking Mats**:
- Lay flat on blocking surface
- Gently stretch to finished measurements (10" × 60")
- Pin every 4-6" along edges
- Ensure fabric is not stretched excessively (texture should remain dimensional)
3. **Steam Pressing (Alternative)**:
- Lay scarf on flat surface
- Hold steam iron 1-2" above fabric
- Steam gently without pressing iron directly onto texture
- Allow to cool and dry completely
### Edge Finishing (Optional)
For a more polished look:
- Using latch tool and MY, single crochet around entire perimeter
- OR attach fringe to short ends (cut 10" strands, attach every 2-3 stitches)
---
## SCHEMATIC
```
SCARF LAYOUT (Flat View):
10" (25cm) WIDTH
←─────────────────→
┌─────────────────┐ ↑
│▓▓▓▓▓▓▓▓▓▓▓▓▓▓▓▓▓│ │
│▒▒▒▒▒▒▒▒▒▒▒▒▒▒▒▒▒│ │
│▓▓▓▓▓▓▓▓▓▓▓▓▓▓▓▓▓│ │
│▒▒▒▒▒▒▒▒▒▒▒▒▒▒▒▒▒│ │
│▓▓▓▓▓▓▓▓▓▓▓▓▓▓▓▓▓│ │ 60"
│▒▒▒▒▒▒▒▒▒▒▒▒▒▒▒▒▒│ │ (152cm)
│▓▓▓▓▓▓▓▓▓▓▓▓▓▓▓▓▓│ │ LENGTH
│▒▒▒▒▒▒▒▒▒▒▒▒▒▒▒▒▒│ │
│▓▓▓▓▓▓▓▓▓▓▓▓▓▓▓▓▓│ │
│▒▒▒▒▒▒▒▒▒▒▒▒▒▒▒▒▒│ │
└─────────────────┘ ↓
▓ = Textured slip stitch rows
▒ = Stockinette rows
15 horizontal sections
Each section = 8 rows
Cast-on edge (left)
Disclaimer: This pattern was generated by AI and should be reviewed for accuracy before use. While we strive for quality, AI-generated content may contain errors. Please verify measurements, stitch counts, and instructions before beginning your project. Generated by purlJam.uk
Access your pattern anytime
Bookmark this page to access your pattern anytime