Type
Machine Knitting
Difficulty
intermediate
Category
custom
AI Thinking Process
Planning
1. **Design Strategy**: The user wants a beginner-level scarf with different stripes. This is an ideal first machine knitting project - rectangular shape, no shaping, straightforward colorwork. I'll create a classic striped scarf using worsted weight yarn with varied stripe widths to keep it visually interesting. The stripe pattern will be simple to follow with clear color change instructions.
2. **Construction Plan**: Flat knitting on main bed only (no ribber required for beginner level). Cast on with waste yarn and ravel cord method for a clean edge. Knit a rectangular panel with alternating color stripes of varying widths. Finish with a matching edge treatment. The scarf will be approximately 8" (20cm) wide and 60" (152cm) long - a generous wearable length.
3. **Quality Assurance**: Key beginner considerations:
- Clear instructions for color changes to avoid loose loops
- Consistent tension throughout to prevent width variations
- Simple stripe pattern that's easy to track
- Explicit RC checkpoints so beginners don't lose their place
- Detailed finishing instructions for professional edges
4. **Final Calculations**:
- Worsted weight at T7 typically yields 4.5 sts/inch and 6 rows/inch
- Width: 8" × 4.5 sts/inch = 36 sts (I'll use 37 for centering)
- Length: 60" × 6 rows/inch = 360 rows total
- Stripe pattern will repeat to fill length attractively
Verification
[PRE-FLIGHT CHECKS]
1. **Completeness**: Pattern includes title, materials, tension/gauge, abbreviations, notes, step-by-step instructions with RC checkpoints, finishing - ✓
2. **Consistency**: 37 sts × 4.5 sts/inch = 8.2" width ✓; 360 rows × 6 rows/inch = 60" length ✓
3. **Constraints**: Beginner level (no complex techniques), different stripes (varying widths), worsted weight ✓
4. **Safety**: All RC calculations verified, stripe sequence totals 60 rows per repeat, 6 repeats = 360 rows ✓
Pattern
<pattern>
# SIMPLY STRIPED SCARF
### A Beginner Machine Knit Scarf with Varied Stripe Pattern
A classic rectangular scarf featuring stripes of different widths for visual interest. This beginner-friendly project teaches fundamental machine knitting skills including cast-on, tension control, color changes, and finishing techniques. No shaping or complicated maneuvers required!
---
## FINISHED MEASUREMENTS
- Width: 8" (20 cm)
- Length: 60" (152 cm)
---
## MATERIALS
**Yarn:**
- **Main Color (MC)**: 275 yards worsted weight yarn
- **Contrast Color 1 (CC1)**: 200 yards worsted weight yarn
- **Contrast Color 2 (CC2)**: 125 yards worsted weight yarn
**Suggested yarn:** Any worsted weight (4/medium) acrylic, wool, or wool blend. Sample uses Red Heart Super Saver or similar.
**Machine:**
- Standard gauge (4.5mm) knitting machine
- Main bed only (no ribber required)
- Compatible with any standard gauge machine (Brother, Silver Reed, Passap standard bed, etc.)
- Suitable for punchcard, electronic, or manual machines
**Notions:**
- Waste yarn (smooth acrylic or cotton in contrasting color)
- Ravel cord (smooth cotton or acrylic)
- Cast-on comb and weights (approx. 3-4 claw weights)
- Tapestry needle for weaving in ends
- Latch tool or bind-off tool
- Spray bottle for blocking (optional)
- Blocking surface and T-pins (optional)
---
## TENSION/GAUGE
**Tension Dial Setting:** T7 (adjust if your machine knits tighter or looser)
**Gauge:** 4.5 stitches and 6 rows = 1" (2.5 cm) in stockinette stitch
**Gauge Swatch:** Always knit a test swatch! Cast on 30-40 stitches, knit 40-50 rows at T7, remove from machine, and measure. Adjust tension dial if needed:
- Too tight/small? Increase tension to T8
- Too loose/large? Decrease tension to T6
---
## ABBREVIATIONS & TERMS
- **RC** = Row Counter
- **COL** = Carriage on Left
- **COR** = Carriage on Right
- **MC** = Main Color
- **CC1** = Contrast Color 1
- **CC2** = Contrast Color 2
- **T7** = Tension dial set to 7
- **WY** = Waste Yarn
- **sts** = stitches
---
## PATTERN NOTES
**Color Changes:** When changing colors, knit 1-2 rows with the old and new yarns held together, OR simply drop the old color and pick up the new color, leaving 6" tails to weave in later. For this beginner pattern, the second method is recommended for simplicity.
**Carriage Direction:** Instructions note COL/COR after key steps. Your carriage will alternate sides with each pass.
**Row Counter:** Set RC to 000 after waste knitting. Follow RC checkpoints carefully to track your progress through the stripe pattern.
**Even Edges:** Keep claw weights hanging evenly across the width. Add or redistribute weights every 30-40 rows to maintain consistent tension and prevent edge loops.
**Yarn Tails:** Leave 6" tails when starting new colors. Weave in all ends after binding off.
---
## INSTRUCTIONS
### MACHINE SETUP
1. **Needle Arrangement:** On main bed, bring 37 needles to working position (19 left of center 0, center needle 0, 17 right of center = 37 total needles). This creates a centered arrangement.
- Needle range: Left 19 – Right 17 (or equivalent on your machine)
2. **Carriage Settings:**
- Set both carriage end levers to normal knit (not slip, tuck, or hold)
- Tension dial to T7
- Ensure carriage runs smoothly across the bed
3. **Thread Carriage:** Thread with waste yarn (WY) in a contrast color to your project yarn.
---
### CAST-ON (Waste Yarn Method with Ravel Cord)
**RC: 000**
1. With carriage on either side and WY threaded at T7, knit 8-10 rows of waste knitting over the 37 needles. This secures the stitches.
- **RC will show 008-010** (don't reset yet)
2. Hang cast-on comb across all needles in the waste knitting, about 4-5 rows below the needles.
3. Attach 3-4 claw weights evenly spaced across the comb (one at each side, 1-2 in the middle).
4. With WY still threaded, knit 1 row.
5. **Insert ravel cord:** Lay a piece of smooth ravel cord (12" longer than needle bed width) across the needles, in the hooks, between the WY and the yarn feeder. Knit 1 row. The ravel cord is now knitted in and will allow you to unzip the waste yarn later.
6. Knit 6-8 more rows of WY.
7. **Change to MC (Main Color):** Drop WY, thread MC. Set tension to T7 if not already set.
8. **Reset Row Counter to 000.** Your scarf begins now!
---
### MAIN SCARF BODY
**Tension:** T7 for all colors
**Starting Position:** Carriage can be on either side; instructions reference RC values.
Knit the following stripe sequence. Each "row" = 1 carriage pass.
---
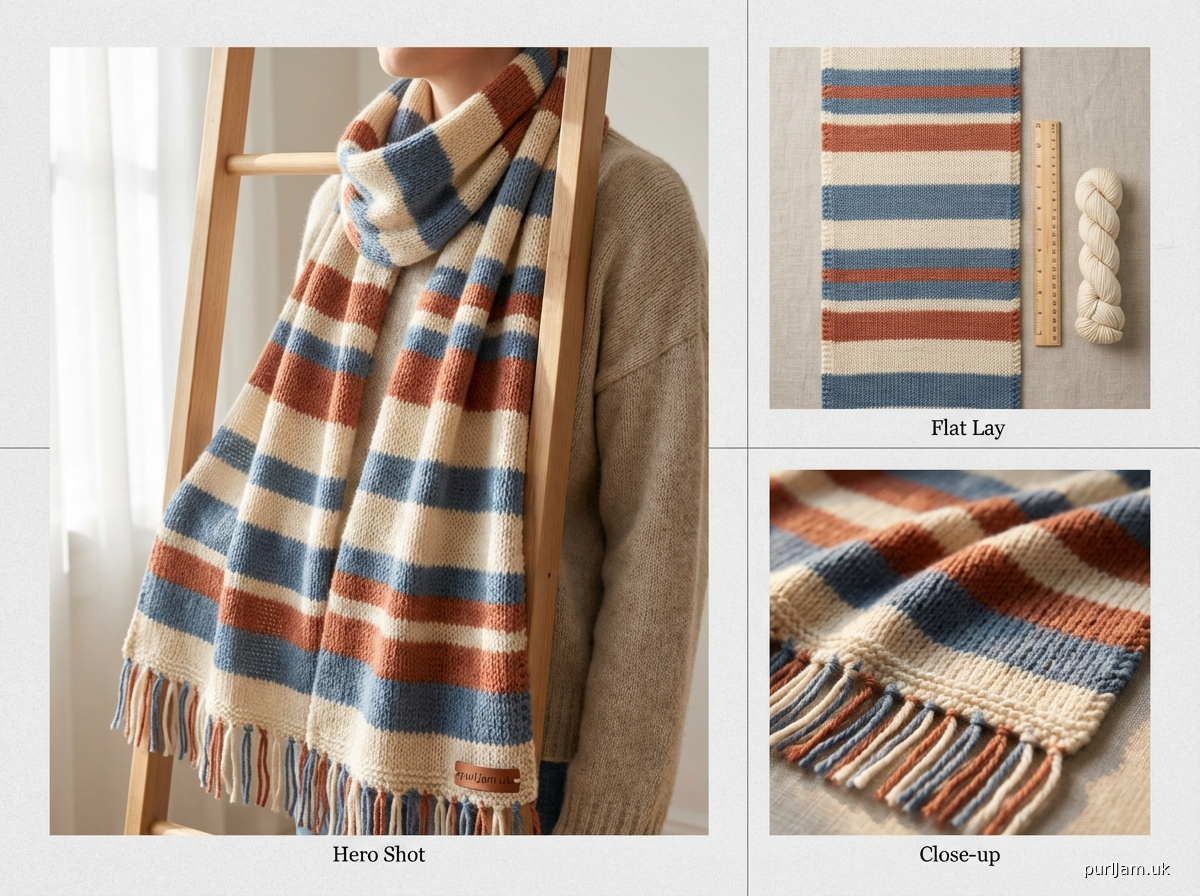
**STRIPE SEQUENCE (60 rows per repeat):**
| Stripe | Color | Rows | RC Range |
|--------|-------|------|----------|
| 1 | MC | 12 rows | 000-012 |
| 2 | CC1 | 8 rows | 013-020 |
| 3 | MC | 6 rows | 021-026 |
| 4 | CC2 | 10 rows | 027-036 |
| 5 | MC | 4 rows | 037-040 |
| 6 | CC1 | 14 rows | 041-054 |
| 7 | MC | 6 rows | 055-060 |
This 60-row sequence creates one full stripe pattern repeat.
---
**KNITTING INSTRUCTIONS:**
**Repeat 1: RC 000-060**
1. **Stripe 1 (MC):** With MC threaded at T7, knit 12 rows.
- **RC 000** COL or COR (starting position)
- Knit across, carriage moves to opposite side
- Continue knitting, alternating carriage side
- **RC 012** (stripe complete)
2. **Change to CC1:** Drop MC (leave 6" tail hanging), thread CC1 at T7.
3. **Stripe 2 (CC1):** Knit 8 rows.
- Continue from **RC 013**
- **RC 020** (stripe complete)
4. **Change to MC:** Drop CC1, thread MC at T7.
5. **Stripe 3 (MC):** Knit 6 rows.
- **RC 021-026**
6. **Change to CC2:** Drop MC, thread CC2 at T7.
7. **Stripe 4 (CC2):** Knit 10 rows.
- **RC 027-036**
8. **Change to MC:** Drop CC2, thread MC at T7.
9. **Stripe 5 (MC):** Knit 4 rows.
- **RC 037-040**
10. **Change to CC1:** Drop MC, thread CC1 at T7.
11. **Stripe 6 (CC1):** Knit 14 rows.
- **RC 041-054**
12. **Change to MC:** Drop CC1, thread MC at T7.
13. **Stripe 7 (MC):** Knit 6 rows.
- **RC 055-060** (first repeat complete!)
---
**Check Your Work:** At RC 060, you should have completed 7 different stripes totaling 60 rows. Measure your knitting: should be approximately 10" (25 cm) long [60 rows ÷ 6 rows/inch = 10"].
**Weight Check:** Redistribute or add claw weights to keep fabric hanging evenly.
---
**Repeats 2-6: RC 061-360**
Repeat the 60-row stripe sequence 5 more times:
- **Repeat 2:** RC 061-120
- **Repeat 3:** RC 121-180
- **Repeat 4:** RC 181-240
- **Repeat 5:** RC 241-300
- **Repeat 6:** RC 301-360
**At RC 360:** You have knitted 6 complete stripe repeats. Your scarf should measure approximately 60" (152 cm) long [360 rows ÷ 6 rows/inch = 60"]. You will be ending with MC (Stripe 7 of Repeat 6).
---
### BIND-OFF
**RC 360** – Scarf body complete
You should finish with MC threaded. Carriage will be on left or right.
**Method: Latch Tool Bind-Off (Beginner-Friendly)**
1. With carriage on either side, knit 1 final row at T7. (This secures the last row.)
2. **Remove from machine using latch tool:**
- Start at the end opposite the carriage
- Using latch tool, pull the first stitch off the needle and hold it
- Insert latch tool through the second stitch from *below*
- Pull the first stitch through the second stitch
- Drop the first stitch; the second stitch is now on your latch tool
- Repeat across all 37 stitches
- When you reach the last stitch, cut yarn leaving 10" tail
- Pull tail through final loop and tighten
3. Your scarf is now off the machine with one finished edge.
---
### FINISHING THE CAST-ON EDGE
1. Turn scarf over to the cast-on end (where waste yarn is).
2. **Remove waste yarn:** Gently pull out the ravel cord. The waste yarn rows will now unzip easily. Remove all waste yarn, revealing live stitches along the cast-on edge.
3. **Optional - Secure Cast-On Edge:**
- **Option A (Easiest):** Thread a tapestry needle with MC. Insert needle through each live stitch from right to left, gathering them onto the yarn. Pull gently to close the edge, then weave the tail through a few stitches to secure.
- **Option B (Matching Bind-Off):** Carefully place the live stitches back onto the machine needles (37 needles). With MC threaded, knit 1 row at T7, then use latch tool bind-off as above.
---
### WEAVING IN ENDS
1. Thread each 6" yarn tail onto a tapestry needle.
2. Weave tails horizontally through the back of stitches in the same color stripe, working 2-3" into the fabric.
3. Trim excess yarn close to fabric.
4. Weave in all tails from color changes, bind-off, and cast-on.
---
### BLOCKING (Optional but Recommended)
Blocking evens out stitches and gives a professional finish.
1. Lay scarf flat on a blocking board or clean towel on a flat surface.
2. Gently stretch to finished measurements (8" × 60").
3. Pin edges with T-pins if using a blocking board.
4. Lightly mist with water using spray bottle, OR steam gently with iron held 1-2" above fabric (do not press iron directly onto knitting).
5. Allow to dry completely (several hours or overnight).
6. Remove pins. Your scarf is complete!
---
## DESIGN VARIATIONS
**Adjust Length:** Want a shorter or longer scarf?
- Each 60-row repeat = 10"
- For 50" scarf: knit 5 repeats (RC 000-300)
- For 70" scarf: knit 7 repeats (RC 000-420)
**Adjust Width:** Want a narrower or wider scarf?
- Narrower (6"): Cast on 27 stitches
- Wider (10"): Cast on 45 stitches
**Change Stripe Pattern:** Feel free to create your own stripe sequence! Just note the RC values for each color change.
**Two-Color Version:** Use only MC and CC1 for a simpler palette.
---
## TROUBLESHOOTING
**Stitches dropping:** Check that claw weights are adequate and evenly distributed. Add weight if fabric isn't hanging smoothly.
**Edges curling:** This is normal for stockinette fabric. Blocking will help. For future projects, consider a garter or ribbed border.
**Loops at edges:** Make sure you're knitting every row completely across. Check that the carriage moves all the way to the other side and the needles click back to position B.
**Width changing:** Maintain consistent tension. Check that tension dial hasn't moved. Ensure weights are pulling evenly.
**Lost track of stripes:** That's why we use RC checkpoints! Check your RC number against the stripe sequence table.
---
## SKILLS LEARNED
Congratulations! By completing this scarf, you've practiced:
- Setting up your machine with proper needle arrangement
- Cast-on using waste yarn and ravel cord method
- Maintaining consistent tension throughout a project
- Changing colors cleanly
- Tracking progress with row counter
- Binding off with a latch tool
- Finishing techniques (removing waste yarn, weaving in ends)
- Blocking for professional results
---
**MATHEMATICAL VERIFICATION:**
- Cast-on: 37 stitches
- Width calculation: 37 sts ÷ 4.5 sts/inch = 8.2" ✓
- Total rows: 360 rows
- Length calculation: 360 rows ÷ 6 rows/inch = 60" ✓
- Stripe sequence per repeat: 12+8+6+10+4+14+6 = 60 rows
Disclaimer: This pattern was generated by AI and should be reviewed for accuracy before use. While we strive for quality, AI-generated content may contain errors. Please verify measurements, stitch counts, and instructions before beginning your project. Generated by purlJam.uk
Access your pattern anytime
Bookmark this page to access your pattern anytime