Type
Crochet
Difficulty
beginner
Category
Pattern
Pattern
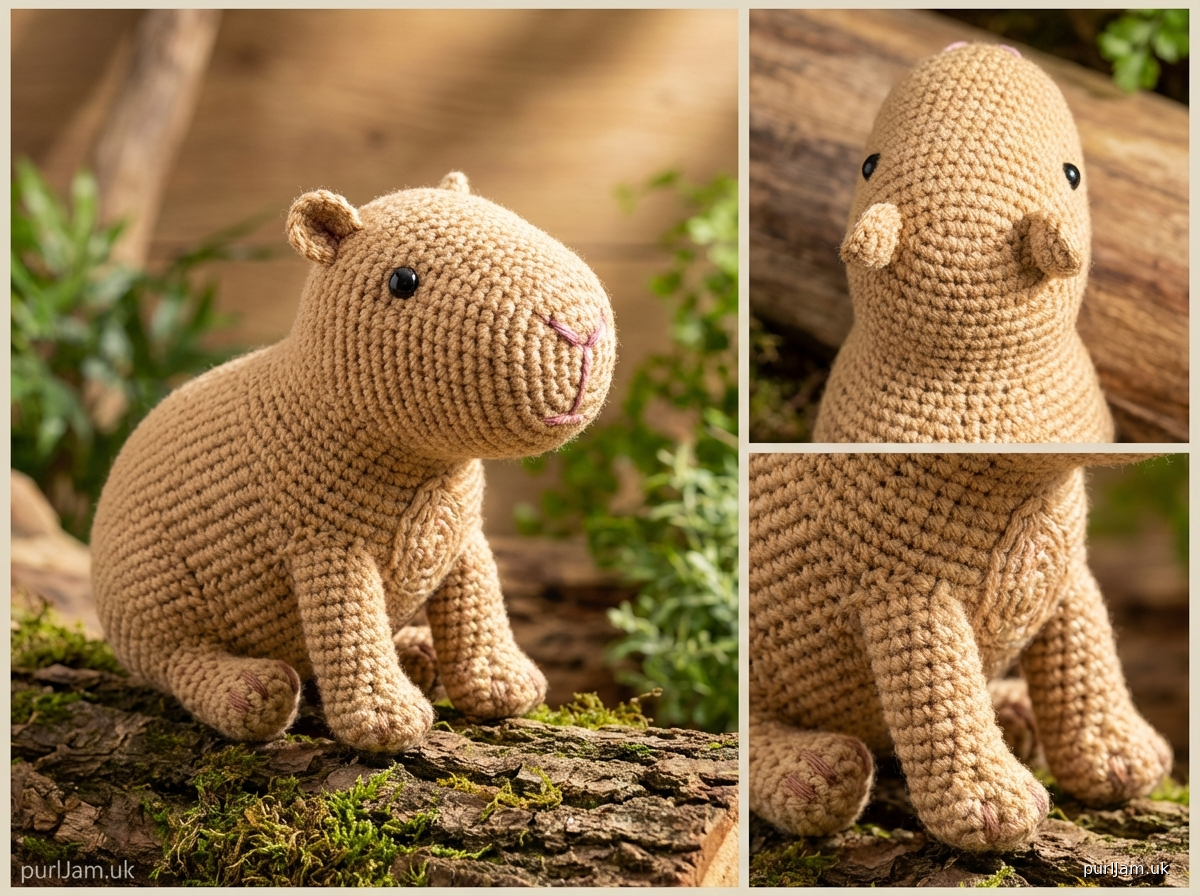
# Crochet Capybara Amigurumi Pattern

**Designed for beginners | Finished size: approximately 4.5" long × 3" tall (sitting)**

## MATERIALS

**Yarn:**
- Worsted weight (4) yarn in brown or tan (main color) - approximately 100 yards
- Small amount of dark brown or black for embroidered details (optional)
- Small amount of pink for nose (optional)

**Recommended yarn:** Any worsted weight acrylic or cotton blend

**Hook & Notions:**
- US E-4 (3.5mm) crochet hook
- Fiberfill stuffing (polyester)
- Yarn needle for sewing
- Stitch marker
- Two 9mm safety eyes (or black yarn for embroidered eyes)
- Scissors
- Pins for assembly (helpful but optional)

## ABBREVIATIONS
- ch = chain
- sc = single crochet
- inc = increase (2 sc in same stitch)
- dec = invisible decrease (insert hook in front loops of next 2 sts, yo, pull through both, yo, pull through 2 loops)
- st(s) = stitch(es)
- rnd(s) = round(s)
- [ ] = total stitch count at end of round

## GAUGE
Gauge is not critical for this project, but for reference:
- Approximately 5-6 sc = 1" with worsted yarn and 3.5mm hook
- Work tightly to prevent stuffing from showing through

## PATTERN NOTES
- Work in continuous rounds (spiral) unless otherwise noted; use stitch marker to track beginning of round
- Do not join or turn unless instructed
- Stuff pieces firmly as you go, but not so tight that stitches distort
- Use invisible decrease for smoothest finish
- Numbers in [ ] indicate total stitch count at end of round

---

## BODY

**Rnd 1:** 6 sc in magic ring [6]

**Rnd 2:** inc in each st around [12]
*Verification: 6 × 2 = 12 ✓*

**Rnd 3:** (sc, inc) around [18]
*Verification: 6 repeats × 3 sts = 18 ✓*

**Rnd 4:** (2 sc, inc) around [24]
*Verification: 6 repeats × 4 sts = 24 ✓*

**Rnd 5:** (3 sc, inc) around [30]
*Verification: 6 repeats × 5 sts = 30 ✓*

**Rnds 6-12:** sc in each st around [30]
*7 rounds of even stitches for body length*

**Rnd 13:** (3 sc, dec) around [24]
*Verification: 30 - 6 = 24 ✓*

**Rnd 14:** sc in each st around [24]

**Rnd 15:** (2 sc, dec) around [18]
*Verification: 24 - 6 = 18 ✓*

**Begin stuffing body firmly.**

**Rnd 16:** (sc, dec) around [12]
*Verification: 18 - 6 = 12 ✓*

**Rnd 17:** dec around [6]
*Verification: 12 ÷ 2 = 6 ✓*

Fasten off, leaving long tail. Weave tail through remaining 6 sts and pull tight to close. Weave in end.

---

## HEAD

**Rnd 1:** 6 sc in magic ring [6]

**Rnd 2:** inc in each st around [12]
*Verification: 6 × 2 = 12 ✓*

**Rnd 3:** (sc, inc) around [18]
*Verification: 6 repeats × 3 sts = 18 ✓*

**Rnd 4:** (2 sc, inc) around [24]
*Verification: 6 repeats × 4 sts = 24 ✓*

**Rnds 5-9:** sc in each st around [24]
*5 rounds of even stitches*

**Insert safety eyes between rnds 7 and 8, approximately 6 stitches apart.**

**Rnd 10:** (2 sc, dec) around [18]
*Verification: 24 - 6 = 18 ✓*

**Begin stuffing head firmly.**

**Rnd 11:** (sc, dec) around [12]
*Verification: 18 - 6 = 12 ✓*

**Rnd 12:** dec around [6]
*Verification: 12 ÷ 2 = 6 ✓*

Fasten off, leaving long tail for sewing. Weave tail through remaining 6 sts and pull tight to close.

---

## LEGS (make 4)

**Rnd 1:** 6 sc in magic ring [6]

**Rnd 2:** inc in each st around [12]
*Verification: 6 × 2 = 12 ✓*

**Rnds 3-8:** sc in each st around [12]
*6 rounds for leg length*

**Stuff leg lightly** (not too firm, so legs remain slightly flexible).

Fasten off, leaving long tail for sewing. Do not close opening - this will be sewn to body.

---

## EARS (make 2)

**Rnd 1:** 4 sc in magic ring [4]

**Rnd 2:** (sc, inc) around [6]
*Verification: 2 repeats × 3 sts = 6 ✓*

**Rnds 3-4:** sc in each st around [6]

Fasten off, leaving long tail for sewing. Do not stuff ears - flatten slightly.

---

## SNOUT

**Rnd 1:** 6 sc in magic ring [6]

**Rnd 2:** inc in each st around [12]
*Verification: 6 × 2 = 12 ✓*

**Rnds 3-4:** sc in each st around [12]

Fasten off, leaving long tail for sewing. Stuff lightly.

---

## ASSEMBLY

Use yarn needle and long tails. Pin pieces in place before sewing if desired.

**1. Attach head to body:**
Position head at narrower end of body, slightly tilted upward. Whip stitch around entire opening, making sure connection is secure. Head should sit at slight angle for characteristic capybara posture.

**2. Attach legs:**
Position legs so capybara can sit stably:
- Front legs: Attach to underside of body, toward the front, approximately 6 stitches apart
- Back legs: Attach to underside of body, toward the back, positioned slightly wider than front legs for stability
- Whip stitch opening of each leg securely to body

**3. Attach ears:**
Position ears on top of head, between rounds 3 and 5 of head, approximately 8 stitches apart. Sew flat edge of ears to head using whip stitch.

**4. Attach snout:**
Center snout on front of head, below eyes (between rounds 8 and 11). Whip stitch around edge, leaving top portion slightly raised for dimension.

**5. Facial features:**
- If you haven't used safety eyes, embroider eyes with black yarn using satin stitch or French knots
- Embroider small pink nose at bottom center of snout (2-3 vertical stitches)
- Optional: Embroider simple mouth line with dark brown yarn

**6. Final touches:**
Weave in all remaining ends. Shape capybara by gently manipulating stuffing if needed.

---

## TIPS FOR SUCCESS

**Tension:** Keep your stitches tight and even. If you can see white stuffing through the stitches, your tension is too loose - try going down a hook size.

**Stuffing:** Stuff firmly but not overstuffed. Over-stuffing can distort the shape and make stitches pull apart.

**Stitch marker:** Move your marker up at the end of each round. This is crucial for keeping track!

**Invisible decrease:** This technique creates a smoother decrease than standard dec. Insert hook under front loop only of next 2 stitches, yarn over, pull through both loops, yarn over, pull through 2 loops on hook.

**Leg placement:** Test stability before sewing legs permanently. The capybara should sit without tipping forward or backward.

**Assembly order:** Following the assembly order listed ensures pieces don't get in the way of each other during sewing.

---

## VARIATIONS

**Larger capybara:** Use bulky weight yarn (5) with 5mm hook for a 6-7" toy.

**Baby capybara:** Use DK weight yarn (3) with 3mm hook for a 3" miniature version.

**Color variations:** Real capybaras range from reddish-brown to gray-brown. Feel free to use any brown, tan, or gray yarn!

**With friends:** Make multiple capybaras in different sizes for a capybara family!

---

## CARE INSTRUCTIONS

- Spot clean with damp cloth
- If using acrylic yarn, can hand wash gently in cool water and air dry
- Not recommended for children under 3 due to small parts (safety eyes)

---

**Pattern designed as beginner-friendly amigurumi project.**
**Questions? Check that:**
- You're working in continuous rounds (spiral)
- Your stitch marker is placed correctly
- Your tension is tight enough
- You're stuffing as you go (before closing pieces)

Happy crocheting! 🧶

---

*Pattern tested with worsted weight acrylic yarn and 3.5mm hook. Finished size approximately 4.5" long × 3" tall in sitting position.*
Disclaimer: This pattern was generated by AI and should be reviewed for accuracy before use. While we strive for quality, AI-generated content may contain errors. Please verify measurements, stitch counts, and instructions before beginning your project. Generated by purlJam.uk
Access your pattern anytime
Bookmark this page to access your pattern anytime