Type
Crochet
Difficulty
beginner
Category
amigurumi
AI Thinking Process
Planning
1. **Design Strategy**: Creating a beginner-friendly penguin using simple amigurumi shapes. The penguin will use a modified oval/sphere for the body, a smaller sphere for the head, and simple flippers/wings. Using the template's basic shapes (sphere, cone, oval) to construct a recognizable penguin with minimal complexity. Color blocking with black/dark gray and white will create the classic penguin appearance. No complex animal assembly - just basic shapes sewn together.
2. **Construction Plan**:
- Body: Modified oval shape (elongated sphere) worked in one piece with color changes for the white belly
- Head: Small sphere attached to body
- Flippers/Wings: Two small oval shapes worked flat or as simple tubes
- Feet: Two small triangular/cone shapes in orange/yellow
- Beak: Small cone shape in orange/yellow
- Work from bottom up on body and head (standard amigurumi practice)
- All pieces stuffed separately then sewn together
- Optional safety eyes or embroidered eyes
3. **Quality Assurance**:
- Color changes: Must provide clear instructions for switching between black and white
- Stuffing: Emphasize firm stuffing for the body to maintain penguin shape
- Attachment points: Clear guidance on where to place head, flippers, and feet
- Stability: Ensure penguin can sit upright by using flat bottom construction
- Beginner considerations: Keep stitch counts simple (increments of 6), use only sc and basic increases/decreases
4. **Final Calculations**:
- Worsted weight yarn with 3.5mm (E-4) hook
- Target size: approximately 4-5 inches tall (handheld size)
- Body max circumference: 24 stitches (follows template sphere pattern)
- Head max circumference: 18 stitches
- All math based on increments of 6 for easy counting
Verification
[PRE-FLIGHT CHECKS]
1. **Completeness**: ✓ Pattern will include materials, abbreviations, notes, gauge, all body parts, assembly, and finishing
2. **Consistency**: ✓ Body increases to 24 sts (4 increase rounds), head to 18 sts (3 increase rounds), appropriate for worsted weight
3. **Constraints**: ✓ Beginner level - uses only sc, inc, dec; simple shapes from template; clear instructions
4. **Safety**: ✓ Stitch counts verified (6→12→18→24 progression); color change rounds marked; all pieces accounted for in assembly
Pattern
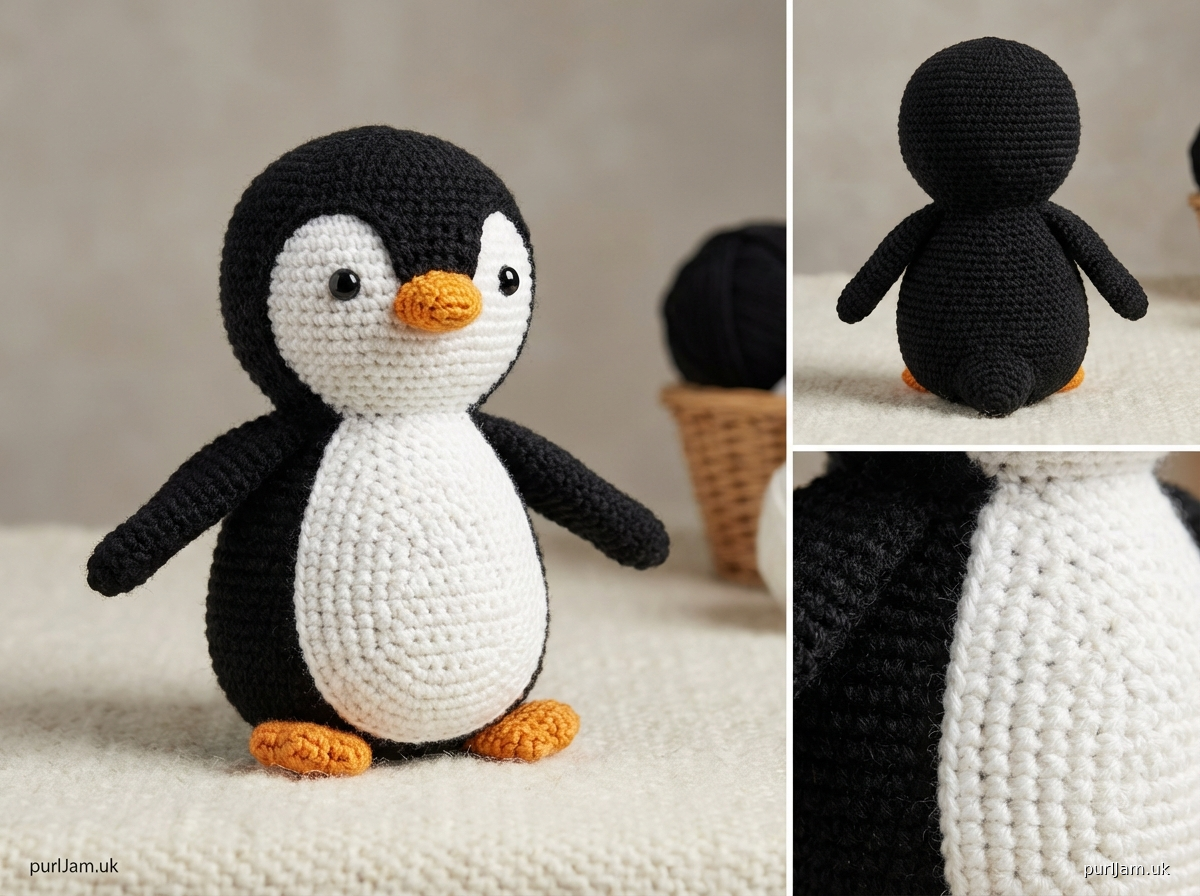
# Crochet Penguin Amigurumi

A beginner-friendly penguin plushie using simple shapes and basic stitches. This adorable penguin stands approximately 4-5 inches tall and is perfect for your first amigurumi project!

## Materials

**Yarn:**
- Worsted weight (4) yarn in the following colors:
  - Black or Dark Gray (Main Color - MC): approximately 40 yards
  - White (Contrast Color - CC): approximately 20 yards
  - Orange or Yellow (Accent): approximately 5 yards

**Suggested Yarn:** Any worsted weight acrylic yarn such as Red Heart Super Saver, Caron Simply Soft, or Lion Brand Vanna's Choice

**Other Materials:**
- US E-4 (3.5mm) crochet hook
- Fiberfill stuffing (polyester)
- Yarn needle for weaving in ends and assembly
- Stitch marker
- Safety eyes (6mm or 9mm) OR black yarn for embroidering eyes
- Scissors
- Pins (optional, helpful for assembly)

## Abbreviations

- ch: chain
- sc: single crochet
- inc: increase (2 sc in same stitch)
- dec: invisible decrease (insert hook in front loops of next 2 stitches, yarn over, pull through both, yarn over, pull through 2 loops)
- st(s): stitch(es)
- rnd(s): round(s)
- MC: main color
- CC: contrast color
- [ ]: total stitch count at end of round

## Pattern Notes

- Work in continuous spirals unless otherwise noted; do not join rounds
- Use a stitch marker to track the beginning of each round
- Work tightly to prevent stuffing from showing through
- Stuff pieces firmly as you go for best results
- All pieces are worked in MC (black/dark gray) unless specified
- Color changes are made by working the last yarn over of the previous stitch in the new color

## Gauge

Gauge is not critical for this project, but your stitches should be tight enough that stuffing doesn't show through.

Approximate gauge: 5 sts and 5 rows = 1 inch in sc

Finished penguin will be approximately 4-5 inches (10-12 cm) tall.

---

## BODY

The body is worked from bottom to top with a color change to create the white belly.

**With MC (black/dark gray):**

**Rnd 1:** 6 sc in magic ring [6]

**Rnd 2:** inc in each st around [12]
*Math check: 6 × 2 = 12 ✓*

**Rnd 3:** (sc, inc) around [18]
*Math check: 6 pairs, 6 × 3 = 18 ✓*

**Rnd 4:** (2 sc, inc) around [24]
*Math check: 6 repeats, 6 × 4 = 24 ✓*

**Rnds 5-6:** sc around [24]
*2 even rounds*

**Rnd 7:** Switch to CC (white) for belly. Sc around [24]
*Color change: complete last st of rnd 6 with white yarn*

**Rnds 8-10:** sc around in CC [24]
*3 even rounds in white*

**Rnd 11:** Switch back to MC (black/dark gray). Sc around [24]

**Rnds 12-13:** sc around in MC [24]
*2 even rounds*

**Rnd 14:** (2 sc, dec) around [18]
*Math check: 6 repeats, 6 × 3 = 18 ✓*

**Begin stuffing the body firmly.**

**Rnd 15:** (sc, dec) around [12]
*Math check: 6 repeats, 6 × 2 = 12 ✓*

**Rnd 16:** dec around [6]
*Math check: 6 decreases, 12 ÷ 2 = 6 ✓*

Fasten off, leaving a long tail. Stuff firmly. Use yarn needle to close the 6-st opening. Weave in end.

---

## HEAD

**With MC (black/dark gray):**

**Rnd 1:** 6 sc in magic ring [6]

**Rnd 2:** inc in each st around [12]
*Math check: 6 × 2 = 12 ✓*

**Rnd 3:** (sc, inc) around [18]
*Math check: 6 × 3 = 18 ✓*

**Rnds 4-6:** sc around [18]
*3 even rounds*

**If using safety eyes, insert them now between rounds 4 and 5, approximately 6-7 stitches apart.**

**Rnd 7:** (sc, dec) around [12]
*Math check: 6 × 2 = 12 ✓*

**Begin stuffing the head firmly.**

**Rnd 8:** dec around [6]
*Math check: 6 decreases, 12 ÷ 2 = 6 ✓*

Fasten off, leaving a long tail for sewing. Stuff firmly. Use yarn needle to close the 6-st opening.

---

## FLIPPERS/WINGS (make 2)

**With MC (black/dark gray):**

**Rnd 1:** 4 sc in magic ring [4]

**Rnd 2:** (sc, inc) around [6]
*Math check: 2 repeats, 2 × 3 = 6 ✓*

**Rnds 3-6:** sc around [6]
*4 even rounds*

**Rnd 7:** (sc, dec) around [4]
*Math check: 2 repeats, 2 × 2 = 4 ✓*

Fasten off, leaving a long tail for sewing. Flatten the flipper and stuff very lightly (or leave unstuffed for a flatter look).

---

## FEET (make 2)

**With Orange or Yellow:**

**Rnd 1:** 4 sc in magic ring [4]

**Rnd 2:** (sc, inc) around [6]
*Math check: 2 × 3 = 6 ✓*

**Rnd 3:** (2 sc, inc) around [8]
*Math check: 2 repeats, 2 × 4 = 8 ✓*

Fasten off, leaving a long tail for sewing. Flatten the foot to create an oval/triangular shape. Do not stuff.

---

## BEAK

**With Orange or Yellow:**

**Rnd 1:** 4 sc in magic ring [4]

**Rnd 2:** sc around [4]

**Rnd 3:** sc around [4]

Fasten off, leaving a long tail for sewing. Stuff very lightly.

---

## ASSEMBLY

Use the photos as a guide and pins to hold pieces in place before sewing.

1. **Attach Head to Body:** Position the head on top of the body, centered over the white belly section. The bottom of the head should slightly overlap the top of the body. Using the long tail from the head and whip stitch, sew the head securely to the body all the way around. Make sure it's firmly attached.

2. **Attach Beak:** Position the beak on the front of the head, centered between the eyes (if you've already placed them) or approximately in the middle of the face. The beak should point slightly downward. Sew in place using the long tail and whip stitch.

3. **Attach Flippers:** Position the flippers on either side of the body, approximately at rounds 10-12 (where the white belly meets the black back on the sides). Angle them slightly downward and outward. Sew securely in place with whip stitch.

4. **Attach Feet:** Position the feet at the bottom front of the body. They should angle outward and forward so the penguin can sit upright. Sew the back edge of each foot to the bottom of the body, leaving the front to stick out.

5. **Add Eyes (if not using safety eyes):** With black yarn, embroider two circles for eyes above the beak, or use French knots. Alternatively, add a small white highlight with white yarn to make them sparkle.

6. **Weave in all remaining ends.**

---

## FINISHING

- Shape your penguin by adjusting the stuffing if needed
- Make sure the penguin sits upright; adjust feet angle if necessary
- Steam block gently if desired to smooth any uneven stitches (test on a swatch first)

---

## Customization Ideas

- **Bow Tie or Scarf:** Chain 30-40 sts and wrap around the neck, or crochet a small bow
- **Different Colors:** Make a blue penguin, rainbow penguin, or use any color combination
- **Baby Penguin:** Use DK weight yarn and a smaller hook for a tiny version
- **Earmuffs:** Make two small circles and connect with a chain or pipe cleaner
- **Add Texture:** Use fuzzy yarn for a fluffy appearance

---

## Care Instructions

Hand wash in cool water with mild detergent. Reshape and lay flat to dry. Do not machine wash or dry.

---

## Skill Level

**Beginner** - Requires knowledge of basic crochet stitches (chain, single crochet, increase, decrease) and working in the round.

---

**Pattern designed for easy amigurumi construction using simple shapes. Perfect for beginners learning to crochet 3D objects!**

**Happy Crocheting! 🐧**

---

© 2025 - This pattern is for personal use only. You may sell finished items made from this pattern, but please credit the designer. Do not redistribute or sell this pattern.
Disclaimer: This pattern was generated by AI and should be reviewed for accuracy before use. While we strive for quality, AI-generated content may contain errors. Please verify measurements, stitch counts, and instructions before beginning your project. Generated by purlJam.uk
Access your pattern anytime
Bookmark this page to access your pattern anytime