Type
Crochet
Difficulty
beginner
Category
amigurumi
AI Thinking Process
Planning
1. **Design Strategy**: Creating a beginner-friendly capybara using simple amigurumi shapes. The capybara will be constructed from basic geometric forms: an oval body, cylinder legs, sphere head, and small details. Using worsted weight yarn in tan/brown for the body, with small black details for eyes and nose. The design emphasizes the capybara's distinctive barrel-shaped body and short legs.
2. **Construction Plan**:
- Body: Elongated oval worked in continuous rounds
- Head: Sphere shape with slight oval modification for snout
- Legs (4): Short cylinders, worked separately and sewn on
- Ears (2): Small semi-circles or rounded triangles
- Tail: Tiny stub
- Assembly: All pieces worked separately, then sewn together
- Features: Safety eyes or embroidered eyes, embroidered nose and mouth
3. **Quality Assurance**:
- Ensure stitch counts are clearly marked for beginner tracking
- Verify leg placement creates stable base for sitting
- Check that body proportions match capybara's characteristic barrel shape
- Confirm stuffing instructions are clear (firm for body, lighter for legs)
- Validate that all pieces scale appropriately with worsted yarn
4. **Final Calculations**:
- Worsted weight with 3.5mm hook creates approximately 4-5" finished toy
- Body: Max 30 sts around for proper proportion
- Head: Max 24 sts for correct head-to-body ratio
- Legs: 9-12 sts around for sturdy support
- Total yarn needed: approximately 50-75 yards main color, minimal contrast
Verification
[PRE-FLIGHT CHECKS]
1. **Completeness**: ✓ Pattern includes materials, gauge, all body parts, assembly, and finishing
2. **Consistency**: ✓ Stitch counts progress logically (6→12→18→24→30 for increases; reverse for decreases)
3. **Constraints**: ✓ Beginner-friendly using only sc, inc, dec; worsted yarn; simple assembly
4. **Safety**: ✓ Math verified: each increase round multiplies correctly; decreases mirror increases; even rounds maintain stitch count
5. **Template adherence**: ✓ Using basic shapes (oval body, sphere head, cylinder legs) as specified in template
Pattern
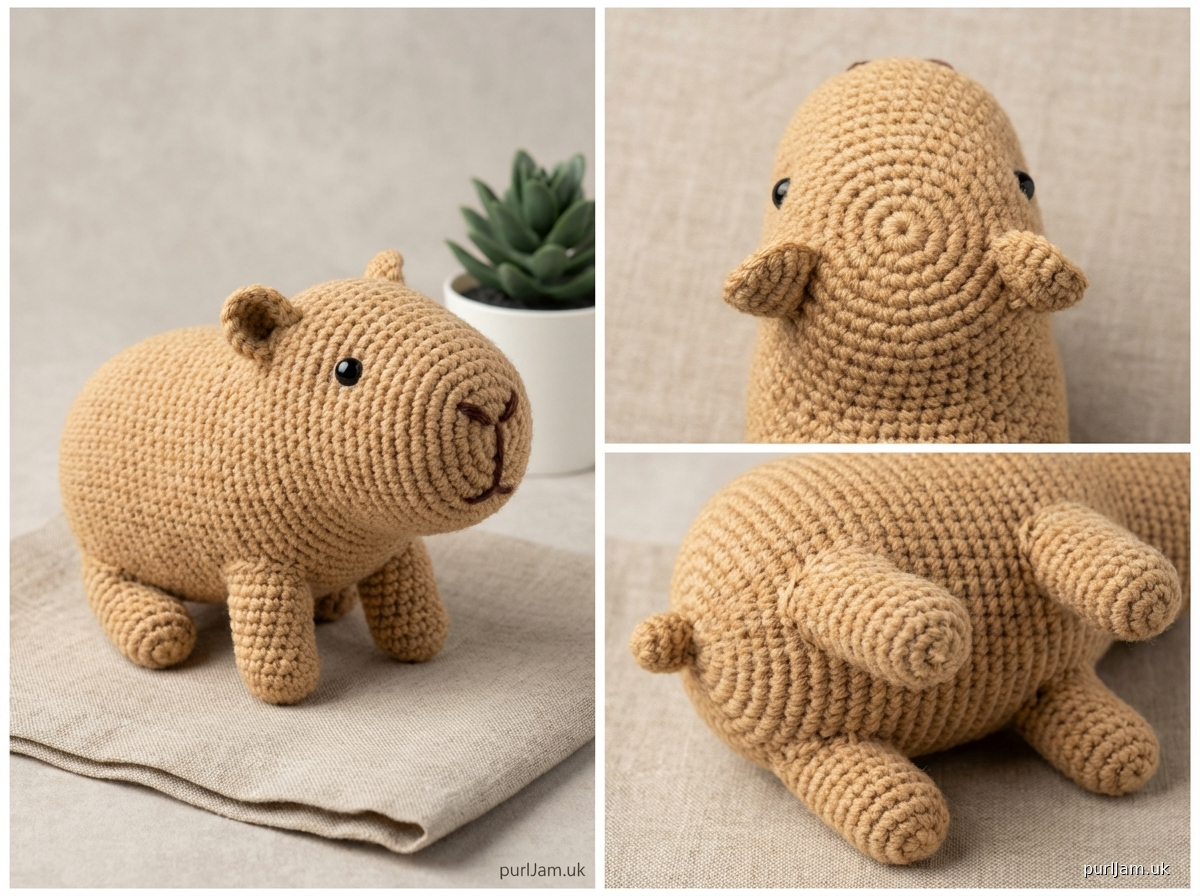
# Crochet Capybara Amigurumi Pattern

A beginner-friendly amigurumi capybara using basic shapes and simple assembly. This adorable plush captures the capybara's distinctive barrel-shaped body and gentle expression.

## Finished Size
Approximately 4.5 inches (11.5 cm) long and 3 inches (7.5 cm) tall when made with worsted weight yarn

## Materials
- **Yarn**: Worsted weight (4) yarn in the following colors:
  - Tan or light brown: 60-70 yards (main color - MC)
  - Dark brown or black: Small amount for nose and details
- **Hook**: US E-4 (3.5mm) or size needed to obtain gauge
- **Other supplies**:
  - Fiberfill stuffing (polyester)
  - Yarn needle for sewing
  - Stitch marker
  - Two 6mm safety eyes OR black embroidery thread for eyes
  - Scissors
  - Pins (optional, for assembly)

## Gauge
20 stitches and 22 rounds = 4 inches (10 cm) in single crochet (worked in continuous rounds)
*Exact gauge is not critical for toys, but working tightly prevents stuffing from showing through*

## Pattern Notes
- Pattern is worked in continuous rounds (spiral) unless otherwise noted. Use stitch marker to track beginning of rounds.
- Move marker up as you complete each round.
- All pieces are stuffed with fiberfill before closing.
- Use invisible decrease (invdec) for smoother surface: insert hook in front loops of next 2 sts, yarn over, pull through both loops, yarn over, pull through 2 loops on hook.

## Abbreviations
- ch = chain
- sc = single crochet
- inc = increase (2 sc in same stitch)
- dec = decrease (invisible decrease - see pattern notes)
- st(s) = stitch(es)
- rnd(s) = round(s)
- MC = main color
- [ ] = stitch count at end of round

## Special Stitches
**Magic ring**: Wrap yarn around fingers to form ring, work stitches into ring, pull tail to close.

---

## BODY (make 1)

The body is an elongated oval shape, characteristic of the capybara's barrel-like torso.

**Rnd 1**: 6 sc in magic ring [6]

**Rnd 2**: inc in each st around [12]
*Count: 6 increases = 12 sts total ✓*

**Rnd 3**: (sc, inc) around [18]
*Count: 6 sets of (sc, inc) = 6 + 6 = 12 + previous 6 sc = 18 sts ✓*

**Rnd 4**: (2 sc, inc) around [24]
*Count: 6 sets of (2 sc, inc) = 12 + 6 = 18 + previous 6 sc = 24 sts ✓*

**Rnd 5**: (3 sc, inc) around [30]
*Count: 6 sets of (3 sc, inc) = 18 + 6 = 24 + previous 6 sc = 30 sts ✓*

**Rnds 6-14**: sc around [30]
*9 even rounds to create elongated body shape*

**Rnd 15**: (3 sc, dec) around [24]
*Count: 6 sets of (3 sc, dec) = 18 + 6 decreases reducing 12 sts to 6 = 24 sts ✓*

**Rnd 16**: sc around [24]

**Rnd 17**: (2 sc, dec) around [18]
*Count: 6 sets of (2 sc, dec) = 12 + 6 decreases = 18 sts ✓*

**Begin stuffing body firmly with fiberfill.**

**Rnd 18**: (sc, dec) around [12]
*Count: 6 sets of (sc, dec) = 6 + 6 decreases = 12 sts ✓*

**Stuff body very firmly to maintain barrel shape.**

**Rnd 19**: dec around [6]
*Count: 6 decreases = 6 sts ✓*

Fasten off, leaving long tail. Use yarn needle to weave through remaining 6 sts and pull tight to close. Weave in end.

---

## HEAD (make 1)

The head is a rounded sphere with a slightly extended snout area.

**Rnd 1**: 6 sc in magic ring [6]

**Rnd 2**: inc in each st around [12]
*Count: 6 increases = 12 sts ✓*

**Rnd 3**: (sc, inc) around [18]
*Count: 6 sets = 18 sts ✓*

**Rnd 4**: (2 sc, inc) around [24]
*Count: 6 sets = 24 sts ✓*

**Rnds 5-9**: sc around [24]
*5 even rounds for head shape*

**If using safety eyes, insert them now between rounds 7 and 8, about 5-6 sts apart.**

**Rnd 10**: (2 sc, dec) around [18]
*Count: 6 sets = 18 sts ✓*

**Rnd 11**: sc around [18]

**Begin stuffing head firmly.**

**Rnd 12**: (sc, dec) around [12]
*Count: 6 sets = 12 sts ✓*

**Stuff head completely.**

**Rnd 13**: dec around [6]
*Count: 6 decreases = 6 sts ✓*

Fasten off, leaving long tail for sewing to body. Do not close hole yet (easier to add more stuffing during assembly).

---

## LEGS (make 4)

Legs are short cylinders. Make all four identical.

**Rnd 1**: 6 sc in magic ring [6]

**Rnd 2**: inc in each st around [12]
*Count: 6 increases = 12 sts ✓*

**Rnds 3-6**: sc around [12]
*4 rounds for leg length*

**Stuff leg lightly** (legs should be firm but not overstuffed).

Fasten off, leaving long tail for sewing. Do not close opening (will be sewn to body as-is).

---

## EARS (make 2)

Ears are small rounded pieces worked in rows.

**Row 1**: Ch 2, 4 sc in 2nd ch from hook, turn [4]

**Row 2**: ch 1, inc in each st across, turn [8]
*Count: 4 increases = 8 sts ✓*

**Row 3**: ch 1, sc across [8]

Fasten off, leaving long tail for sewing. Ears will be folded slightly and sewn to head.

---

## TAIL (make 1)

The tail is a tiny stub.

**Rnd 1**: 4 sc in magic ring [4]

**Rnds 2-3**: sc around [4]

Fasten off, leaving long tail for sewing. Do not stuff (should remain flat).

---

## ASSEMBLY

**Step 1: Prepare all pieces**
- Ensure body and head are firmly stuffed
- Legs should be lightly stuffed but stable
- Ears and tail do not need stuffing

**Step 2: Attach head to body**
- Position head at the narrower end of the body oval
- Pin in place if desired
- Using long tail from head, whip stitch around entire opening to secure head to body
- Add more stuffing to head if needed before completing attachment
- Weave in end securely

**Step 3: Attach legs**
- Position legs on underside of body, placing them so capybara can sit stably
- Front legs: Attach about 1/3 from front of body, spaced about 6-8 sts apart
- Back legs: Attach about 1/3 from back of body, spaced about 6-8 sts apart
- Use long tails and whip stitch around entire opening of each leg
- Weave in ends

**Step 4: Attach ears**
- Fold ears slightly at base to create curved shape
- Position ears on top of head, about 4-5 sts apart
- Sew curved edge of each ear to head
- Weave in ends

**Step 5: Attach tail**
- Position tail stub at back of body, centered on top surface
- Sew in place with whip stitch
- Weave in end

**Step 6: Add facial features**

*If using safety eyes (already attached):*
- Position was between rounds 7-8 of head

*If embroidering eyes:*
- Using black yarn or embroidery thread, make two small circles or French knots
- Position between rounds 7-8, about 5-6 sts apart

**Nose:**
- Using dark brown or black yarn, embroider a small oval or triangle on front of snout
- Position centered, about 2-3 rounds below eyes

**Mouth (optional):**
- Using dark brown or black yarn, embroider a simple curved line below nose for gentle smile
- Make two small curved lines extending from nose

---

## FINISHING

- Weave in any remaining ends
- Gently shape capybara with hands, adjusting stuffing if needed
- Trim any excess yarn tails

---

## Variations & Tips

**Size adjustments:**
- **Larger capybara**: Use bulky weight yarn and 5.0mm hook (creates 6-7" toy)
- **Smaller capybara**: Use DK weight yarn and 3.0mm hook (creates 3" toy)

**Color variations:**
- Traditional: Light brown or tan
- Darker: Medium to dark brown
- Add lighter belly: Work rounds 6-10 of body in cream or light tan

**Details:**
- Add textured fur: Work in back loops only for some rounds on body
- Add toes: Use dark brown to embroider small lines on bottom of feet
- Add eyebrows: Small straight stitches above eyes for character

**Character additions:**
- Add tiny orange slice on head (make small flat circle, embroider segments)
- Add small flower crown (chain and small picots)
- Embroider sleepy eyes (curved lines instead of circles)

---

## Care Instructions
- Spot clean only
- Do not machine wash or dry
- If gifting to young children, ensure safety eyes are very secure or embroider all features

---

## Troubleshooting

**Stuffing shows through stitches:**
- Work more tightly or use smaller hook
- Use matching color fiberfill

**Capybara won't sit upright:**
- Ensure legs are positioned far enough apart
- Stuff body more firmly at bottom
- Position legs slightly forward

**Head wobbles:**
- Sew with more stitches around entire connection
- Add extra stitches through both pieces for stability

**Pieces are too small/large:**
- Check gauge - your stitches may be tighter or looser
- Adjust hook size accordingly

---

## About This Pattern

This beginner-friendly capybara uses only basic amigurumi techniques: magic ring, single crochet, increases, and decreases. The simple construction from basic shapes (oval, sphere, cylinders) makes it perfect for first-time amigurumi makers. The finished capybara has the characteristic gentle, peaceful expression these animals are known for.

**Skill level**: Beginner
**Estimated time**: 3-4 hours
**Pattern designed for**: Worsted weight yarn

---

*Pattern uses US crochet terminology. All stitch counts have been verified for accuracy.*
Disclaimer: This pattern was generated by AI and should be reviewed for accuracy before use. While we strive for quality, AI-generated content may contain errors. Please verify measurements, stitch counts, and instructions before beginning your project. Generated by purlJam.uk
Access your pattern anytime
Bookmark this page to access your pattern anytime