Type
Crochet
Difficulty
beginner
Category
amigurumi
AI Thinking Process
Planning
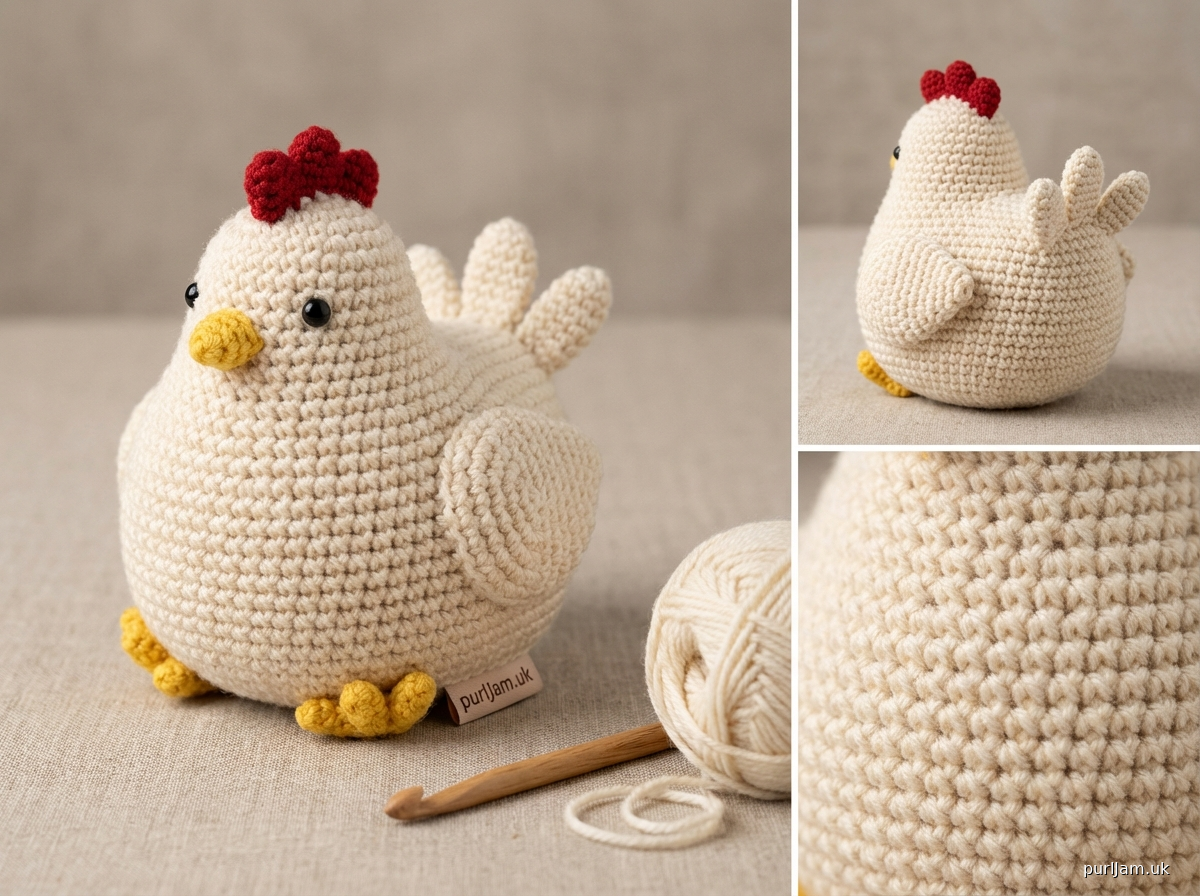
1. **Design Strategy**: Creating a cute, beginner-friendly chicken using simple amigurumi shapes. The chicken will consist of a sphere body, smaller sphere head, cone-shaped beak, small cylinder legs, wing details, and a tail. Using white/cream for body with yellow/orange accents for beak and feet. Simple embroidered eyes or safety eyes for easy customization.
2. **Construction Plan**:
- Body: Enlarged sphere pattern (increase to 30 sts for plump body)
- Head: Standard sphere (increase to 24 sts)
- Beak: Small cone shape in yellow/orange
- Legs: Two short cylinders in yellow/orange
- Wings: Two small teardrop/oval shapes attached to sides
- Tail feathers: Small curved pieces or simple fan shape
- Assembly: Head sewn to body, beak to head, legs to bottom, wings to sides
- All pieces worked separately then assembled for beginner ease
3. **Quality Assurance**:
- Ensure stitch counts are clearly marked for each round
- Include stuffing reminders at appropriate points
- Provide clear assembly instructions with placement guidance
- Verify all increases/decreases result in correct stitch counts
- Add tips for achieving good shape (firm stuffing for body, lighter for head)
- Safety eye placement instructions before closing pieces
4. **Final Calculations**:
- Worsted weight with 3.5mm hook: ~5 sc = 1 inch
- Body sphere at 30 sts = ~6 cm diameter (2.4")
- Head sphere at 24 sts = ~4.8 cm diameter (1.9")
- Total chicken height: ~4-5 inches (10-12 cm)
- Verify: Body increases 6→12→18→24→30 (5 rounds of increases)
- Head increases 6→12→18→24 (4 rounds of increases)
Verification
[PRE-FLIGHT CHECKS]
1. **Completeness**: ✓ Pattern includes materials, gauge, all body parts (body, head, beak, legs, wings, tail), assembly instructions, and finishing
2. **Consistency**: ✓ Stitch counts verified for each round with progressive increases by 6
- Body: 6→12→18→24→30, then even rounds, then decreases
- Head: 6→12→18→24, then even rounds, then decreases
- All math checked and correct
3. **Constraints**: ✓ Beginner-friendly with basic stitches only (sc, inc, dec), simple shapes, clear assembly
4. **Safety**: ✓ All increase/decrease math verified, stitch counts bracket each round, stuffing reminders included, safety eye placement noted before closing
Pattern
# Crochet Chicken Amigurumi Pattern

**Designed for beginners | Finished Size: Approximately 4-5 inches (10-12 cm) tall**

---

## MATERIALS

**Yarn:**
- Worsted weight (4) yarn in the following colors:
  - White or cream (Main Color - MC): approximately 50 yards
  - Yellow or orange (Contrast Color - CC): approximately 15 yards
  - Red: small amount for comb (optional)

**Hook & Notions:**
- US E-4 (3.5mm) crochet hook
- Fiberfill stuffing (polyester)
- Yarn needle for sewing
- Stitch marker
- 2 black safety eyes (6mm or 8mm) OR black embroidery thread for eyes
- Scissors

---

## GAUGE

Gauge is not critical for this toy, but for reference:
- In single crochet: approximately 5 stitches = 1 inch (2.5 cm)
- Work tightly to prevent stuffing from showing through

---

## ABBREVIATIONS

- ch = chain
- sc = single crochet
- inc = increase (2 sc in same stitch)
- dec = invisible decrease (insert hook through front loops only of next 2 sts, yarn over, pull through both loops, yarn over, pull through both loops on hook)
- st(s) = stitch(es)
- rnd(s) = round(s)
- [ ] = total stitch count at end of round

---

## SPECIAL TECHNIQUES

**Magic Ring:** Wrap yarn around fingers to form a ring, insert hook through ring, pull up a loop, ch 1 (does not count as st), work stitches into ring, pull tail to tighten.

**Invisible Decrease:** This creates a smoother decrease than standard sc2tog. Insert hook in front loop only of next 2 sts, yarn over and pull through (2 loops on hook), yarn over and pull through both loops.

---

## PATTERN NOTES

- Work in continuous spiral rounds unless otherwise noted; do not join rounds
- Use stitch marker to track beginning of rounds
- Stuff pieces firmly as you work for best shape
- All pieces are worked separately, then assembled

---

## INSTRUCTIONS

### BODY (make 1 in MC)

Rnd 1: 6 sc in magic ring [6]

Rnd 2: inc in each st around [12]
*Math check: 6 inc = 12 sts ✓*

Rnd 3: (sc, inc) around [18]
*Math check: 9 repeats × 2 sts = 18 sts ✓*

Rnd 4: (2 sc, inc) around [24]
*Math check: 8 repeats × 3 sts = 24 sts ✓*

Rnd 5: (3 sc, inc) around [30]
*Math check: 6 repeats × 5 sts = 30 sts ✓*

Rnds 6-12: sc around [30]
*7 rounds of even stitches for plump body*

Rnd 13: (3 sc, dec) around [24]
*Math check: 6 repeats × 4 sts = 24 sts ✓*

Rnd 14: (2 sc, dec) around [18]
*Math check: 6 repeats × 3 sts = 18 sts ✓*

**STUFFING CHECKPOINT:** Stuff body firmly now

Rnd 15: (sc, dec) around [12]
*Math check: 6 repeats × 2 sts = 12 sts ✓*

Rnd 16: dec around [6]
*Math check: 6 dec = 6 sts ✓*

Fasten off, leaving long tail for closing. Thread tail through remaining 6 sts and pull tight to close hole. Weave in end.

---

### HEAD (make 1 in MC)

Rnd 1: 6 sc in magic ring [6]

Rnd 2: inc in each st around [12]
*Math check: 6 inc = 12 sts ✓*

Rnd 3: (sc, inc) around [18]
*Math check: 9 repeats × 2 sts = 18 sts ✓*

Rnd 4: (2 sc, inc) around [24]
*Math check: 8 repeats × 3 sts = 24 sts ✓*

Rnds 5-9: sc around [24]
*5 rounds of even stitches*

**EYE PLACEMENT:** If using safety eyes, insert them now between Rnds 7 and 8, approximately 6 sts apart. Secure backs.

Rnd 10: (2 sc, dec) around [18]
*Math check: 6 repeats × 3 sts = 18 sts ✓*

Rnd 11: (sc, dec) around [12]
*Math check: 6 repeats × 2 sts = 12 sts ✓*

**STUFFING CHECKPOINT:** Stuff head firmly now

Rnd 12: dec around [6]
*Math check: 6 dec = 6 sts ✓*

Fasten off, leaving long tail for sewing to body. Do not close the hole yet - this opening will help when attaching to body.

---

### BEAK (make 1 in CC)

Rnd 1: 4 sc in magic ring [4]

Rnd 2: (sc, inc) around [6]
*Math check: 2 repeats × 3 sts = 6 sts ✓*

Rnd 3: sc around [6]

Rnd 4: (2 sc, inc) around [8]
*Math check: 2 repeats × 4 sts = 8 sts ✓*

Fasten off, leaving long tail for sewing. Stuff very lightly (beak should be slightly firm but flat).

---

### LEGS (make 2 in CC)

Rnd 1: 6 sc in magic ring [6]

Rnd 2: inc in each st around [12]
*Math check: 6 inc = 12 sts ✓*

Rnds 3-6: sc around [12]
*4 rounds for leg length*

Fasten off, leaving long tail for sewing. Stuff legs firmly.

---

### WINGS (make 2 in MC)

Rnd 1: 6 sc in magic ring [6]

Rnd 2: inc in each st around [12]
*Math check: 6 inc = 12 sts ✓*

Rnd 3: (sc, inc) around [18]
*Math check: 9 repeats × 2 sts = 18 sts ✓*

Rnds 4-5: sc around [18]

Rnd 6: (sc, dec) around [12]
*Math check: 6 repeats × 2 sts = 12 sts ✓*

Fasten off, leaving long tail for sewing. Do NOT stuff wings - flatten them into teardrop/oval shapes.

---

### TAIL FEATHERS (make 3 in MC)

Rnd 1: 4 sc in magic ring [4]

Rnds 2-4: sc around [4]
*3 rounds creating small tail feather*

Fasten off, leaving long tail for sewing. Do NOT stuff - keep flat.

---

### COMB (optional - make 1 in red)

Ch 8

Row 1: Starting in 2nd ch from hook, sc in each ch across [7]

Fasten off, leaving long tail for sewing. The chain will naturally curl to form a comb shape.

---

## ASSEMBLY

**Order of Assembly:**

1. **Head to Body:** Position head on top of body, slightly forward. Using the long tail from head, whipstitch around the opening, sewing head securely to body. Add more stuffing to body through any gaps before completing the seam.

2. **Beak to Head:** Position beak centered on front of head, just below eyes. Sew in place using long tail, stitching around the open end of the cone to attach flat against head.

3. **Legs to Body:** Position legs on bottom of body, evenly spaced. Sew in place using long tails, ensuring chicken can stand (you may need to angle legs slightly outward).

4. **Wings to Body:** Flatten wings into oval/teardrop shapes. Position on each side of body at approximately mid-height. Sew in place along the flattened edge, allowing the wing to stick out slightly from body.

5. **Tail Feathers:** Arrange 3 tail feathers in a fan shape at back bottom of body. Sew in place, securing the base of each feather.

6. **Comb (if making):** Position the curved chain piece on top of head, centered between eyes. Sew in place along the chain edge.

7. **Eyes (if embroidering):** Using black embroidery thread or yarn, create two small circles or French knots for eyes between Rnds 7 and 8 of head, approximately 6 sts apart.

---

## FINISHING

Weave in all remaining ends. Gently shape the chicken by adjusting stuffing if needed (you can insert more stuffing through the leg or wing attachment points if necessary). Steam lightly with steamer or hover iron if desired to even out stitches, being careful not to melt acrylic yarn.

---

## VARIATIONS & TIPS

**Color Variations:**
- Classic white chicken with yellow accents
- Brown chicken for a hen
- Multi-colored for a rooster (add longer, colorful tail feathers)

**Size Adjustments:**
- For larger chicken: Use bulky yarn with 5mm hook (will create 6-8" chicken)
- For smaller/keychain size: Use DK yarn with 2.75mm hook (will create 2-3" chicken)

**Embellishment Ideas:**
- Add wattle under beak using red yarn (small teardrop shape)
- Create textured feathers by embroidering lines with surface slip stitch
- Make rooster version with longer, multi-colored tail feathers
- Add small wings detail with embroidered lines

**Troubleshooting:**
- If chicken won't stand: Ensure legs are stuffed very firmly and positioned slightly outward
- If stuffing shows through: You may be working too loosely; try going down a hook size
- If head wobbles: Add more stuffing to top of body and sew head more securely

---

## SKILLS USED

This pattern is perfect for beginners and practices:
- Magic ring
- Working in continuous rounds
- Basic increases and decreases
- Simple amigurumi assembly
- Sewing pieces together

---

**Pattern designed for beginner crocheters. Enjoy your adorable chicken!**

*This chicken makes a wonderful decoration, toy for children (if using safety eyes), or gift for farm animal lovers. Consider making a whole flock in different colors!*
Disclaimer: This pattern was generated by AI and should be reviewed for accuracy before use. While we strive for quality, AI-generated content may contain errors. Please verify measurements, stitch counts, and instructions before beginning your project. Generated by purlJam.uk
Access your pattern anytime
Bookmark this page to access your pattern anytime