Type
Knitting
Difficulty
intermediate
Category
amigurumi
AI Thinking Process
Planning
Verification
Pattern
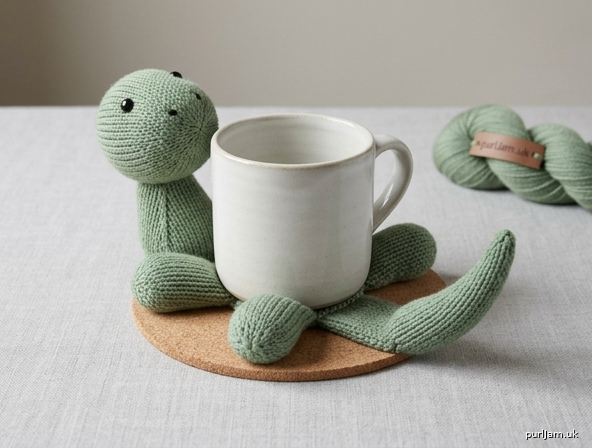
Cute Dinosaur Coaster-Hugger — Knitted Parts (Head, Tail & Legs)
Diseño para acompañar tu base de posavasos viral. Estas piezas se tejen aparte y se cosen a la base, de modo que al colocar la taza el dinosaurio parece abrazarla y quedar "aplastadito". / These pieces are knitted separately and sewn to your existing coaster base so the cup appears to hug and squash the dino.
Difficulty: Intermediate Technique: Worked in the round (DPNs or Magic Loop), stockinette throughout.
Materials
- Yarn: Worsted weight (medium / #4), main dino color — approx. 50–70 yds (46–64 m) total for all pieces. Small amount of contrast for spots/belly if desired.
- Needles: US 5 / 3.75 mm DPNs or a long circular for Magic Loop (1–2 sizes smaller than the worsted label recommendation, to make a tight fabric).
- Stuffing: Polyester fiberfill, approx. 0.5–0.75 oz (15–20 g) total across all pieces.
- Notions: Tapestry needle, stitch marker, embroidery floss (black for eyes, or two 6 mm safety eyes for the head), scissors.
- Base: Your existing viral coaster base (the flat body/shell the pieces attach to).
Gauge
20 sts × 28 rnds = 4" (10 cm) in stockinette in the round, worked tightly. Note: For toys, a tight, even fabric that won't show stuffing matters more than hitting an exact stitch count. If stuffing peeks through, go down another needle size.
Abbreviations
k = knit · kfb = knit front and back (1 inc) · k2tog = knit 2 together (1 dec) · ssk = slip slip knit (1 dec) · rnd = round · st(s) = stitch(es) · MC = main color
Setup for all pieces: Cast on the stated number of sts, divide evenly over 3 DPNs (or Magic Loop), place marker, and join to work in the round, being careful not to twist.
PIECE 1 — HEAD (make 1)
Finished size: approx. 2.5" (6.5 cm) diameter, rounded.
Cast on 6 sts. Join in the round.
- Rnd 1: kfb in every st → 12 sts (6 + 6 = 12 ✓)
- Rnd 2: knit
- Rnd 3: [k1, kfb] 6 times → 18 sts (12 + 6 = 18 ✓)
- Rnd 4: knit
- Rnd 5: [k2, kfb] 6 times → 24 sts (18 + 6 = 24 ✓)
- Rnds 6–12: knit (7 rnds straight)
Insert safety eyes now (if using) between Rnds 8 and 9, about 6 sts apart. Or embroider eyes after stuffing.
- Rnd 13: [k2, k2tog] 6 times → 18 sts (24 − 6 = 18 ✓)
- Rnd 14: knit
- Rnd 15: [k1, k2tog] 6 times → 12 sts (18 − 6 = 12 ✓)
Stuff firmly now.
- Rnd 16: [k2tog] 6 times → 6 sts (12 − 6 = 6 ✓)
Cut yarn, thread through remaining 6 sts, pull tight, and secure. Leave a long tail for seaming.
PIECE 2 — LEGS (make 4: 2 front, 2 back — all identical)
Finished size: approx. 2" (5 cm) tall.
Cast on 6 sts. Join in the round.
- Rnd 1: kfb in every st → 12 sts (6 + 6 = 12 ✓)
- Rnds 2–10: knit (9 rnds straight) — this is the leg column.
Stuff lightly (legs should stay soft enough to look "squished" under the cup).
- Rnd 11: [k2tog] 6 times → 6 sts (12 − 6 = 6 ✓)
Cut yarn, thread through remaining 6 sts, pull tight, secure. Leave a long tail for seaming.
Repeat until you have 4 legs.
PIECE 3 — TAIL (make 1)
Finished size: approx. 4" (10 cm) long, tapering from a pointed tip to a wide base.
Cast on 6 sts. Join in the round. (This is the pointed tip.)
- Rnds 1–3: knit (narrow point)
- Rnd 4: [k1, kfb] 3 times → 9 sts (6 + 3 = 9 ✓)
- Rnds 5–7: knit
- Rnd 8: [k2, kfb] 3 times → 12 sts (9 + 3 = 12 ✓)
- Rnds 9–11: knit
- Rnd 12: [k3, kfb] 3 times → 15 sts (12 + 3 = 15 ✓)
- Rnds 13–15: knit
- Rnd 16: [k4, kfb] 3 times → 18 sts (15 + 3 = 18 ✓)
- Rnds 17–19: knit (wide base)
Stuff firmly from the tip up, packing the point so it holds its shape; leave the base opening slightly softer for a natural curve.
Bind off all 18 sts loosely, or leave sts live on a holder if you prefer to seam the open base flat against the body. Leave a long tail for seaming.
Finishing & Assembly
Work in this order for a balanced, symmetrical "hugging" look:
- Weave in cast-on tails to the inside of each piece before seaming.
- Attach the head: Position the head at the "top" edge of your coaster base, tilted slightly upward so the cup rim will press it into a hug. Sew all around the base of the head with mattress stitch, adding a little more stuffing through the gap just before closing the seam.
- Attach the tail: Sew the wide base of the tail to the opposite (back) edge of the coaster base, curving the point outward. Mattress stitch around the full base opening.
- Attach the legs symmetrically: Sew the 2 front legs at the front edge, evenly spaced, and the 2 back legs at the back edge, mirroring the fronts. Keep left/right spacing equal on both sides so the dino looks evenly "squashed" when the cup sits down. Sew each leg's open (cast-on ring) end flat to the base.
- Features: If not using safety eyes, embroider two eyes with black floss using satin stitch, and add two small nostrils. Optional: embroider a tiny smile so the "squashed" pose reads as happy, not sad.
- Spots (optional): Use duplicate stitch or French knots in contrast yarn along the back and tail.
- Secure and hide all ends deep inside the stuffed pieces; snip close.
Fit / Effect Note
The head and legs are stuffed firmly so they spring back and "hug" the cup, while the legs are stuffed only lightly so they flatten under the cup's weight — this is what creates the viral "the animal gets squished" effect. If your coaster base is small, reduce the head to end at Rnd 11 (18-st version, closing 18 → 12 → 6) for better proportion.
¡Disfruta tu dinosaurio abraza-tazas! / Enjoy your cup-hugging dino!
Disclaimer: This pattern was generated by AI and should be reviewed for accuracy before use. While we strive for quality, AI-generated content may contain errors. Please verify measurements, stitch counts, and instructions before beginning your project. Generated by purlJam.uk
Love this pattern?
Save this pattern to your free PurlJam libraryAccess your pattern anytime
Bookmark this page to access your pattern anytime