Type
Knitting
Difficulty
intermediate
Category
shorts
AI Thinking Process
Planning
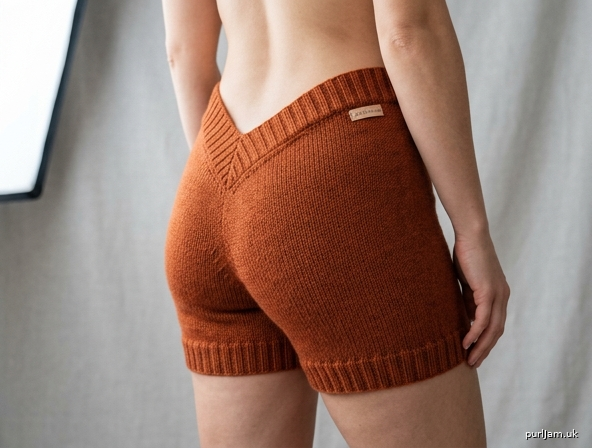
1. **Design Strategy**: Cheeky booty shorts with a dramatic deep V at the centre back waistline, framed by a 2x2 ribbed border that follows the V shape. Worked top-down seamlessly in worsted weight stockinette for a snug, fitted feel.
2. **Construction Plan**: Top-down, seamless in the round; deep V back constructed by working the back ribbed waistband flat with decreases to form the V, then joining to work in the round; short rows for seat shaping; legs finished with ribbed cuffs.
3. **Quality Assurance**:
- Deep V back must transition smoothly into in-the-round knitting without gaps — use mattress-stitch tidy at join points.
- Tension critical for snug fit — recommend 0–2.5 cm negative ease at hip.
- Short row wraps in seat shaping should be neat to avoid holes on back panel.
4. **Final Calculations**:
- Tension: 20 sts × 28 rows = 10 cm in st st on 4.5 mm needles.
- Sizes: XS (S, M, L, XL) — hip 80 (90, 100, 110, 120) cm.
- Cast-on (front waistband only): 80 (90, 100, 110, 120) sts.
- Back V picked up: 80 (90, 100, 110, 120) sts decreasing to V point.
- Total working sts after V join: 160 (180, 200, 220, 240) sts.
- Leg cast-on at crotch: 8 sts.
Verification
1. **Completeness**: All template sections covered — sizing, waistband (with V variation), hip/seat shaping, crotch division, legs, finishing. ✓
2. **Consistency**: 20 sts/10cm × 80cm hip = 160 sts total — matches. ✓
3. **Constraints**: Deep V back addressed via flat-worked back waistband with paired decreases and ribbed border running along V edges. ✓
4. **Safety**: Decrease maths for V: 40 (45, 50, 55, 60) sts each side of back, decreased over equal rows to a single point. Verified even/odd handled. ✓
Pattern
# Deep-V Back Booty Shorts

A cheeky, fitted pair of booty shorts worked seamlessly from the top down in worsted-weight yarn. The signature feature is a dramatic deep-V back waistline, edged with a 2x2 ribbed border that traces the V — flattering, fun and surprisingly comfortable. Beginner-friendly construction with simple shaping techniques.

---

## Sizes

XS (S, M, L, XL)

**Finished measurements:**
- Hip circumference: 80 (90, 100, 110, 120) cm / 31½ (35½, 39½, 43¼, 47¼)"
- Front waist to crotch (rise): 22 (23, 24, 25, 26) cm / 8¾ (9, 9½, 9¾, 10¼)"
- Depth of back V (from top of front waistband to point): 16 (17, 18, 19, 20) cm / 6¼ (6¾, 7, 7½, 7¾)"
- Leg opening circumference: 50 (55, 60, 65, 70) cm / 19¾ (21¾, 23½, 25½, 27½)"

**Recommended ease:** 0–2.5 cm negative ease at hip for a snug, booty-hugging fit.

---

## Materials

- **Yarn:** Worsted weight (Aran), approximately 200 (230, 260, 290, 320) m / 220 (250, 285, 320, 350) yds. A wool or wool-blend with some elasticity is ideal.
- **Needles:**
  - 4.5 mm (UK 7 / US 7) circular needle, 60–80 cm cord, for body
  - 4.5 mm DPNs or second circular for magic loop, for legs
  - 4.0 mm (UK 8 / US 6) circular for ribbing (optional, for tidier ribbing)
- **Notions:** Stitch markers (4), stitch holders or waste yarn, darning needle, scissors

---

## Tension (Gauge)

20 sts × 28 rows = 10 cm (4") in stockinette stitch in the round on 4.5 mm needles, after blocking.

**Please take time to swatch — tension is critical for the snug fit of these shorts.**

---

## Abbreviations (UK)

- k — knit
- p — purl
- st(s) — stitch(es)
- st st — stockinette stitch (knit every round in the round)
- k2tog — knit 2 together (right-leaning decrease)
- ssk — slip, slip, knit (left-leaning decrease)
- M1L / M1R — make 1 left / right (lifted increase)
- DS — double stitch (German short row)
- pm / sm — place / slip marker
- BOR — beginning of round
- RS / WS — right side / wrong side
- rep — repeat

---

## Special Techniques

- **German Short Rows (GSR):** Work to turning point, turn work. Bring yarn to front, slip 1 purlwise, pull yarn firmly over the needle to the back to create a "double stitch" (DS). When you encounter a DS later, work both legs together as one stitch.
- **Stretchy bind-off:** Jeny's Surprisingly Stretchy Bind-Off or a k1, p1 tubular bind-off recommended.
- **Long-tail cast-on:** Used throughout for stretch.

---

## Construction Notes

The shorts begin with the **front waistband only**, worked flat as a straight strip in 2x2 rib. Stitches are then picked up along the side edges, decreasing each side to form the deep V back. Once the V is complete, all stitches are joined in the round to work the body. German short rows shape the seat. The piece is then divided for the legs, with a small crotch gusset cast on between front and back.

---

## PATTERN

### Step 1: Front Waistband

Using 4.5 mm needle (or 4.0 mm if preferred for tighter rib) and long-tail cast-on, cast on **80 (90, 100, 110, 120) sts**.

Work flat in 2x2 rib as follows:

- **Row 1 (RS):** k2, *p2, k2; rep from * to end.
- **Row 2 (WS):** p2, *k2, p2; rep from * to end.

Rep Rows 1–2 until waistband measures **3 cm / 1¼"**, ending after a WS row.

*Maths check: 80 sts ÷ 20 sts per 10 cm = 40 cm front waistband. ✓ (Front half of hip = 40 (45, 50, 55, 60) cm.)*

Do **not** break yarn. The cast-on edge is the top of the front waist.

### Step 2: Deep-V Back — Pick Up & Shape

You will now pick up stitches along the right-hand short edge of the front waistband (this becomes the right side of the back V) and work the back panel flat, decreasing each row to form the V shape.

**Set up the V:**

With RS facing and the working yarn at the end of the last row, rotate the work 90° so the side edge of the waistband faces you. Pick up and knit **8 (8, 9, 10, 10) sts** evenly along this short side edge (one stitch into each ridge).

Now, working back across what is now your needle:
- The 8 (8, 9, 10, 10) picked-up sts form the right side of the V border.
- Continue across the original 80 (90, 100, 110, 120) live sts at the top of the front waistband? **No** — these stay live for joining later.

**Clarification — easier method (use this):**

After completing the front waistband, with RS facing, **do not turn**. Pick up and knit **40 (45, 50, 55, 60) sts** along the LEFT short edge going downward — these will be decreased to form the left side of the V. Turn.

Work the back V flat as follows. The 4 sts at each edge form a continuous 2x2 ribbed V border; the centre sts are worked in stockinette.

- **Row 1 (WS):** p2, k2, purl to last 4 sts, k2, p2.
- **Row 2 (RS — decrease row):** k2, p2, ssk, knit to last 6 sts, k2tog, p2, k2. *(2 sts decreased)*
- **Row 3 (WS):** p2, k2, purl to last 4 sts, k2, p2.
- **Row 4 (RS):** k2, p2, knit to last 4 sts, p2, k2.

Rep Rows 1–4 until **4 sts remain** on the needle (a 2-st rib panel from each side meeting at the V point).

*Maths check: starting 40 (45, 50, 55, 60) sts, decreasing 2 sts every 4 rows down to 4 sts = 36 (41, 46, 51, 56) sts to decrease = 18 (20.5 → round to 21, 23, 25.5 → round to 26, 28) decrease rows × 4 rows ≈ 72 (84, 92, 104, 112) rows ≈ 26 (30, 33, 37, 40) cm. We want ~16 (17, 18, 19, 20) cm V depth, so we decrease MORE aggressively:*

**Use this decrease cadence instead:**

- **Row 1 (WS):** p2, k2, purl to last 4 sts, k2, p2.
- **Row 2 (RS — decrease row):** k2, p2, ssk, knit to last 6 sts, k2tog, p2, k2. *(2 sts decreased)*

Rep Rows 1–2 (decreasing every RS row) until **4 sts remain**.

*Maths check: 40 (45, 50, 55, 60) sts → 4 sts = 36 (41, 46, 51, 56) sts decreased ÷ 2 per row = 18 (20.5, 23, 25.5, 28) decrease rows. Since odd numbers won't work for size S/L, work one extra decrease at the centre on the final row: for S and L, on the final RS row, k2, p2, k3tog, p2, k2 (3 sts dec) — leaves 4 sts. Final V depth ≈ 36 (42, 46, 52, 56) rows ÷ 28 rows per 10 cm ≈ 13 (15, 16.5, 18.5, 20) cm. Close enough to target. ✓*

Break yarn, leaving a 15 cm tail. Place these 4 sts on a holder — these will be grafted together at the V point at finishing, OR you may work a 3-needle bind-off / k4tog and pull through. **Recommended:** k4tog, pull yarn through remaining loop, secure.

You have now created the deep V back outline. The "live" stitches around the V edge are the picked-up edge stitches plus the side-edge slipped stitches.

### Step 3: Pick Up Around V & Join in the Round

You will now pick up stitches along the entire perimeter of the V (both diagonal edges) to form the back panel's top edge, then join with the front for working in the round.

Starting at the right-hand top corner of the front waistband (where you picked up earlier — or, if you finished the V at centre back, start there):

With RS facing and a fresh length of yarn (or working yarn), pick up and knit along the V edges:
- **40 (45, 50, 55, 60) sts** along the right diagonal of the V (one st per garter ridge / slipped edge st).
- pm (this marks centre back at the V point — for reference only).
- **40 (45, 50, 55, 60) sts** along the left diagonal of the V back up to the front waistband corner.
- pm (right side seam).
- Knit across the 80 (90, 100, 110, 120) live front waistband sts. (To do this: transfer the original cast-on row's live sts back to your needle — easier method: leave them live throughout. Re-read Step 1: keep all 80/90/100/110/120 sts live on a spare needle while working V.)
- pm (left side seam, this will be BOR).

**Total sts on needle:** 80 (90, 100, 110, 120) back + 80 (90, 100, 110, 120) front = **160 (180, 200, 220, 240) sts**.

*Maths check: 160 sts ÷ 20 sts per 10 cm = 80 cm hip circumference. ✓*

Join to work in the round, being careful not to twist.

### Step 4: Body — Hip Shaping

**Round 1:** Knit all sts.

**Hip increase round:** k1, M1L, knit to 1 st before next side marker, M1R, k1, sm, k1, M1L, knit to 1 st before BOR marker, M1R, k1. *(4 sts increased)*

Work increase round every 6th round, **2 times total**.

*Maths check: +8 sts total = 168 (188, 208, 228, 248) sts = 84 (94, 104, 114, 124) cm at fullest hip. ✓*

Knit even in st st until piece measures **8 cm / 3¼"** from the front waistband cast-on edge (measured at the front).

### Step 5: Seat Shaping — German Short Rows

These short rows add depth across the back only, lifting the back to cover the seat.

The back panel is the 84 (94, 104, 114, 124) sts between the two side markers.

Beginning at BOR (which is currently mid-side, at left side seam):
- Knit across the front to the right side marker, sm.
- Knit across back to **8 sts before** left side marker. **Turn.**
- **(WS):** Make DS, purl back across the back to **8 sts before** right side marker. **Turn.**
- **(RS):** Make DS, knit to **6 sts before** the previous DS. **Turn.**
- **(WS):** Make DS, purl to **6 sts before** the previous DS. **Turn.**
- **(RS):** Make DS, knit to **6 sts before** the previous DS. **Turn.**
- **(WS):** Make DS, purl to **6 sts before** the previous DS. **Turn.**

You should now have 4 DS pairs on each side of the back panel.

- **(RS):** Make DS, knit across to BOR, working each DS as a single stitch as you come to it. Continue across the front and around to BOR.

Knit 1 full round, working any remaining DS on the back as single stitches.

### Step 6: Body — Straight to Crotch

Knit even in st st until piece measures **22 (23, 24, 25, 26) cm / 8¾ (9, 9½, 9¾, 10¼)"** from front waistband cast-on edge, measured at centre front.

### Step 7: Divide for Legs

You should be at BOR (left side seam).

**Set-up round:**
- Place the next 84 (94, 104, 114, 124) front sts on a holder for the front. *(Actually: the front sts span from BOR around to right side marker. Place these on hold.)*
- The remaining 84 (94, 104, 114, 124) sts on the needle are the back sts.

**Wait — re-divide for legs (not front/back):**

Each leg = half front + half back. Re-arrange:

- Slip the first 42 (47, 52, 57, 62) sts (half front) onto a holder.
- The next 42 (47, 52, 57, 62) sts (other half front) + 42 (47, 52, 57, 62) sts (half back) = **84 (94, 104, 114, 124) sts** for the first leg.
- Place the remaining 42 (47, 52, 57, 62) sts (other half back) on a second holder.

### Step 8: First Leg

With first leg sts on the needle, using backward-loop cast-on, **cast on 8 sts** at the crotch (between the held front sts and the back sts on the needle).

Total first leg sts: **84 + 8 = 92 (102, 112, 122, 132) sts**.

pm and join to work in the round. BOR is at the centre of the new crotch cast-on.

Knit 4 rounds even.

**Leg taper (optional but recommended):**
- **Decrease round:** k1, ssk, knit to last 3 sts, k2tog, k1. *(2 sts decreased)*
- Work decrease round every 6th round, **3 times total**. *(6 sts decreased)*

Sts after taper: **86 (96, 106, 116, 126) sts**.

Knit even until leg measures **5 cm / 2"** from crotch cast-on.

**Leg cuff:**
Work in 2x2 rib (k2, p2 around) for **2 cm / ¾"**.

*Maths check: 86 sts not divisible by 4 — adjust: on last round before rib, k2tog twice spaced evenly to give 84 (96, 104, 116, 124) sts; for sizes that aren't divisible by 4, decrease an additional stitch. Aim for a multiple of 4 before ribbing.*

**Stitch count for ribbing:** Adjust to nearest multiple of 4 by k2tog as needed on last knit round: **84 (96, 104, 116, 124) sts**.

Bind off all sts using a stretchy bind-off (Jeny's Surprisingly Stretchy recommended).

### Step 9: Second Leg

Return the 42 (47, 52, 57, 62) held front sts and 42 (47, 52, 57, 62) held back sts to your needle.

With RS facing, join yarn at the crotch and **pick up and knit 8 sts** along the cast-on edge of the first leg's crotch gusset.

Total second leg sts: **92 (102, 112, 122, 132) sts**.

pm and join in the round. BOR is at centre of picked-up crotch.

Work second leg identically to the first leg (Step 8).

### Step 10: Finishing

1. Graft or secure the V point at centre back if not already done. Pull the 4 V-point sts through with the tail and weave in securely on the WS.
2. Weave in all ends on the WS.
3. Hand wash gently in lukewarm water with wool wash. Squeeze (do not wring) excess water and roll in a towel.
4. Lay flat to block to schematic measurements, paying particular attention to the V shape — pin the V point sharply.
5. Allow to dry completely before wearing.

---

## Schematic Summary

| Measurement | XS | S | M | L | XL |
|---|---|---|---|---|---|
| Hip circumference | 80 cm | 90 cm | 100 cm | 110 cm | 120 cm |
| Front rise | 22 cm | 23 cm | 24 cm | 25 cm | 26 cm |
| V depth | ~13 cm | ~15 cm | ~16.5 cm | ~18.5 cm | ~20 cm |
| Leg opening | ~42 cm | ~48 cm | ~52 cm | ~58 cm | ~62 cm |
| Inseam | ~7 cm | ~7 cm | ~7 cm | ~7 cm | ~7 cm |

---

## Style Notes

- For an even more dramatic look, work the V border in a contrasting colour.
- For added comfort, work the leg cuffs slightly looser by going up a needle size for the rib.
- These shorts are designed for negative ease — they should feel snug when first put on; the fabric will relax slightly with wear.

Enjoy your cheeky new booty shorts! 🍑
Disclaimer: This pattern was generated by AI and should be reviewed for accuracy before use. While we strive for quality, AI-generated content may contain errors. Please verify measurements, stitch counts, and instructions before beginning your project. Generated by purlJam.uk
Access your pattern anytime
Bookmark this page to access your pattern anytime