Type
Knitting
Difficulty
intermediate
Category
shawl
AI Thinking Process
Planning
Verification
Pattern
Dragon Wings Shawl
A Beginner Triangular Shawl in Bulky Yarn
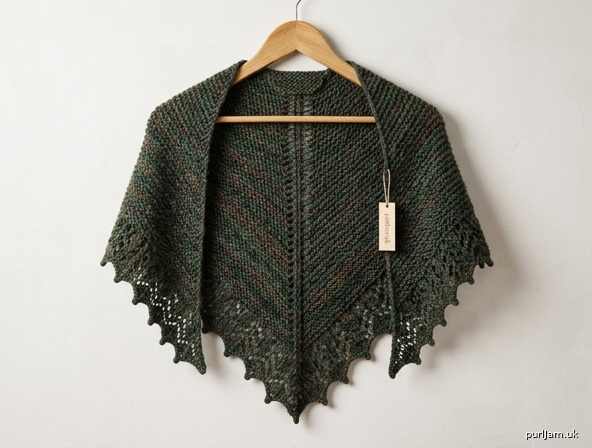
A cozy, dramatic triangular shawl worked from the center-top down. A soft garter-stitch body opens into a pointed lace border that evokes the membranous edge of a dragon's wing. Written in US terminology; bulky-weight yarn (UK: "chunky") throughout.
Skill Level
Beginner — knit, purl, yarn over, k2tog, ssk only.
Finished Measurements (after blocking)
- Wingspan (top edge): approx. 60 in (152 cm)
- Depth (center spine): approx. 28 in (71 cm)
Materials
- Yarn: Bulky weight (US bulky #5 / UK chunky), approx. 330 yd (300 m) — about 200 g.
- Needles: US 11 / 8 mm circular needle (24–32 in / 60–80 cm cable to hold stitches). Working flat; circular used only for capacity.
- Notions: 3 stitch markers (2 optional edge markers + 1 center-spine marker), tapestry needle, blocking pins/wires.
Gauge
12 sts and 24 rows = 4 in (10 cm) in garter stitch (knit every row), blocked. Gauge is not critical for fit but affects finished size and yardage.
Abbreviations (US)
- k – knit
- p – purl
- yo – yarn over
- k2tog – knit 2 together (right-leaning decrease)
- ssk – slip, slip, knit (left-leaning decrease)
- sm – slip marker
- pm – place marker
- RS / WS – right side / wrong side
- st(s) – stitch(es)
Construction Overview
The shawl begins with a small garter tab cast-on that creates a tidy top edge. You then increase 4 stitches every right-side row — one at each end and two at the center spine — forming the classic triangle. After the garter body, a simple two-row lace pattern creates the pointed "dragon wing" edge. Blocking sharpens the points.
Center stitch note: The single center stitch (the spine) sits between the two center yarn-overs. Keep the center marker with this stitch at all times.
Instructions
1. Garter Tab Cast-On
- Cast on 3 sts.
- Knit 6 rows (you will have 3 garter ridges). Do not turn after the last row.
- Rotate the strip 90° clockwise and pick up and knit 3 sts along the long garter edge (one in each ridge).
- Rotate again and pick up and knit 3 sts from the cast-on edge.
You now have 9 sts.
✔ Count check: 3 (original) + 3 (side) + 3 (cast-on) = 9 sts.
2. Setup Rows
Setup Row (WS): k3, p1 (this p1 is the center spine st — pm on the needle before it if helpful), k...
To keep it beginner-simple, we place markers now: Setup Row (WS): k3, pm, k1 (center st — pm on each side of it), pm, k3. → 9 sts, with center stitch isolated.
Reduce to the working border by knitting one plain setup: Setup Row 2 (RS): k9. → 9 sts.
For a clean start we begin the increase pattern from a 7-st arrangement. If you prefer the simplest possible start, use the Simple Start below.
Simple Start (recommended for beginners)
After the tab you have 9 sts arranged: [3 edge sts] [center st] [... ]. Use this repeating body pattern from here:
3. Garter Body (Increase Section)
Work these two rows repeatedly. The RS row adds 4 sts each time.
- Row 1 (RS): k3, yo, knit to center marker, yo, sm, k1 (center st), sm, yo, knit to last 3 sts, yo, k3.
- Row 2 (WS): knit all stitches (slip markers as you come to them).
Repeat Rows 1–2.
Stitch count grows by 4 on each RS row.
Starting count entering Row 1 the first time = 9 sts.
- After 1st RS row: 13 sts
- After 2nd RS row: 17 sts
- …increases of 4 each RS row.
Work Rows 1–2 a total of 50 times.
✔ Count check: 9 + (50 × 4) = 9 + 200 = 209 sts on the needle after the 50th WS row. The layout is: 3 (garter edge) + 100 (left body incl. its yo's) + 1 (center) + 100 (right body) + 3 (garter edge) = 207 body/edge sts framed by yo increases; total on needle = 209 sts. Keep this 209 number for the border math below.
If you want a smaller or larger shawl, work fewer or more repeats — each additional repeat adds ~7 in (18 cm) of wingspan. Remember to end after a WS (Row 2) row.
4. "Dragon Wing" Lace Border
This simple 2-row repeat creates scalloped points along the bottom edge — the wing membrane. It requires the stitch count between markers to be a multiple of 6 plus edge stitches. If your live count is not compatible, adjust in the next plain row (instructions below).
Adjustment row (WS): Knit across, evenly increasing or decreasing so the total is 209 sts (a multiple of 6 works cleanly for the border: 209 → adjust to 207 by k2tog once near the center, giving a clean symmetrical count of 207 = 6 × 34 + 3, with 3 edge sts each side accounted). For beginners: knit across, decreasing to 207 sts total.
✔ Count check: 207 − 3 (right garter edge) − 3 (left garter edge) − 1 (center st) = 200 patterning sts, worked as two mirrored halves of 100. 100 is not a multiple of 6, so we simplify with a universal points border that works over any even number — use the border below, which needs no special multiple.
Universal Points Border (works over any stitch count)
- Border Row 1 (RS): k3, *yo, k2tog; repeat from * to last 3 sts, k3.
- Border Row 2 (WS): knit all sts.
- Border Row 3 (RS): k1, *k2tog, yo; repeat from * to last st, k1.
- Border Row 4 (WS): knit all sts.
Work Rows 1–4 once, then Rows 1–2 once more (6 border rows total). The offset yo/k2tog eyelets create the airy "wing" texture. Stitch count stays constant at 207 sts.
✔ Count check: yo and k2tog pair balances (each yo adds 1, each k2tog removes 1) → net 0 change. Count remains 207 sts throughout the border.
5. Picot Point Bind-Off (the wing tips)
This bind-off creates tiny points along the edge.
- *Cast on 2 sts using the knitted cast-on, bind off 4 sts (in the usual way), then slip the remaining st on the right needle back to the left needle; repeat from * across.
- Fasten off the final stitch and pull yarn through.
✔ Note: The picot bind-off consumes stitches steadily; work loosely so points can splay when blocked.
Finishing & Blocking (Essential)
Blocking transforms the shawl — it opens the lace and sharpens the wing points.
- Weave in all ends with the tapestry needle.
- Soak the shawl in cool water with a little wool wash for 15–20 minutes. Do not agitate.
- Gently squeeze out water (do not wring); roll in a towel and press.
- Lay flat on blocking mats. Pin the center top corners and the center spine point first to set the triangle.
- Stretch the top edge to approx. 60 in (152 cm) and the depth to approx. 28 in (71 cm).
- Pin out each bottom point individually using pins or blocking wires to form sharp "dragon wing" tips.
- Allow to dry completely before unpinning.
Beginner Tips
- Track the center stitch: the single knit stitch between your center markers is the spine — always keep its markers in place.
- Lifeline: thread a contrasting yarn through your stitches every 20 rows in case you need to rip back.
- Ending on WS: always finish a body repeat after Row 2 before starting the border.
- Loose bind-off: if the edge pulls in, switch up one needle size for the picot bind-off.
Schematic (Approximate, Blocked)
        60 in (152 cm) top edge
   ●───────────────────────────────●
    \                             /
     \        garter body        /   28 in
      \                         /    (71 cm)
       \      lace border      /     depth
        \    ∨∨∨∨∨∨∨∨∨∨∨∨    /
         ●∨∨∨∨∨∨∨∨∨∨∨∨∨∨∨●
              wing points
Enjoy your Dragon Wings Shawl — wrap up and take flight! 🐉
Disclaimer: This pattern was generated by AI and should be reviewed for accuracy before use. While we strive for quality, AI-generated content may contain errors. Please verify measurements, stitch counts, and instructions before beginning your project. Generated by purlJam.uk
Access your pattern anytime
Bookmark this page to access your pattern anytime