Type
Crochet
Difficulty
intermediate
Category
bag
AI Thinking Process
Planning
Verification
Pattern
Drawstring Market Tote
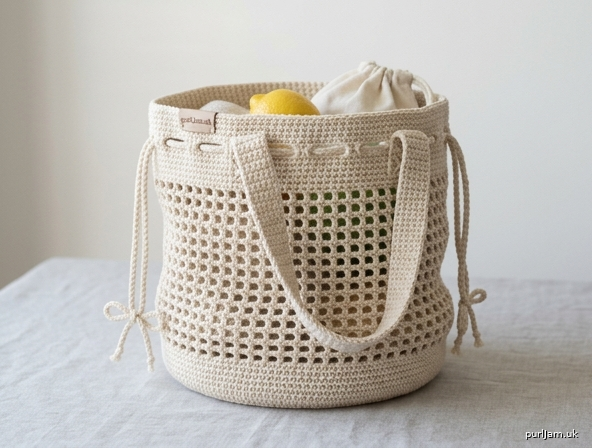
A sturdy beginner tote worked from the bottom up. A firm single crochet base supports the bag, an open mesh body adds stretch for market runs, and a solid top band with eyelets cinches closed with dual drawstrings. Sewn-on handles keep it easy to carry. Cotton yarn is recommended for strength and a more structured fabric.
Skill level: Beginner
Finished measurements
Measured flat, unstretched. Mesh will grow with use.
- Base diameter: 8½" (21.5 cm)
- Circumference: 27" (68.5 cm)
- Height (excluding handles): 14½" (37 cm)
- Handle length: 20" (51 cm)
- Handle width: 2" (5 cm)
- Handle drop: about 8" (20.5 cm)
One size.
Materials
Yarn: Worsted weight (medium / 4), 100% cotton, about 500 yd (457 m) in one color.
Suggested yarns (choose one):
- Lion Brand 24/7 Cotton [186 yd (170 m) per skein]: 3 skeins
- Knit Picks / WeCrochet Dishie [190 yd (174 m) per skein]: 3 skeins
- Lily Sugar’n Cream Solids [120 yd (109 m) per skein]: 5 skeins
Hook: US H/8 (5.0 mm), or size needed to obtain gauge. Use a smaller hook if your fabric is loose — a firm fabric makes a better bag.
Notions:
- Yarn needle
- Scissors
- 1 locking stitch marker (optional, for the start of each round)
- 4 stitch markers or pins (for handle placement)
Gauge
16 sc and 18 rnds = 4" (10 cm) in single crochet, worked in the round, unstretched.
Work a 5" (12.5 cm) swatch in joined sc rounds, then measure the center 4" (10 cm). If you have fewer than 16 sc in 4" (10 cm), go down a hook size. Firm fabric is more important here than matching gauge exactly; a slightly dense fabric is ideal.
Abbreviations (US)
- beg — beginning
- ch — chain
- dc — double crochet
- rep — repeat
- rnd(s) — round(s)
- sc — single crochet
- sk — skip
- sl st — slip stitch
- sp(s) — space(s)
- st(s) — stitch(es)
- BLO — back loop only
Pattern notes
- US crochet terminology throughout.
- Bag is worked in joined rounds, without turning. After joining, the next round starts in the same stitch as the join unless the instructions say otherwise.
- Sc rounds: Ch 1 at the start of the round does not count as a stitch. Join with a sl st to the first sc.
- Mesh rounds: Beg ch 4 counts as dc + ch 1. Join with a sl st in the 3rd ch of the beg ch-4.
- Move a stitch marker to the first stitch of each round if it helps you track the join.
- Do not worry about a slight spiral look at the join on sc rounds; it will not show once the bag is in use.
- Cotton is strongly recommended. Acrylic will grow more and feel less sturdy.
- To change height, work more or fewer mesh repeats before the top band. Extra yarn may be needed.
Magic ring alternative: If you prefer not to use a magic ring, ch 2, work 6 sc in the 2nd ch from the hook, and join. (6 sts)
Bag
Base
Work a tight magic ring.
Rnd 1: Ch 1, 6 sc in ring, join. (6 sts)
Rnd 2: Ch 1, 2 sc in each st around, join. (12 sts) (6 increases → 6 + 6 = 12 ✓)
Rnd 3: Ch 1, *sc in next st, 2 sc in next st; rep from * around, join. (18 sts) (6 increases → 12 + 6 = 18 ✓)
Rnd 4: Ch 1, *sc in next 2 sts, 2 sc in next st; rep from * around, join. (24 sts) (6 increases → 18 + 6 = 24 ✓)
Rnd 5: Ch 1, *sc in next 3 sts, 2 sc in next st; rep from * around, join. (30 sts) (6 increases → 24 + 6 = 30 ✓)
Rnd 6: Ch 1, *sc in next 4 sts, 2 sc in next st; rep from * around, join. (36 sts) (6 increases → 30 + 6 = 36 ✓)
Rnd 7: Ch 1, *sc in next 5 sts, 2 sc in next st; rep from * around, join. (42 sts) (6 increases → 36 + 6 = 42 ✓)
Rnd 8: Ch 1, *sc in next 6 sts, 2 sc in next st; rep from * around, join. (48 sts) (6 increases → 42 + 6 = 48 ✓)
Rnd 9: Ch 1, *sc in next 7 sts, 2 sc in next st; rep from * around, join. (54 sts) (6 increases → 48 + 6 = 54 ✓)
Rnd 10: Ch 1, *sc in next 8 sts, 2 sc in next st; rep from * around, join. (60 sts) (6 increases → 54 + 6 = 60 ✓)
Rnd 11: Ch 1, *sc in next 9 sts, 2 sc in next st; rep from * around, join. (66 sts) (6 increases → 60 + 6 = 66 ✓)
Rnd 12: Ch 1, *sc in next 10 sts, 2 sc in next st; rep from * around, join. (72 sts) (6 increases → 66 + 6 = 72 ✓)
Rnd 13: Ch 1, *sc in next 11 sts, 2 sc in next st; rep from * around, join. (78 sts) (6 increases → 72 + 6 = 78 ✓)
Rnd 14: Ch 1, *sc in next 12 sts, 2 sc in next st; rep from * around, join. (84 sts) (6 increases → 78 + 6 = 84 ✓)
Rnd 15: Ch 1, *sc in next 13 sts, 2 sc in next st; rep from * around, join. (90 sts) (6 increases → 84 + 6 = 90 ✓)
Rnd 16: Ch 1, *sc in next 14 sts, 2 sc in next st; rep from * around, join. (96 sts) (6 increases → 90 + 6 = 96 ✓)
Rnd 17: Ch 1, *sc in next 15 sts, 2 sc in next st; rep from * around, join. (102 sts) (6 increases → 96 + 6 = 102 ✓)
Rnd 18: Ch 1, *sc in next 16 sts, 2 sc in next st; rep from * around, join. (108 sts) (6 increases → 102 + 6 = 108 ✓)
Base should measure about 8½" (21.5 cm) across.
Rnd 19 (turning ridge): Ch 1, sc in BLO of each st around, join. (108 sts)
This ridge helps the base sit flat.
Rnds 20–22: Ch 1, sc in each st around, join. (108 sts)
Mesh body
Mesh Rnd 1: Ch 4 (counts as dc + ch 1), sk next st, *dc in next st, ch 1, sk next st; rep from * around, join with sl st in 3rd ch of beg ch-4. (54 dc, 54 ch-1 sps) (108 sts accounted for: 54 + 54 = 108 ✓)
Mesh Rnd 2: Ch 4 (counts as dc + ch 1), *dc in next dc, ch 1; rep from * around, join with sl st in 3rd ch of beg ch-4. (54 dc, 54 ch-1 sps)
Mesh Rnds 3–24: Repeat Mesh Rnd 2.
Work even if you lose your place: each round has 54 dc, and every dc is worked into a dc from the round below. Mesh section should measure about 12" (30.5 cm) tall. For a taller or shorter tote, add or omit mesh rounds here.
Top band and drawstring eyelets
Rnd 1 (transition): Ch 1, sc in same st as join (this is the top of the beg ch-3 / first dc), sc in next ch-1 sp, *sc in next dc, sc in next ch-1 sp; rep from * around, join. (108 sc) (54 dc + 54 sps = 108 ✓)
Rnds 2–3: Ch 1, sc in each st around, join. (108 sts)
Handles will be sewn to this solid band, below the eyelets.
Rnd 4 (eyelets): Ch 1, *sc in next 4 sts, ch 2, sk next 2 sts; rep from * around, join. (72 sc, 18 ch-2 sps) (18 repeats × 6 sts = 108 ✓)
Rnd 5: Ch 1, *sc in next 4 sc, 2 sc in next ch-2 sp; rep from * around, join. (108 sts) (72 sc + 36 sc in sps = 108 ✓)
Rnds 6–8: Ch 1, sc in each st around, join. (108 sts)
Fasten off. Weave in the remaining base and top ends.
Handles (make 2)
Worked flat in rows, then edged for strength.
Row 1: Ch 9, sc in 2nd ch from hook and in each ch across, turn. (8 sc) (8 sc ÷ 16 sc per 4" = 2" / 5 cm wide ✓)
Rows 2–90: Ch 1, sc in each st across, turn. (8 sc)
90 rows at 18 rows = 4" → 90 ÷ 18 × 4" = 20" (51 cm) ✓
Do not fasten off.
Edging: Ch 1, sc evenly around the entire rectangle, working 1 sc in each st or row-end on the long sides, 3 sc in each corner, and 8 sc across each short end. Join to first sc. Fasten off, leaving a 24" (61 cm) tail for sewing.
Make the second handle the same way.
Drawstrings (make 2)
Each cord should measure 42" (107 cm).
Ch until the chain measures 42" (107 cm) — about 160–170 chains, but measure rather than count.
Next row: Sl st in the 2nd ch from the hook and in each ch across.
Fasten off. Tie the two yarn tails of each cord together in a small, firm knot and trim. Gently stretch the cord so the slip stitches settle.
Finishing
Attach the handles
Handles sit on the solid band below the eyelets so the top can still cinch. Do not sew over the eyelet round.
- Lay the bag flat. The two folded side edges are the “sides” of the tote.
- On the front, place one handle so each short end overlaps the top band by 1½" (4 cm). Center the handle: each outer edge of a handle end should sit about 2½" (6.5 cm) in from a side fold. You will have about 4½" (11.5 cm) between the inner edges of the two ends.
- Pin in place. Using the long tail (or matching yarn), sew each end to the band with a firm backstitch around the 1½" (4 cm) overlap, then sew an X through the overlap for extra strength. Work through both the handle and the bag fabric, but do not close the eyelets above.
- Turn the bag over and repeat with the second handle, lining it up with the first so the bag hangs evenly.
Weave in remaining tails.
Thread the drawstrings
There are 18 eyelets. Use them as a ring, like a gym bag.
Cord A: Starting at any eyelet (call it eyelet 1), weave in and out through every eyelet all the way around. Come back out through eyelet 1. Both ends of Cord A now hang from the same eyelet.
Cord B: Start at the eyelet directly opposite (eyelet 10: 1 + 9 = 10 ✓). Weave in and out through every eyelet all the way around. Come back out through eyelet 10.
Pull both pairs of ends to cinch. Tie each pair in a bow or a firm overhand knot, as you prefer.
Shape
Steam-block or wet-block the base so it lies flat, if needed. Do not stretch the mesh aggressively — it will relax in use. Let dry completely before filling.
Care
Follow the yarn label. Most cotton worsted yarns are machine washable cold, then reshaped and dried flat. Cinch the drawstrings before washing so they do not snag.
Customizing
- Taller bag: Work extra mesh rounds before the top band.
- Denser fabric: Use US G/6 (4.0 mm) for a firmer, slightly smaller tote; stitch counts stay the same.
- Longer shoulder handles: Work 108 rows instead of 90 (about 24" / 61 cm) and allow extra yarn.
- One long drawstring: Make a single 48" (122 cm) cord and weave it once around, tying the ends together.
Disclaimer: This pattern was generated by AI and should be reviewed for accuracy before use. While we strive for quality, AI-generated content may contain errors. Please verify measurements, stitch counts, charts, and instructions before beginning your project. Generated by purlJam.uk
Love this pattern?
Save this pattern to your free PurlJam libraryAccess your pattern anytime
Bookmark this page to access your pattern anytime