Type
Crochet
Difficulty
advanced
Category
blanket
AI Thinking Process
Planning
Verification
Pattern
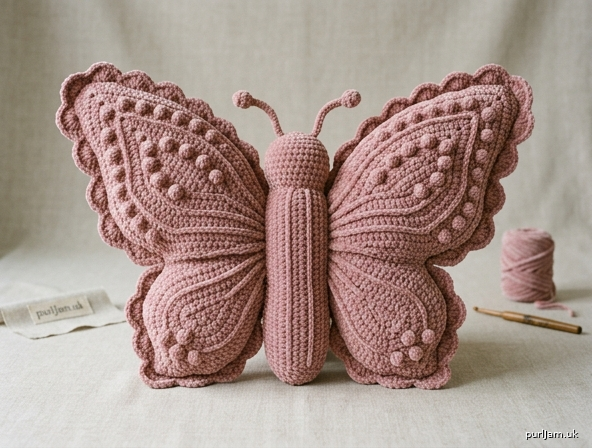
Dusty Rose Boho Butterfly Pillow
Advanced Crochet Pattern – US Terminology
Finished Size
Wingspan: 26″ (66 cm)
Height (top of upper wing to bottom of lower wing): 18″ (46 cm)
Body length: 14″ (35.5 cm)
Body diameter (stuffed): 6″ (15 cm)
Difficulty
Advanced – requires confident increases/decreases, short-row shaping, post stitches, seamless joining, and firm amigurumi-style stuffing.
Materials
- Yarn: Worsted-weight chenille, color Dusty Rose (approx. 1000 yd / 915 m). Choose a soft, non-shedding chenille that still shows stitch definition (e.g., 100% polyester or cotton-blend chenille).
- Hook: US I/9 (5.5 mm) – or size needed to obtain gauge. Smooth metal or coated hook recommended to prevent snagging.
- Notions:
- Stitch markers (at least 8)
- Yarn needle (blunt, large-eye)
- Polyester fiberfill (approx. 12–14 oz / 340–400 g)
- Locking stitch markers or safety pins for wing alignment
- Scissors
- Optional: 12″ (30 cm) length of floral wire or pipe cleaners for posable antennae
Gauge
15 dc and 8 rows = 4″ (10 cm) in plain dc, lightly steamed (do not flatten texture).
Work a 6″ × 6″ swatch in dc, measure center 4″. Adjust hook if necessary; chenille fabric should be dense enough that fiberfill does not show through.
Abbreviations (US)
- ch – chain
- st(s) – stitch(es)
- sl st – slip stitch
- sc – single crochet
- hdc – half double crochet
- dc – double crochet
- tr – treble crochet
- dtr – double treble crochet
- fpdc – front-post double crochet
- bpdc – back-post double crochet
- bobble – [yo, insert hook, yo, pull up loop, yo, draw through 2 loops] 4 times in same st, yo, draw through all 5 loops on hook
- inc – increase (2 dc in same st)
- dc2tog – double crochet 2 together (decrease)
- sc2tog – single crochet 2 together
- PM – place marker
- RM – remove marker
- RS – right side
- WS – wrong side
- FLO/BLO – front/back loop only
Special Stitches
- Scallop Shell (used on wing edges): (dc, ch 1, dc, ch 1, dc, ch 1, dc) in indicated st or space.
- Picot: ch 3, sl st in 3rd ch from hook.
- Short-row turn: work stated sts, turn, leaving remaining sts unworked; later rows rejoin them for 3-D cupping.
Pattern Notes
- Chenille has low stretch and can pill; keep tension even and avoid frogging more than once in the same area.
- All rounds of the body are worked in continuous spiral unless otherwise stated; mark first st of each round.
- Wings are worked flat in turned rows, then shaped with short rows and seamed to body.
- Stuff body firmly as you close; final shape should be a smooth elongated oval.
- Block wings lightly with steam (hover iron, never press) before assembly to set scallops.
- Inline stitch-count checks appear as (X sts ✓).
BODY (worked in spiral, stuffed)
With Dusty Rose and 5.5 mm hook, make a magic ring (or ch 4, sl st to form ring).
Rnd 1: Ch 2 (does not count as st), 8 dc in ring, pull ring closed. (8 dc ✓)
Rnd 2: 2 dc in each st around. (16 dc ✓)
Rnd 3: *1 dc, inc; rep from * around. (24 dc ✓)
Rnd 4: *2 dc, inc; rep from * around. (32 dc ✓)
Rnd 5: *3 dc, inc; rep from * around. (40 dc ✓)
Rnd 6: *4 dc, inc; rep from * around. (48 dc ✓)
Rnd 7: *5 dc, inc; rep from * around. (56 dc ✓)
Rnd 8: Dc in each st around. (56 dc ✓)
Work even in dc for length:
Rnds 9–28: Dc in each st around. (56 dc each rnd ✓)
— Body tube measures approx. 11″ (28 cm) long before final shaping.
Begin taper (head end):
Rnd 29: *5 dc, dc2tog; rep from * around. (48 dc ✓)
Rnd 30: *4 dc, dc2tog; rep from * around. (40 dc ✓)
Rnd 31: *3 dc, dc2tog; rep from * around. (32 dc ✓)
Stuff firmly now, shaping into a smooth oval. Continue stuffing as you close.
Rnd 32: *2 dc, dc2tog; rep from * around. (24 dc ✓)
Rnd 33: *1 dc, dc2tog; rep from * around. (16 dc ✓)
Rnd 34: Dc2tog around. (8 dc ✓)
Fasten off, leaving 12″ tail. Thread tail through remaining 8 sts, pull tight, weave in securely.
Tail end (opposite opening):
Rejoin yarn at opposite end (magic-ring end).
Rnd 1: Work 8 sc evenly around original ring opening, joining to form closed base if needed. (8 sc)
Rnd 2: Sc2tog around. (4 sc)
Fasten off, weave tail through final sts, pull closed, secure. Body is now a fully enclosed, firmly stuffed 14″ × 6″ oval.
Surface texture (optional boho detail):
With yarn needle or hook, work 4–5 vertical lines of surface sl st or fpdc ridges along the length of the body for a segmented look. Weave ends inside body.
UPPER WINGS (make 2 – mirror images)
Right Upper Wing (RS facing for outer surface)
Ch 18.
Row 1 (RS): Dc in 4th ch from hook and in each ch across, turn. (16 dc ✓)
Row 2: Ch 3 (counts as dc here and throughout), dc in next 2 sts, bobble in next st, *dc in next 3 sts, bobble in next st; rep from * to last 3 sts, dc in last 3 sts, turn. (16 sts: 4 bobbles ✓)
Row 3: Ch 3, dc across, turn. (16 dc)
Row 4 (inc row): Ch 3, dc in first st (inc), dc across to last st, 2 dc in last st, turn. (18 dc ✓)
Row 5: Ch 3, *fpdc around next st, bpdc around next st; rep from * to last st, dc in last st, turn. (18 sts)
Row 6 (inc): Ch 3, dc in first st, dc across to last st, 2 dc in last st, turn. (20 dc ✓)
Row 7: Ch 3, dc across, turn.
Row 8 (inc): Rep Row 6. (22 dc ✓)
Row 9: Ch 3, dc in next 3 sts, bobble, *dc in next 4 sts, bobble; rep from * to last 4 sts, dc in last 4 sts, turn.
Row 10 (inc): Rep Row 6. (24 dc ✓)
Row 11–12: Ch 3, dc across, turn.
Row 13 (inc): Rep Row 6. (26 dc ✓)
Row 14: Ch 3, dc across, turn.
Row 15 (inc): Rep Row 6. (28 dc ✓)
Row 16 (short-row shaping for 3-D cup): Ch 3, dc in next 19 sts, turn leaving 8 sts unworked. (20 dc)
Row 17: Ch 3, dc in next 15 sts, turn leaving 4 sts unworked. (16 dc)
Row 18: Ch 3, dc across all 16, then dc in next 4 previously unworked sts, turn. (20 dc)
Row 19: Ch 3, dc across all 20, then dc in next 8 previously unworked sts, turn. (28 dc ✓)
Row 20 (inc): Ch 3, dc in first st, dc to last st, 2 dc in last st, turn. (30 dc ✓)
Row 21–22: Ch 3, dc across, turn.
Row 23 (inc): Rep Row 20. (32 dc ✓)
Row 24: Ch 3, dc across, turn.
Row 25 (widest point): Ch 3, dc across. (32 dc ✓)
Begin outer taper & scallop foundation:
Row 26: Ch 3, dc2tog, dc to last 3 sts, dc2tog, dc in last st, turn. (30 dc ✓)
Row 27: Ch 3, dc across, turn.
Row 28: Rep Row 26. (28 dc ✓)
Row 29: Ch 3, dc2tog, dc to last 3 sts, dc2tog, dc in last st, turn. (26 dc ✓)
Row 30: Ch 3, dc across, turn.
Row 31: Rep Row 29. (24 dc ✓)
Row 32: Ch 3, dc2tog, dc to last 3 sts, dc2tog, dc in last st, turn. (22 dc ✓)
Row 33: Ch 3, dc2tog, dc to last 3 sts, dc2tog, dc in last st, turn. (20 dc ✓)
Row 34: Ch 3, dc2tog twice, dc to last 5 sts, dc2tog twice, dc in last st, turn. (16 dc ✓)
Row 35: Ch 3, dc2tog, dc to last 3 sts, dc2tog, dc in last st, turn. (14 dc ✓)
Fasten off, leaving 24″ tail for seaming.
Left Upper Wing: Work exactly as Right Upper Wing through Row 35, but reverse the short-row side (work short rows on the opposite edge) so the curved outer edges mirror each other. Mark RS of each wing.
LOWER WINGS (make 2 – mirror images)
Ch 14.
Row 1 (RS): Dc in 4th ch from hook and each ch across, turn. (12 dc ✓)
Row 2: Ch 3, dc across, turn.
Row 3 (inc): Ch 3, dc in first st, dc to last st, 2 dc in last st, turn. (14 dc ✓)
Row 4: Ch 3, bobble in next st, *dc in next 2 sts, bobble; rep from * to last st, dc in last st, turn.
Row 5 (inc): Rep Row 3. (16 dc ✓)
Row 6: Ch 3, *fpdc, bpdc; rep from * to last st, dc in last st, turn.
Row 7 (inc): Rep Row 3. (18 dc ✓)
Row 8–9: Ch 3, dc across, turn.
Row 10 (inc): Rep Row 3. (20 dc ✓)
Row 11: Ch 3, dc across, turn.
Row 12 (inc): Rep Row 3. (22 dc ✓)
Row 13 (short-row cup): Ch 3, dc in next 15 sts, turn (6 sts left unworked).
Row 14: Ch 3, dc in next 11 sts, turn.
Row 15: Ch 3, dc across 12, then dc in next 4 unworked sts, turn. (16 dc)
Row 16: Ch 3, dc across 16, then dc in remaining 6 unworked sts, turn. (22 dc ✓)
Row 17 (inc): Rep Row 3. (24 dc ✓)
Row 18–19: Ch 3, dc across, turn.
Row 20 (widest): Ch 3, dc across. (24 dc ✓)
Taper:
Row 21: Ch 3, dc2tog, dc to last 3 sts, dc2tog, dc in last st, turn. (22 dc ✓)
Row 22: Ch 3, dc across, turn.
Row 23: Rep Row 21. (20 dc ✓)
Row 24: Rep Row 21. (18 dc ✓)
Row 25: Ch 3, dc2tog twice, dc to last 5 sts, dc2tog twice, dc in last st, turn. (14 dc ✓)
Row 26: Ch 3, dc2tog, dc to last 3 sts, dc2tog, dc in last st, turn. (12 dc ✓)
Fasten off, leaving 20″ tail.
Left Lower Wing: Mirror short-row placement of Right Lower Wing.
ANTENNAE (make 2)
Ch 28.
Row 1: Sl st in 2nd ch from hook and next 9 ch, sc in next 8 ch, hdc in next 6 ch, dc in last 4 ch.
Fasten off, leaving long tail.
Optional: Insert floral wire into the chain before finishing for posable antennae; crochet over the wire.
Make a small bobble or French knot at the tip of each antenna for a clubbed end.
SCALLOP RUFFLE EDGES (worked on all four wings)
With RS facing, join yarn at the inner (body) corner of one wing.
Rnd/Pass 1 (foundation): Work sc evenly around the entire outer perimeter of the wing, placing 3 sc in each outer corner curve and 1 sc in each row-end or st. Aim for a multiple of 6 sts. Do not worry about exact count; smooth curves matter more. Sl st to first sc if working closed, or simply continue.
Pass 2 (scallops): *Skip 2 sc, scallop shell in next sc, skip 2 sc, sl st in next sc; rep from * around entire outer edge. At the two points where the wing will meet the body, work plain sc instead of shells so the join stays flat.
Fasten off. Repeat for all four wings. Steam-block each wing flat, pinning scallops open; allow to dry completely. Do not crush bobbles or post stitches.
ASSEMBLY – Seamless Joining
-
Position wings: Lay body flat. Pin Right Upper Wing and Left Upper Wing to the upper half of the body so the straight inner edges lie along the body’s midline, overlapping the body by approx. ¾″ (2 cm). Lower wings sit just below, slightly overlapping the upper wings at the body for a natural layered look. Check bilateral symmetry.
-
Join upper wings: Using the long tails and yarn needle, whip-stitch the inner edge of each upper wing securely to the body through both loops of the wing edge and into the body stitches. For a nearly seamless look, also work a line of surface slip stitch or tight sc along the join on the RS, catching the wing edge and body together. Reinforce the top “shoulder” points with a few extra stitches.
-
Join lower wings: Repeat whip-stitch + surface sl st method. The lower wings should sit slightly forward of the upper wings’ base.
-
Close any gaps: If small openings remain between wing layers and body, work a few sc or mattress stitches from the WS to close them so fiberfill cannot escape and the silhouette stays clean.
-
Attach antennae: Position antennae at the head end of the body, slightly apart. Sew bases securely through the body fabric several times. If using wire, bury wire ends inside the body.
-
Final body texture (optional): Add a few scattered bobbles or French knots along the body’s back for extra boho interest.
FINISHING
- Weave in every remaining end securely, burying tails inside the stuffed body or under wing joins.
- Steam the entire pillow lightly from the WS, hovering the iron; reshape scallops and wing curves with your fingers while warm.
- Check that the pillow sits flat and both sides are mirror images. Adjust stuffing distribution through any tiny residual openings if needed, then close permanently.
- Optional: Add a hidden fabric liner or pillow insert inside a removable cover if the piece will receive heavy use, but the crocheted form is self-contained and fully stuffed.
Stitch Diagram Notes (text representation)
- Body: classic amigurumi spiral oval – magic ring → inc rnds to 56 sts → even tube → dec to close.
- Upper wing silhouette: long rectangle widened with paired inc at both edges, short rows on outer third create cup, then paired dec taper to tip.
- Scallop: classic 4-dc shell with ch-1 separators, anchored by sl st.
- Bobble placement: every 4th st on accent rows for raised texture without stiffening chenille.
Care
Spot clean only. Chenille should not be machine-washed. Reshape and air dry if damp. Store flat or lightly stuffed to preserve 3-D wing shape.
Enjoy your heirloom-quality Dusty Rose Boho Butterfly Pillow!
Disclaimer: This pattern was generated by AI and should be reviewed for accuracy before use. While we strive for quality, AI-generated content may contain errors. Please verify measurements, stitch counts, charts, and instructions before beginning your project. Generated by purlJam.uk
Love this pattern?
Save this pattern to your free PurlJam libraryAccess your pattern anytime
Bookmark this page to access your pattern anytime