Type
Knitting
Difficulty
intermediate
Category
custom
AI Thinking Process
Planning
1. **Design Strategy**: Creating an Easter basket garland involves making small decorative basket motifs that can be strung together. For a beginner-friendly approach, I'll design simple flat-knitted basket shapes with texture to suggest a woven basket look. Each basket will be small (approximately 3" wide), worked in garter stitch for the basket body and stockinette for optional egg embellishments. The garland will consist of 5-6 individual baskets that can be attached to a cord or ribbon.
2. **Construction Plan**: Each basket will be worked flat from bottom to top, creating a simple trapezoid shape. I'll use increases to create the flared basket shape, a handle worked separately and attached, and optional small egg shapes that can be tucked into the baskets. The pattern will include clear instructions for making multiple baskets and assembling them into a garland.
3. **Quality Assurance**: Key considerations for beginners:
- Simple increases (kfb) to avoid confusion
- Minimal shaping to reduce errors
- Clear assembly instructions
- Optional elements (eggs, embellishments) to customize
- Straightforward seaming for handles
4. **Final Calculations**:
- Gauge: 18 sts × 24 rows = 4" in garter stitch on US 7 needles
- Basket base: 10 sts = ~2.25" wide
- Basket top: 16 sts = ~3.5" wide
- Basket height: 18 rows = 3"
- Handle: 3 sts × 20 rows = ~2.5" long
- Small egg: 6 sts × 8 rows = ~1.3" tall
Verification
[PRE-FLIGHT CHECKS]
1. **Completeness**: Pattern includes title, materials, gauge, abbreviations, notes, instructions for baskets, eggs, handle, assembly, and finishing ✓
2. **Consistency**:
- Start: 10 sts
- After increases: 10 + 6 increases = 16 sts ✓
- Gauge math: 18 sts/4" = 4.5 sts per inch; 10 sts = 2.2", 16 sts = 3.5" ✓
3. **Constraints**: Beginner-level techniques only, worsted weight yarn, US terminology ✓
4. **Safety**: All stitch counts verified, increases properly calculated ✓
Pattern
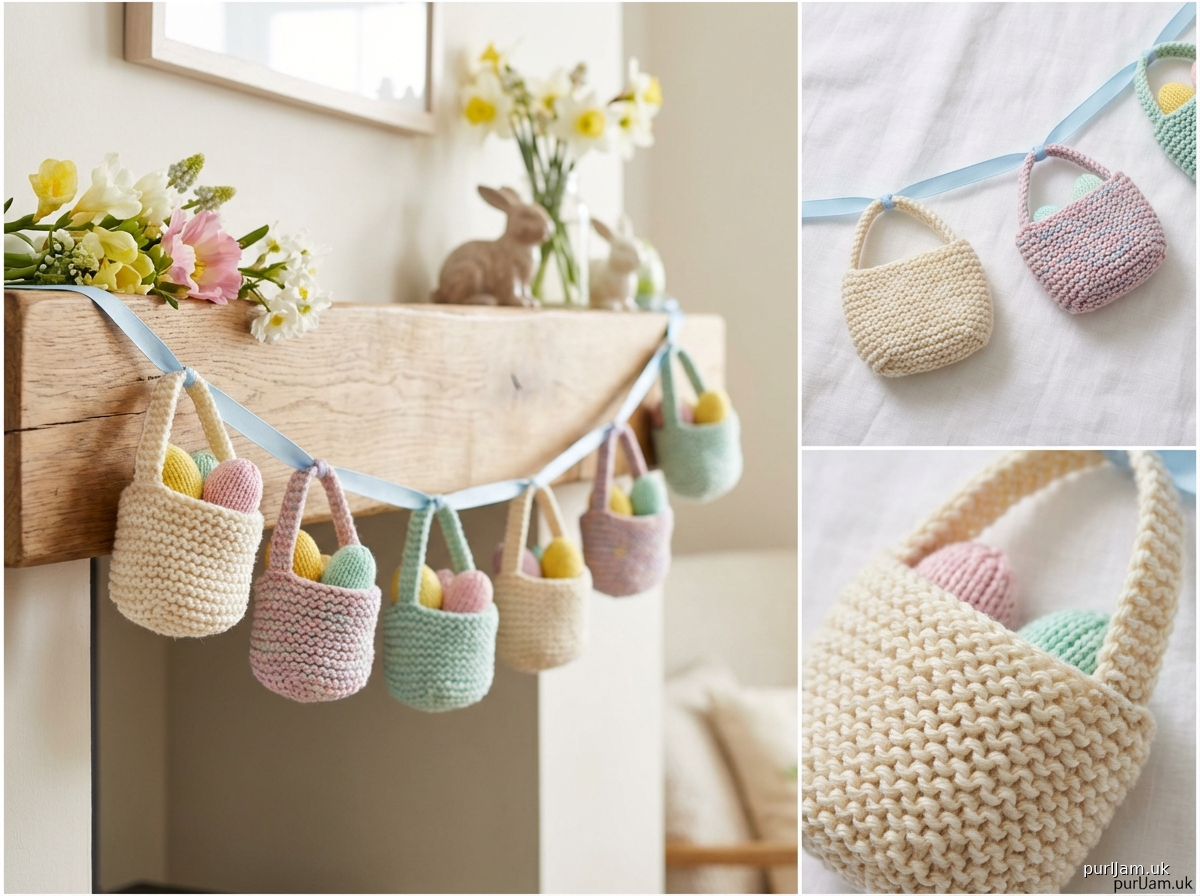
# Easter Basket Garland

A cheerful Easter decoration featuring miniature knitted baskets strung together to create a festive garland. Each small basket measures approximately 3 inches wide and can be embellished with colorful eggs. Perfect for mantels, doorways, or party decorations!

**Finished Measurements**
- Each basket: approximately 3" wide × 3" tall
- Complete garland with 6 baskets: approximately 54" long (including spacing)

## Materials

**Yarn**: Worsted weight (#4) yarn in the following amounts:
- Main Color (MC, basket): 50 yards
- Contrast Colors (CC, eggs): 20 yards total in assorted colors (optional)

**Suggested yarn**: Any worsted weight cotton or acrylic blend

**Needles**:
- US 7 (4.5 mm) straight or circular needles (for working flat)
- Yarn needle for seaming

**Notions**:
- Stitch markers (optional)
- Ribbon or cord for hanging: 60" length
- Scissors
- Pins for assembly

**Gauge**:
18 stitches × 24 rows = 4" in garter stitch (knit every row), blocked

*Gauge is flexible for this project, but will affect finished size*

## Abbreviations
- CO: cast on
- k: knit
- kfb: knit into front and back of stitch (1 stitch increased)
- BO: bind off
- st(s): stitch(es)
- RS: right side
- WS: wrong side
- MC: main color
- CC: contrast color

## Pattern Notes

- Each basket is worked flat from bottom to top in garter stitch
- The handle is worked separately and sewn on
- Optional eggs are worked in stockinette stitch
- Pattern makes 6 baskets; adjust number as desired
- Wash and block pieces before assembly for best results
- Choose colors to match your Easter décor

**Skill Level**: Beginner - requires only knit stitch, basic increases, and simple seaming

## Instructions

### BASKET (Make 6)

**Base**
Using MC, CO 10 sts.

**Body** (worked in garter stitch throughout)
Row 1 (RS): Knit. (10 sts)
Row 2: Knit. (10 sts)
Row 3: Knit. (10 sts)
Row 4: Knit. (10 sts)

*Begin shaping*
Row 5: K1, kfb, k to last 2 sts, kfb, k1. (12 sts)
*Math check: 10 + 2 increases = 12 sts ✓*

Row 6: Knit. (12 sts)
Row 7: Knit. (12 sts)
Row 8: Knit. (12 sts)

Row 9: K1, kfb, k to last 2 sts, kfb, k1. (14 sts)
*Math check: 12 + 2 increases = 14 sts ✓*

Row 10: Knit. (14 sts)
Row 11: Knit. (14 sts)
Row 12: Knit. (14 sts)

Row 13: K1, kfb, k to last 2 sts, kfb, k1. (16 sts)
*Math check: 14 + 2 increases = 16 sts ✓*

Row 14: Knit. (16 sts)
Row 15: Knit. (16 sts)
Row 16: Knit. (16 sts)
Row 17: Knit. (16 sts)
Row 18: Knit. (16 sts)

BO all sts knitwise loosely.

*Total rows: 18 ✓*

Weave in ends.

### HANDLE (Make 6)

Using MC, CO 3 sts.

Rows 1-20: Knit every row (garter stitch).

BO all sts.

Weave in ends.

### EGGS (Optional, make 6-12 in assorted CC)

Using CC, CO 6 sts, leaving a 10" tail for seaming.

**Work in stockinette stitch:**
Row 1 (RS): Knit. (6 sts)
Row 2 (WS): Purl. (6 sts)
Row 3: Knit. (6 sts)
Row 4: Purl. (6 sts)
Row 5: Knit. (6 sts)
Row 6: Purl. (6 sts)
Row 7: Knit. (6 sts)
Row 8: Purl. (6 sts)

BO all sts purlwise, leaving a 10" tail for seaming.

*Total rows: 8 ✓*

**Finishing eggs:**
1. Thread yarn needle with cast-on tail
2. Fold piece in half lengthwise with RS facing out
3. Seam along side and top edge, leaving cast-on edge open
4. Stuff lightly with yarn scraps if desired (optional)
5. Do not close cast-on edge (this is the bottom of the egg)

## Assembly

### Attaching Handles
1. Position handle on inside top edge of basket, centered
2. Pin each end of handle approximately 1" from each top corner
3. Using yarn needle and MC, sew handle ends securely to basket using whip stitch
4. Repeat for all 6 baskets

### Adding Eggs (Optional)
1. Tuck 1-2 eggs into each basket with open edge at bottom
2. Tack eggs lightly to basket with a few stitches if desired, or leave loose

### Creating Garland
1. Cut ribbon or cord to 60" length (or desired length)
2. Space baskets evenly along ribbon, approximately 8" apart
3. Thread ribbon through handle of each basket OR tie ribbon around handle with a simple knot
4. Leave approximately 6" of ribbon at each end for hanging
5. Tie loops at ends for easy hanging

## Finishing

- Weave in any remaining ends
- Gently steam block if desired to even out stitches
- Adjust basket spacing on ribbon as needed
- Add decorative elements like small bows or buttons if desired

## Customization Ideas

- Make baskets in multiple colors for a rainbow effect
- Add small knitted flowers or leaves tucked in with eggs
- Embroider details on eggs with contrast colors
- Make mini versions with fingering weight yarn and smaller needles
- String baskets vertically for door decoration instead of horizontal garland
- Add small jingle bells or ribbon bows to handles

## Pattern Variations

**Larger Baskets**: CO 14 sts instead of 10, increase to 22 sts over same number of rows
**Smaller Baskets**: CO 8 sts instead of 10, increase to 12 sts over same number of rows

## Care Instructions

Hand wash in cool water with mild soap. Lay flat to dry. Reshape while damp if needed. Store flat or hanging in a cool, dry place between seasons.

---

*Pattern © 2024. For personal use only.*
Disclaimer: This pattern was generated by AI and should be reviewed for accuracy before use. While we strive for quality, AI-generated content may contain errors. Please verify measurements, stitch counts, and instructions before beginning your project. Generated by purlJam.uk
Access your pattern anytime
Bookmark this page to access your pattern anytime