Type
Knitting
Difficulty
beginner
Category
scarf
AI Thinking Process
Planning
Verification
Pattern
Epigenetics Helix Scarf
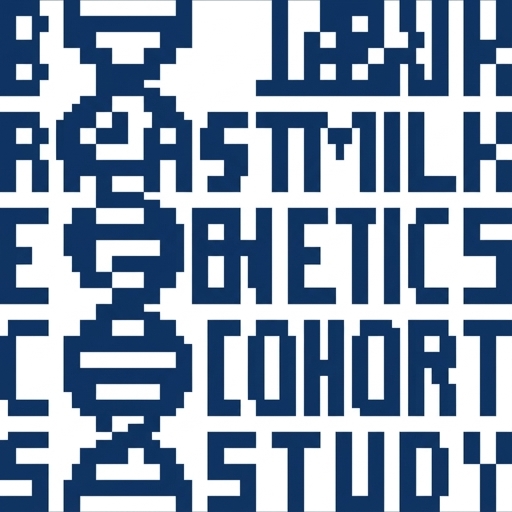
A simple rectangular scarf in garter stitch with the words “Breastmilk Epigenetics Cohort Study” running along its length, flanked by DNA double-helix strands. The knitting is knit-every-row only. Motifs are added afterward from the attached stitch chart.
Skill level: Beginner (knitting); adventurous beginner (duplicate-stitch finishing).
Materials
Yarn: Worsted weight (CYC 4), approx 220 yd / 100 g per skein
- MC (background): 350 yd / 320 m
- CC1 (DNA strands): 75 yd / 69 m
- CC2 (lettering): 50 yd / 46 m
Suggested colors: MC natural or light gray; CC1 teal; CC2 navy.
Needles: US 8 / 5 mm, straight or circular, or size needed to obtain gauge
Notions:
- 6 stitch markers
- Tapestry needle
- Scissors
- Blocking mats and pins
Gauge
18 stitches and 36 rows = 4" (10 cm) in garter stitch, blocked.
Work a swatch at least 5" (12.5 cm) square, bind off, wet-block, and measure the center 4" (10 cm). Change needle size if needed to match gauge. Row gauge can vary; length is measured, not counted.
Finished Size
9" (23 cm) wide × 60" (152.5 cm) long, after blocking.
Width check: 40 sts ÷ 18 sts × 4" = 8.89", blocked to 9" (23 cm).
Length check: 60" ÷ 4" × 36 rows = 540 rows.
To shorten or lengthen, knit to the desired measurement. If you change length, keep extra unlettered fabric at each end so the phrase still fits on the attached lettering chart.
Abbreviations
| Abbrev. | Meaning |
|---|---|
| BO | bind off |
| CC1, CC2 | contrasting colors 1 and 2 |
| CO | cast on |
| k | knit |
| MC | main color |
| pm | place marker |
| RS | right side (public side) |
| slm | slip marker |
| st(s) | stitch(es) |
Garter stitch: knit every stitch of every row.
Attached Stitch Chart
Use the separate attached chart panel for the visual grids. There is no stitch chart, symbol grid, or row-by-row chart in this written pattern. Do not look for one here.
Where the chart is: The attached panel sits beside or immediately after this written pattern. It has two labeled grids:
- DNA helix repeat — one repeat of the double-helix motif (two intertwining strands with base-pair rungs).
- Lettering — the full phrase BREASTMILK EPIGENETICS COHORT STUDY, with word spaces already charted.
How to read the charts (knit fabric, duplicate stitch):
- Each square = 1 stitch wide and 1 row tall.
- Work with the RS facing, after the scarf is knitted and blocked.
- Read every chart row from right to left on the fabric as you see it (you are embroidering, not knitting back and forth).
- Work from the bottom of the chart upward, starting near the cast-on edge.
- Background (empty) squares are already knitted in MC — skip them.
- Filled squares are duplicate-stitched in the color shown in the chart legend (CC1 for DNA, CC2 for letters).
- The DNA grid is a repeat. Restart at chart row 1 each time you complete a repeat, and continue along the full length of each DNA column.
- The lettering grid is worked once, centered along the length.
Color and yarn management:
- Duplicate stitch is embroidery, not stranded knitting. Use 18–24" (45–60 cm) lengths of CC1 and CC2. Do not carry unused color across the back.
- Start a new length rather than traveling more than 3 sts. Weave tails under duplicate stitches of the same color on the WS.
- CC1 is shared by both helix columns; you may work one column at a time.
- CC2 is used only in the center lettering column.
Stitch-count integration (markers match the chart columns):
The scarf is 40 sts throughout (no increases or decreases).
3 (border) + 11 (DNA) + 2 (gutter) + 8 (lettering) + 2 (gutter) + 11 (DNA) + 3 (border) = 40 sts ✓
| Stitches | Role | Chart |
|---|---|---|
| 1–3 | MC garter border | none |
| 4–14 | Left DNA helix (11 sts) | DNA helix repeat in CC1 |
| 15–16 | MC gutter | none |
| 17–24 | Lettering (8 sts) | Lettering chart in CC2 |
| 25–26 | MC gutter | none |
| 27–37 | Right DNA helix (11 sts) | DNA helix repeat in CC1 |
| 38–40 | MC garter border | none |
On garter stitch, duplicate-stitch into the same stitch column on every ridge so the helices stay vertical. Each garter ridge is 2 rows; follow the attached chart row by row, not ridge by ridge.
Placement along the length:
- DNA: Begin the first helix repeat 1" (2.5 cm) above the cast-on edge in both 11-st columns. Repeat until 1" (2.5 cm) before the bind-off edge. 60" − 1" − 1" = 58" of helix. At 36 rows/4", that is 58 ÷ 4 × 36 = 522 rows of DNA chart ✓.
- Lettering: Center the attached lettering chart on sts 17–24. Leave about 4" (10 cm) of unlettered fabric at each end (4" × 36 rows/4" = 36 rows each end ✓). If your row gauge differs, measure, do not count, and shift the block of letters so it sits in the middle third of the scarf.
Pattern
With MC, CO 40 sts.
Set-up row: k3, pm, k11, pm, k2, pm, k8, pm, k2, pm, k11, pm, k3. (3+11+2+8+2+11+3 = 40 sts ✓)
Every row: Knit all sts, slipping markers as you come to them.
The markers do not change the stitch. They only mark the columns you will embroider later. If a marker slips off, replace it in the same gap; the stitch count stays 40.
Continue until the piece measures 60" (152.5 cm) from the cast-on edge (about 540 rows at pattern gauge: 60 ÷ 4 × 36 = 540 ✓). End after any row.
BO all sts knitwise. Cut MC, leaving a 6" (15 cm) tail. Weave the CO and BO tails on the WS.
Do not remove the column logic: if you took the markers off at bind-off, use locking markers or pins on the RS to re-mark sts 4, 15, 17, 25, 27, and 38 before embroidering.
Finishing
Block the plain scarf first. Soak in lukewarm water, press out water in a towel, and pin to 9" × 60" (23 × 152.5 cm). Let dry fully. Blocking before duplicate stitch makes stitch columns easier to see and keeps the helices from puckering.
Choose a public side. Garter stitch looks the same on both faces until you embroider. Pick the neater face as the RS.
Work the attached charts in duplicate stitch on the RS, following the Attached Stitch Chart section:
- Left DNA column (sts 4–14) in CC1, helix repeat along the length.
- Right DNA column (sts 27–37) in CC1, same repeat, starting at the same row as the left column so the two helices line up.
- Lettering (sts 17–24) in CC2, phrase reading from the cast-on end toward the bind-off end.
For each duplicate stitch, bring the needle up at the base of a knit stitch, follow the path of that stitch, and return at its top so the embroidery sits on the stitch like a second layer. Keep tension even with the knitted fabric — too tight draws the scarf in; too loose looks loopy.
Weave in all remaining ends on the WS. Steam-press the embroidered areas lightly from the WS if needed, without flattening the garter ridges.
The scarf has a public (charted) side and a wrong side where duplicate-stitch tails are woven. It does not need fringe or seaming.
Disclaimer: This pattern was generated by AI and should be reviewed for accuracy before use. While we strive for quality, AI-generated content may contain errors. Please verify measurements, stitch counts, charts, and instructions before beginning your project. Generated by purlJam.uk
Love this pattern?
Save this pattern to your free PurlJam libraryAccess your pattern anytime
Bookmark this page to access your pattern anytime