Type
Crochet
Difficulty
intermediate
Category
dress
AI Thinking Process
Planning
Verification
Pattern
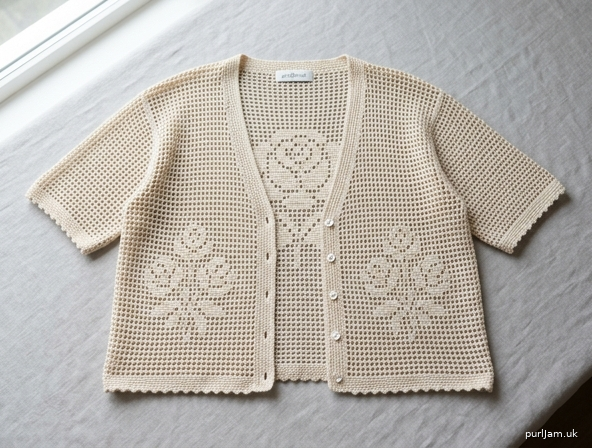
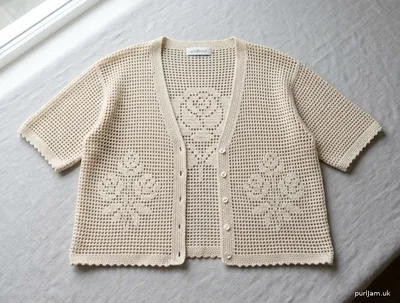
Filet Floral Cardigan
XS – Slightly Flowy / Oversized
Skill Level: Intermediate
Finished Measurements (blocked):
- Bust (with fronts closed): 38" (96.5 cm) – approx. 6–7" positive ease over standard XS
- Length (shoulder to hem): 25" (63.5 cm)
- Armhole depth: 7½" (19 cm)
- Sleeve length (underarm to cuff): 5" (12.5 cm) short sleeve
- Upper arm circumference: 13" (33 cm)
- Cross-back: 14½" (37 cm)
- Front neck drop: 7" (18 cm) from shoulder
Yarn: Sport weight (#2), approx. 1,050 yd (960 m). Suggested: mercerized cotton or cotton-blend for crisp filet and drape (e.g., 5 skeins of 220 yd each).
Hook: US E-4 / 3.5 mm (or size needed to obtain gauge)
Notions: Yarn needle, 5–7 buttons (½–⅝"), stitch markers, blocking wires/pins
Gauge: 18 sts and 9 rows = 4" (10 cm) in filet mesh (dc, ch 2) after blocking.
One filet block (dc, ch 2) = ⅔" wide × ½" tall.
Always make a gauge swatch of at least 6" square including one floral motif and block before starting.
Abbreviations (US terms)
ch – chain
dc – double crochet
sc – single crochet
sl st – slip stitch
sp(s) – space(s)
st(s) – stitch(es)
sk – skip
RS – right side
WS – wrong side
beg – beginning
rem – remaining
rep – repeat
pm – place marker
Filet Basics:
- Open mesh (space): dc in next dc, ch 2, sk next 2 sts (or next ch-2 sp).
- Solid block: dc in next dc, 2 dc in next ch-2 sp (or dc in each of next 2 dc).
- Each “block” or “space” occupies 3 stitches. Pattern is worked on a multiple of 3 sts + 1 edge dc.
- Charts are read right-to-left on RS rows, left-to-right on WS rows. Written instructions given for all motifs.
Stitch Multiple
Filet mesh: multiple of 3 + 1.
Pattern Notes
- Cardigan is worked bottom-up in one piece (open fronts) to the underarms, then split into Right Front, Back, and Left Front.
- Floral motifs are placed symmetrically: one large centered rose on Back, smaller rose sprays on each Front.
- Maintain even front edges for later button bands.
- When shaping, always keep the outermost stitch a dc (edge stitch). Convert spaces to blocks or vice-versa only inside the motif area as charted.
- Wet-block aggressively to open mesh and set floral shapes.
Body
Foundation:
With sport yarn and E-4 hook, ch 172.
Row 1 (RS): Dc in 4th ch from hook (counts as first dc), *ch 2, sk 2 ch, dc in next ch; rep from * across. (57 spaces / 171 sts total including turning ch)
Turn. (Foundation measures approx. 38" after light blocking.)
Rows 2–4: Ch 3 (counts as dc here and throughout), *ch 2, dc in next dc; rep from * across, ending dc in top of turning ch. Turn.
(These 4 rows establish plain filet mesh hem. Place markers at st 43 and st 129 to mark approximate side “seams” for motif placement reference: Right Front 43 sts, Back 85 sts, Left Front 43 sts.)
Begin Floral Motifs
Work plain mesh on side panels while placing motifs as follows. Motifs are written in block/space language. “B” = solid block (3 dc), “S” = open space (dc, ch 2). Always begin and end every row with an edge dc.
Back Motif – Large Rose (centered over middle 33 blocks / 99 sts of Back)
Work the 15-row rose chart over the center Back while keeping Right Front, side panels, and Left Front in plain mesh (S).
Rose Chart (15 blocks wide × 15 rows tall) – written for RS start:
Row 1 (RS): S S S S B B B S B B B S S S S
Row 2: S S S B B B B B B B B B S S S
Row 3: S S B B S S B B B S S B B S S
Row 4: S B B S S S B B B S S S B B S
Row 5: B B S S S B B B B B S S S B B
Row 6: B B S S B B S B S B B S S B B
Row 7: B B B B B S S B S S B B B B B
Row 8: B B B B S S S B S S S B B B B
Row 9: B B B B B S S B S S B B B B B
Row 10: B B S S B B S B S B B S S B B
Row 11: B B S S S B B B B B S S S B B
Row 12: S B B S S S B B B S S S B B S
Row 13: S S B B S S B B B S S B B S S
Row 14: S S S B B B B B B B B B S S S
Row 15: S S S S B B B S B B B S S S S
Front Motifs – Small Rose Spray (centered on each Front, 9 blocks wide)
Begin Small Spray at the same row as Back Rose so all motifs finish together.
Small Rose Spray Chart (9 blocks × 11 rows):
Row 1: S S B B B S S S S
Row 2: S B B B B B S S S
Row 3: B B S B S B B S S
Row 4: B B B B B B B S S
Row 5: S B B B B B S B S
Row 6: S S B B B S B B B
Row 7: S S S B S B B B B
Row 8: S S B B B B B B S
Row 9: S B B S B S B B S
Row 10: S S B B B B B S S
Row 11: S S S B B B S S S
Body continuation:
Work Rows 1–15 of Large Rose on Back center and simultaneous Rows 1–11 of Small Spray on each Front (place Small Spray beginning 6 blocks in from each front edge so it sits nicely). Outside motif areas remain plain mesh (all S).
After motifs finish, continue in plain filet mesh until Body measures 17½" (44.5 cm) from foundation edge, ending after a WS row.
Total body rows to underarm: approximately 39–40 rows (adjust by 1–2 rows if needed for exact length; keep even number so RS faces outward for split).
Stitch count check at underarm: still 171 sts (57 spaces). ✓
Divide for Armholes & Upper Body
Next Row (RS) – Divide:
Work in established plain mesh across first 43 sts (Right Front), turn, leaving rem sts unworked.
(Place the next 85 sts on hold for Back; final 43 sts on hold for Left Front.)
Right Front
Continue in plain mesh on these 43 sts.
Armhole shaping:
Row 1 (WS): Ch 3, work mesh across to last 4 sts, dc2tog over next space/edge (dec 1 block), dc in last dc. Turn. (40 sts / 13 spaces + edge)
Row 2 (RS): Ch 3, dc2tog, mesh across. Turn. (37 sts)
Row 3: Ch 3, mesh across to last 3 sts, dc2tog, dc. Turn. (34 sts)
Row 4: Ch 3, mesh across. Turn.
Work even in mesh until armhole measures 5½" (14 cm) from divide, ending ready for neck shaping. (Approx. 12 more rows.)
Neck shaping (Right Front):
At neck edge (front edge) begin decreases:
Next RS row: Work mesh to last 7 sts, dc2tog twice, dc. Turn.
Next WS row: Ch 3, dc2tog, mesh across. Turn.
Rep last 2 rows once more. Then dec 1 st at neck edge every row 3 times.
Continue even on rem 18 sts (6 blocks) until armhole measures 7½" (19 cm). Fasten off, leaving 12" tail for shoulder seam.
Left Front
Return to held Left Front sts, join yarn at armhole edge with RS facing.
Mirror Right Front exactly: shape armhole at armhole edge, then shape neck at front edge.
(Same stitch counts: end with 18 sts.) Fasten off.
Back
Return to held 85 Back sts. Join yarn at right armhole edge with RS facing.
Armhole shaping (both sides):
Row 1: Ch 3, dc2tog, mesh across to last 4 sts, dc2tog, dc. Turn. (79 sts)
Row 2: Ch 3, dc2tog, mesh to last 3 sts, dc2tog, dc. Turn. (73 sts)
Row 3: Ch 3, mesh across. Turn.
Work even in plain mesh until armhole measures 7½" (19 cm), matching Front armhole row count.
Shoulder & neck:
Next row: Work 18 sts in mesh, fasten off. Sk center 37 sts for back neck, join yarn and work rem 18 sts in mesh. Fasten off.
(Back neck is straight boat-style; later edging will soften it.)
Shoulder seams: With RS together, whip-stitch or mattress-stitch Front shoulders to corresponding Back shoulders (18 sts each side). Weave ends.
Sleeves (make 2)
Worked top-down into armhole for seamless look, short length.
Rnd 1 (RS): Join yarn at underarm center. Work 54 dc evenly around armhole (approx. 3 dc per 2 rows along vertical edges + sts across underarm). Join with sl st to first dc. (54 sts)
Rnd 2: Ch 3, *ch 2, sk 2 dc, dc in next dc; rep from * around, join. (18 spaces)
Rnds 3–5: Ch 3, *ch 2, dc in next dc; rep from * around, join.
Rnd 6 (optional slight taper): Ch 3, ch 2, dc in next dc, [ch 2, dc] 7 times, dc2tog over next space, [ch 2, dc] 7 times, ch 2, join. (17 spaces)
Rnds 7–11: Work even in mesh.
Rnd 12: Ch 1, sc in each dc and 2 sc in each ch-2 sp around, join. Fasten off.
Sleeve length from underarm ≈ 5".
(Repeat for second sleeve.)
Finishing
Button Band (Right Front edge, for women’s cardigan – buttons on right):
With RS facing, join yarn at lower Right Front corner.
Row 1: Work sc evenly up front edge (approx. 3 sc per 2 rows), around neckline, and down Left Front edge. Do not turn; ch 1.
Row 2: Sc in each sc, working 3 sc in corner sts at neck. Turn.
Row 3 (buttonholes – Right Front only): Sc to first desired buttonhole position (place 5–7 holes evenly spaced from hem to 1" below neck), *ch 2, sk 2 sc, sc in next 6–7 sc; rep from * for all buttonholes, then sc to neck and continue plain sc around neck and Left Front. Turn.
Row 4: Sc in each sc and 2 sc in each ch-2 buttonhole. Fasten off.
Left Front / Button Band: Work 4 rows plain sc (no holes) to match width of Right band, or simply continue the single continuous edging already started and reinforce with a second pass of sc if desired.
Hem & Cuff edging (optional picot):
Join at side of hem, *sc in next 3 sts, ch 3, sl st in first ch of ch-3 (picot); rep from * around hem and each sleeve cuff. Fasten off.
Buttons: Sew buttons opposite buttonholes on Left Front band.
Weave in all ends securely on WS.
Blocking
Fill basin with lukewarm water and mild wool wash. Submerge cardigan, gently press out air, soak 15–20 min. Roll in towels to remove excess water. Lay flat on blocking mats.
Pin to finished measurements: 38" bust, 25" length, open mesh fully, floral motifs squared and petals distinct. Use blocking wires along front edges and hem for straight lines. Allow to dry completely (24–48 hrs). Steam lightly if needed to set.
Customization Notes
- Length: Add or subtract plain mesh rows before underarm divide (each 2 rows ≈ 1").
- More oversized: Add 6–12 foundation sts (2–4 spaces) distributed evenly; keep multiple of 3 + 1.
- Longer sleeves: Continue mesh rounds to desired length before cuff rnd; add optional decreases every 4–6 rnds for gentle taper.
- Motif placement: Charts may be shifted 1–2 blocks left/right for personal preference; keep at least 3 plain spaces from armhole edges.
- Yarn substitution: Any sport yarn with good stitch definition; adjust hook for gauge.
Math validation summary (XS):
Foundation 171 sts ÷ 4.5 sts/in = 38" ✓
Right/Left Front start 43 sts each, Back 85 sts (43+85+43=171) ✓
After armhole decs: Fronts 18 sts shoulder, Back 18+37+18 ✓
Sleeve 54 sts around 7.5" armhole (approx. 7.2 sts/in vertical ease) ✓
Enjoy your filet floral cardigan! The open mesh and floral blocks create a romantic, airy layer perfect for transitional weather.
Disclaimer: This pattern was generated by AI and should be reviewed for accuracy before use. While we strive for quality, AI-generated content may contain errors. Please verify measurements, stitch counts, charts, and instructions before beginning your project. Generated by purlJam.uk
Love this pattern?
Save this pattern to your free PurlJam libraryAccess your pattern anytime
Bookmark this page to access your pattern anytime