Type
Knitting
Difficulty
intermediate
Category
custom
AI Thinking Process
Planning
Verification
Pattern
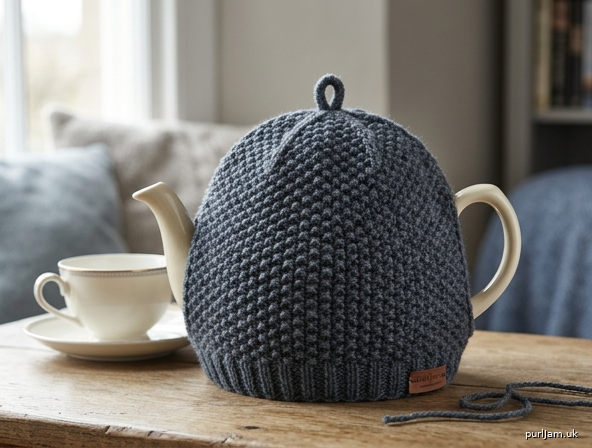
Fitted Seed Stitch Tea Cozy — for a 6-Cup Teapot
A cosy, densely textured tea cozy worked in bulky wool. Two identical seed-stitch panels are knitted flat, each rising from a snug k1 p1 ribbed band that hugs the base of the pot, up through a textured body, and finished with a gathered, fitted crown. The panels are seamed at the sides, leaving neat openings for the spout and handle. An advanced-friendly project thanks to its crown shaping and careful selective seaming.
Materials
- Yarn: Paintbox Yarns Wool Mix Chunky (bulky weight; 100% wool blend), colour of your choice.
- Approx. 140–160 m (150–175 yds) total — roughly 1½ balls (each 50 g ≈ 66 m). Buy 2 balls to be safe.
- Needles: 6.0 mm (UK/metric) straight or circular needles, or size needed to achieve tension.
- Notions: Tapestry (darning) needle, stitch markers, tape measure, scissors.
Tension (Gauge)
14 sts × 22 rows = 10 cm (4 in) over seed stitch on 6.0 mm needles, blocked.
Take the time to knit a tension swatch — the fit depends on it. Seed stitch draws in slightly, so measure relaxed, not stretched.
Size
Designed to fit a standard 6-cup teapot:
- Circumference: approx. 56 cm (22 in)
- Height (band to crown): approx. 23 cm (9 in)
Finished cozy circumference (unstretched): approx. 57 cm with slight negative ease for a snug hug. The ribbed band and seed-stitch fabric both stretch comfortably to fit pots of 54–58 cm.
Abbreviations (UK terminology)
- k – knit
- p – purl
- k2tog – knit two stitches together (right-leaning decrease)
- st(s) – stitch(es)
- RS – right side
- WS – wrong side
- rep – repeat
- beg – beginning
Pattern Notes
- Worked flat in two identical panels, then seamed.
- Seed stitch is worked over an even number of stitches: on every row you knit the purls and purl the knits, i.e. begin each row with the opposite stitch to how the previous row ended. Instructions below spell this out.
- Cast on and cast off relatively loosely so the fabric retains its stretch to hug the pot.
- Openings: when seaming, you will leave gaps on each side for the spout and handle. Seam the lower band section and the upper crown section, leaving the middle open on each side.
- Read through the crown shaping before starting — decreases happen only on right-side rows.
Instructions
Panel (make 2 identical)
1. Ribbed Bottom Band (hugs the teapot)
Cast on 40 sts (even — required for both rib and seed stitch ✓).
Rib Row: *k1, p1; rep from * to end. (40 sts)
Repeat this Rib Row until the band measures 5 cm (2 in) from cast-on edge — approx. 11 rows.
The k1 p1 rib pulls in to grip the base of the pot.
2. Seed Stitch Body
Now establish seed stitch. Note that to convert rib into seed stitch you offset the pattern each row.
Row 1 (RS): *k1, p1; rep from * to end. (40 sts) Row 2 (WS): *p1, k1; rep from * to end. (40 sts)
Rows 1–2 form seed stitch. Because you begin Row 2 with a purl (over the previous knit) and Row 1 with a knit (over the previous purl), each stitch sits opposite its neighbour below — creating the bumpy seed texture.
Repeat Rows 1–2 until the body measures 18 cm (7 in) from the top of the ribbed band — approx. 40 rows (ending after a WS row so you are ready for a RS row).
Total height so far: 5 cm band + 18 cm body = 23 cm before crown ✓.
Piece should still have 40 sts.
3. Fitted Crown Shaping
The crown is shaped by two decrease rounds worked on right-side rows, gathering the fabric into a snug fitted top.
Decrease Row 1 (RS): *k2tog; rep from * to end. (20 decreases: 40 ÷ 2 = 20 sts remaining ✓)
Next Row (WS): purl all sts. (20 sts)
Decrease Row 2 (RS): *k2tog; rep from * to end. (10 decreases: 20 ÷ 2 = 10 sts remaining ✓)
Next Row (WS): purl all sts. (10 sts)
Cut yarn leaving a long tail (approx. 30 cm). Thread tail through a tapestry needle, slip all 10 remaining sts off the needle and onto the tail, pull tight to gather the crown, and secure with a firm stitch. Do not cut yet — you can use this tail for seaming or making the top loop.
Make the second panel identically.
Finishing
1. Block
Gently steam or wet-block both panels to the finished measurements. This relaxes the seed stitch and evens the fabric. Lay flat to dry.
2. Seam with Openings
Lay the two panels together with right sides facing out (or wrong sides together for an invisible mattress-stitch seam from the outside).
For each side seam, measure your teapot to position the openings, but as a guide for a standard 6-cup pot:
- Lower seam: starting from the cast-on edge, seam upward 8 cm (approx. 18 rows).
- Opening: leave the next 7 cm (approx. 15 rows) unseamed — this is the spout gap on one side and the handle gap on the other.
- Upper seam: seam the remaining 8 cm plus the entire crown to the gathered top.
Tip: 8 cm + 7 cm + 8 cm = 23 cm, matching the panel height before crown ✓. Fit the cozy on your pot before finalising the seam length and adjust the opening position so it lines up with your spout and handle.
Use mattress stitch for a tidy, invisible join, matching the seed-stitch bumps row for row.
3. Optional Top Loop
Using the long crown tail, work a short crochet chain or a twisted cord loop of about 4 cm and secure it to the centre of the gathered crown — handy for lifting the cozy on and off.
4. Weave in Ends
Weave all remaining ends into the wrong side of the fabric with the tapestry needle. Give the cozy a final light steam if needed.
Quick Reference — Stitch Count Map (per panel)
| Section | Rows | Stitches |
|---|---|---|
| Ribbed band | 11 | 40 |
| Seed body | 40 | 40 |
| Decrease Row 1 (RS) | 1 | 40 → 20 ✓ |
| Purl row (WS) | 1 | 20 |
| Decrease Row 2 (RS) | 1 | 20 → 10 ✓ |
| Purl row (WS) | 1 | 10 |
| Gather crown | — | 10 → gathered |
Enjoy your beautifully fitted, warm seed-stitch tea cozy!
Disclaimer: This pattern was generated by AI and should be reviewed for accuracy before use. While we strive for quality, AI-generated content may contain errors. Please verify measurements, stitch counts, and instructions before beginning your project. Generated by purlJam.uk
Access your pattern anytime
Bookmark this page to access your pattern anytime