Type
Crochet
Difficulty
intermediate
Category
custom
AI Thinking Process
Planning
Verification
Pattern
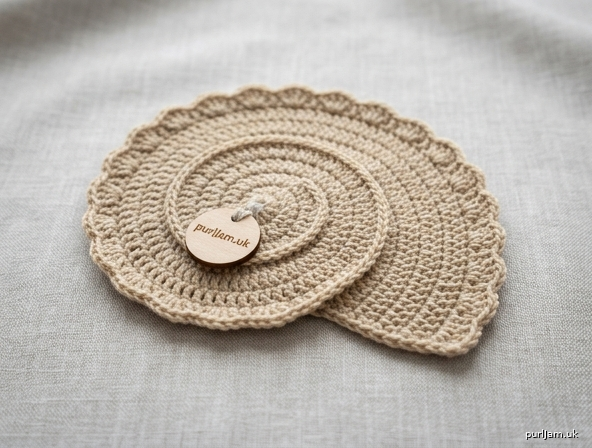
Flat Spiral Seashell (Concha Espiral en Plano)
A beginner-friendly flat spiral seashell motif worked in a continuous spiral. Perfect as an appliqué, coaster, ornament, or embellishment. The shape gently curves like a conch shell while remaining completely flat.
Materials
- Worsted weight yarn (category 4), approx 40–50 yd (37–46 m) in main color (MC); small amount of contrasting color (CC) optional for edging
- Crochet hook US H/8 (5 mm) or size needed to obtain gauge
- Yarn needle
- Scissors
- Stitch marker
Gauge
14 sc and 16 rows = 4" (10 cm) in single crochet. Gauge is not critical for a motif but affects finished size. Finished seashell measures approximately 5" (12.5 cm) long × 3.5" (9 cm) wide.
Size
One size: approx 5" (12.5 cm) long × 3.5" (9 cm) wide.
Abbreviations (US Terms)
- ch: chain
- sc: single crochet
- hdc: half double crochet
- dc: double crochet
- sl st: slip stitch
- st(s): stitch(es)
- sp: space
- rep: repeat
- rnd: round
- MC: main color
- CC: contrasting color
- pm: place marker
- MR: magic ring (adjustable ring)
Pattern Notes
- Worked flat in a continuous spiral (do not join rounds). Use a stitch marker to mark the first stitch of each round and move it up as you go.
- Turning chains are not used because the piece is worked in continuous spiral.
- All stitches are worked through both loops unless otherwise stated.
- The spiral shell shape is created by placing more increases and taller stitches along one side (the outer curve).
- Stitch counts are given in parentheses at the end of every round.
- Keep tension even so the piece lies flat; if it cups, go up a hook size; if it ruffles, go down a hook size.
- Special stitch: shell ridge = (sc, hdc, dc) in same st (used on outer curve for texture).
Instructions
Foundation With MC, make a magic ring. Rnd 1: Work 6 sc in MR. Pull tail to close. Pm in first sc to mark beginning of rnd. (6 sc)
Rnd 2: 2 sc in each st around. (12 sc) (6 increases → 6 + 6 = 12 ✓)
Rnd 3: *Sc in next st, 2 sc in next st; rep from * around. (18 sc) (6 increases → 12 + 6 = 18 ✓)
Rnd 4: *Sc in next 2 sts, 2 sc in next st; rep from * around. (24 sc) (6 increases → 18 + 6 = 24 ✓)
Rnd 5: Sc in next 3 sts, 2 sc in next st, sc in next 3 sts, 2 sc in next st, sc in next 2 sts, (sc, hdc) in next st, (hdc, dc) in next st, 2 dc in next st, (dc, hdc) in next st, (hdc, sc) in next st, sc in next 2 sts, 2 sc in next st, sc in next 3 sts, 2 sc in next st. (32 sts) (8 increases/taller sts placed to begin the curve → 24 + 8 = 32 ✓)
Rnd 6: Sc in next 4 sts, 2 sc in next st, sc in next 4 sts, 2 sc in next st, sc in next 3 sts, (sc, hdc) in next st, hdc in next st, (hdc, dc) in next st, 2 dc in next st, dc in next st, (dc, hdc) in next st, hdc in next st, (hdc, sc) in next st, sc in next 3 sts, 2 sc in next st, sc in next 4 sts, 2 sc in next st. (40 sts) (8 increases → 32 + 8 = 40 ✓)
Rnd 7 (final body rnd): Sc in next 5 sts, 2 sc in next st, sc in next 5 sts, 2 sc in next st, sc in next 4 sts, (sc, hdc) in next st, hdc in next 2 sts, (hdc, dc) in next st, 2 dc in next st, dc in next 2 sts, (dc, hdc) in next st, hdc in next 2 sts, (hdc, sc) in next st, sc in next 4 sts, 2 sc in next st, sc in next 5 sts, 2 sc in next st, sc in last st. (48 sts) (8 increases → 40 + 8 = 48 ✓)
Do not fasten off if working optional ridge edging. The piece should now form a gentle elongated spiral that curves like a flat conch shell.
Optional Shell Ridge Edging (recommended for definition) Continue with MC or change to CC. Rnd 8: Working in continuous spiral, *sc in next 3 sts, shell ridge in next st; rep from * around, adjusting as needed near the inner curve by working sc only (skip shell ridge) on the tight inner edge so the piece stays flat. (approx 12 shell ridges + sc sections; total sts will increase slightly—work evenly to keep flat) Fasten off after completing the round, leaving a 6" (15 cm) tail.
Finishing
- Weave in all ends securely with yarn needle on the wrong side.
- Gently block the seashell by misting with water and pinning to shape on a blocking board or towel. Emphasize the spiral curve and outer ridges while keeping the piece completely flat. Allow to dry completely.
- For a coaster: weave ends extra securely and consider a light fabric stiffener if desired.
- For an appliqué: sew onto project with matching yarn using whipstitch around the outer edge.
Tips for Success
- Count stitches at the end of every round—the marker is your friend.
- If the inner spiral hole looks large, pull the magic ring tail tighter.
- Taller stitches (hdc/dc) naturally push the outer edge outward to create the shell curve; do not fight this.
- Beginner tip: If you lose your place, lay the piece flat—the longer curved side is where the taller stitches and extra increases belong.
Your flat spiral seashell is complete! Make a set in beachy colors for a charming collection.
Disclaimer: This pattern was generated by AI and should be reviewed for accuracy before use. While we strive for quality, AI-generated content may contain errors. Please verify measurements, stitch counts, charts, and instructions before beginning your project. Generated by purlJam.uk
Love this pattern?
Save this pattern to your free PurlJam libraryAccess your pattern anytime
Bookmark this page to access your pattern anytime