Type
Knitting
Difficulty
beginner
Category
blanket
AI Thinking Process
Planning
1. **Design Strategy**: Creating an 8" x 8" crochet granny square with a simple flower motif using three colours (two main colours plus border). The flower will be worked in the centre using traditional granny square construction with colour changes. Difficulty is intermediate, allowing for colour work and basic shaping.
2. **Construction Plan**: Start with a magic ring for the flower centre, work outward in rounds using treble crochet clusters (granny stitch), incorporate colour changes for flower petals and background, then add a contrasting border. The square will be worked in concentric rounds to achieve the 8" x 8" dimension.
3. **Quality Assurance**: Main concerns include:
- Ensuring square maintains shape (equal stitch counts on all sides)
- Clear colour change instructions to avoid confusion
- Consistent tension across colour changes
- Corner shaping to keep square flat
- Final measurements matching 8" x 8" specification
4. **Final Calculations**: Using worsted weight yarn with a 5mm hook:
- Standard tension: 16 tr and 8 rows = 10cm (4")
- For 8" (20cm) square: approximately 6-8 rounds needed
- Each round increases the square by approximately 2.5cm (1")
- Corner spaces must maintain 2ch throughout for proper shaping
Verification
[PRE-FLIGHT CHECKS]
1. **Completeness**: Pattern includes materials, tension, abbreviations, instructions (flower centre through border), finishing, and dimensions ✓
2. **Consistency**: Stitch counts verified for each round, corners maintain proper spacing (2ch), sides should be equal ✓
3. **Constraints**: 8" x 8" square ✓, three colours specified ✓, simple flower motif ✓, UK terminology ✓, border included ✓
4. **Safety**: Each round's stitch count verified, increases calculated, corner placement confirmed ✓
Pattern
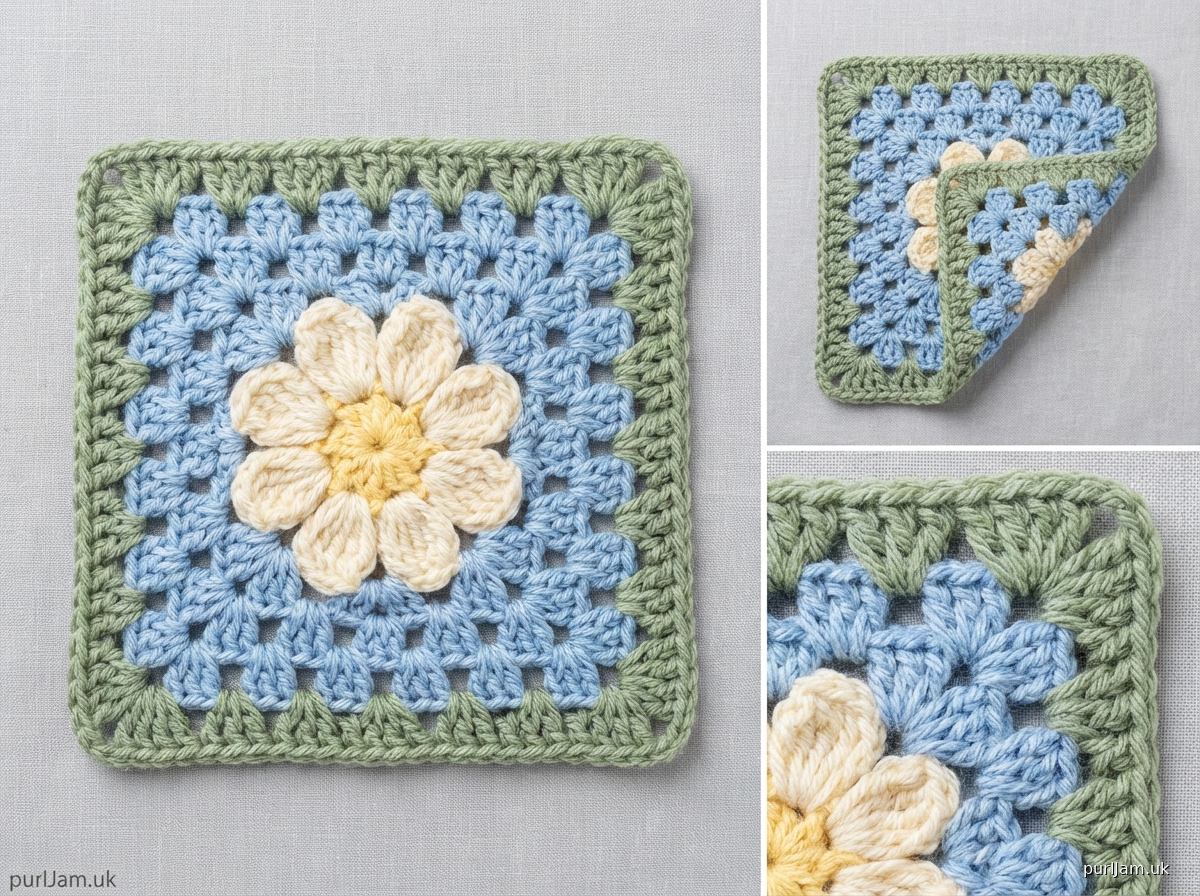
# Flower Granny Square

**Finished Measurements**: 20cm x 20cm (8" x 8")

**Difficulty**: Intermediate

## Materials

**Yarn**: Worsted weight (medium/aran) yarn in three colours:
- Colour A (flower centre): approximately 10g
- Colour B (background): approximately 25g
- Colour C (border): approximately 15g

**Hook**: 5mm (UK 6, US H/8)

**Notions**:
- Yarn needle for weaving in ends
- Scissors

## Tension (Gauge)

16 tr and 8 rounds = 10cm x 10cm (4" x 4") in granny stitch pattern

Tension is important for achieving correct finished measurements. Make a test square and adjust hook size if needed.

## Abbreviations

- ch = chain
- sl st = slip stitch
- dc = double crochet (US single crochet)
- tr = treble crochet (US double crochet)
- sp = space
- RS = right side
- ( ) = repeat instructions within brackets
- * * = repeat instructions between asterisks

## Special Stitches

**3-tr cluster**: (Yarn over, insert hook in indicated st/sp, yarn over and pull through, yarn over and pull through 2 loops) 3 times in same st/sp, yarn over and pull through all 4 loops on hook.

**Granny cluster**: 3 tr worked in same space.

## Pattern Notes

- This square is worked in continuous rounds from the centre outward.
- Join each round with a slip stitch unless otherwise indicated.
- Ch-3 at beginning of rounds counts as first tr throughout.
- The flower is created in the first three rounds using colour changes.
- Do not turn work; RS always facing.

## Instructions

### Round 1 (Flower Centre - Colour A)

Using Colour A, make a magic ring (or ch 4 and sl st to first ch to form a ring).

**Round 1**: Ch 3 (counts as first tr), 2 tr in ring, ch 2, (3 tr in ring, ch 2) 3 times, sl st to top of beginning ch-3. (4 groups of 3-tr with 4 corner ch-2 sps)
*Total: 12 tr + 4 corner spaces*

Pull magic ring tail tight to close centre hole. Fasten off Colour A.

### Round 2 (Flower Petals - Colour B)

Join Colour B with sl st to any ch-2 corner sp.

**Round 2**: Ch 3 (counts as first tr), (2 tr, ch 2, 3 tr) in same corner sp, ch 1, *(3 tr, ch 2, 3 tr) in next corner ch-2 sp, ch 1; repeat from * twice more, sl st to top of beginning ch-3. (4 corners made with ch-1 sp between)
*Total: 24 tr + 4 corner spaces + 4 side ch-1 spaces*

Fasten off Colour B.

### Round 3 (Background - Colour B)

Join Colour B with sl st to any ch-2 corner sp.

**Round 3**: Ch 3 (counts as first tr), (2 tr, ch 2, 3 tr) in same corner sp, ch 1, 3 tr in next ch-1 sp, ch 1, *(3 tr, ch 2, 3 tr) in next corner ch-2 sp, ch 1, 3 tr in next ch-1 sp, ch 1; repeat from * twice more, sl st to top of beginning ch-3.
*Total: 48 tr + 4 corner spaces + 8 side ch-1 spaces (2 per side)*

Do not fasten off.

### Rounds 4-6 (Background - Colour B)

**Round 4**: Sl st to corner ch-2 sp, ch 3 (counts as first tr), (2 tr, ch 2, 3 tr) in same corner sp, ch 1, (3 tr in next ch-1 sp, ch 1) twice, *(3 tr, ch 2, 3 tr) in next corner ch-2 sp, ch 1, (3 tr in next ch-1 sp, ch 1) twice; repeat from * twice more, sl st to top of beginning ch-3.
*Total: 72 tr + 4 corner spaces + 12 side ch-1 spaces (3 per side)*

**Round 5**: Sl st to corner ch-2 sp, ch 3 (counts as first tr), (2 tr, ch 2, 3 tr) in same corner sp, ch 1, (3 tr in next ch-1 sp, ch 1) 3 times, *(3 tr, ch 2, 3 tr) in next corner ch-2 sp, ch 1, (3 tr in next ch-1 sp, ch 1) 3 times; repeat from * twice more, sl st to top of beginning ch-3.
*Total: 96 tr + 4 corner spaces + 16 side ch-1 spaces (4 per side)*

**Round 6**: Sl st to corner ch-2 sp, ch 3 (counts as first tr), (2 tr, ch 2, 3 tr) in same corner sp, ch 1, (3 tr in next ch-1 sp, ch 1) 4 times, *(3 tr, ch 2, 3 tr) in next corner ch-2 sp, ch 1, (3 tr in next ch-1 sp, ch 1) 4 times; repeat from * twice more, sl st to top of beginning ch-3.
*Total: 120 tr + 4 corner spaces + 20 side ch-1 spaces (5 per side)*

Fasten off Colour B.

### Round 7 (Border - Colour C)

Join Colour C with sl st to any ch-2 corner sp.

**Round 7**: Ch 1, (dc, ch 2, dc) in same corner sp, *dc in each tr and ch-1 sp across to next corner (working 1 dc in each tr and 1 dc in each ch-1 sp), (dc, ch 2, dc) in corner ch-2 sp; repeat from * 3 times more, ending last repeat with sl st to first dc.
*Total: approximately 32 dc per side + 4 corner ch-2 spaces*

Fasten off, leaving a 20cm (8") tail for weaving in.

## Finishing

1. Weave in all ends securely using yarn needle, working ends through several stitches on wrong side.
2. Block square to 20cm x 20cm (8" x 8") dimensions:
   - Wet block by soaking in cool water, gently squeeze out excess (do not wring)
   - Pin square to blocking board, ensuring corners are 90-degree angles and sides are equal length
   - Allow to dry completely before unpinning
3. Check that all sides measure the same length and corners are square.

## Making Multiple Squares

To create a blanket or larger project:

1. Make desired number of squares (e.g., 25 squares for a 5 x 5 layout = approximately 100cm x 100cm / 40" x 40" finished blanket)
2. Arrange squares in desired layout
3. Join using one of these methods:

**Whip Stitch Method**:
- Place two squares RS together
- Using yarn needle and matching yarn, whip stitch through back loops only along one edge
- Continue joining squares in rows, then join rows together

**Join-as-you-go Method**:
- Work Round 7 of second square up to point where it meets first square
- Instead of working ch 2 at corner, ch 1, sl st into corresponding corner of first square, ch 1
- Along joining edge, sl st into corresponding stitches of first square instead of working dc
- Continue around square normally

## Optional Edging for Blanket

Once all squares are joined, work a border around entire blanket using Colour C:

**Round 1**: Join yarn at any corner, ch 1, work dc evenly around entire edge, working (dc, ch 2, dc) in each corner, sl st to first dc.

**Round 2**: Ch 1, dc in each dc around, working (dc, ch 2, dc) in each corner ch-2 sp, sl st to first dc. Fasten off.

## Design Variations

- **Colour Changes**: Experiment with different colour combinations for flower and background
- **Larger Square**: Continue working additional rounds in Colour B before adding border (each round adds approximately 2.5cm / 1")
- **Different Flower**: Work all of Rounds 1-2 in Colour A for a larger flower centre
- **Striped Background**: Alternate between two colours in Rounds 3-6

---

**Pattern Design**: Traditional granny square construction with flower motif
**Technical Editor**: Pattern verified for accuracy

© [Current Year] - For personal and small-scale gift use. Not for mass production.
Disclaimer: This pattern was generated by AI and should be reviewed for accuracy before use. While we strive for quality, AI-generated content may contain errors. Please verify measurements, stitch counts, and instructions before beginning your project. Generated by purlJam.uk
Access your pattern anytime
Bookmark this page to access your pattern anytime