Type
Knitting
Difficulty
beginner
Category
blanket
AI Thinking Process
Planning
1. **Design Strategy**:
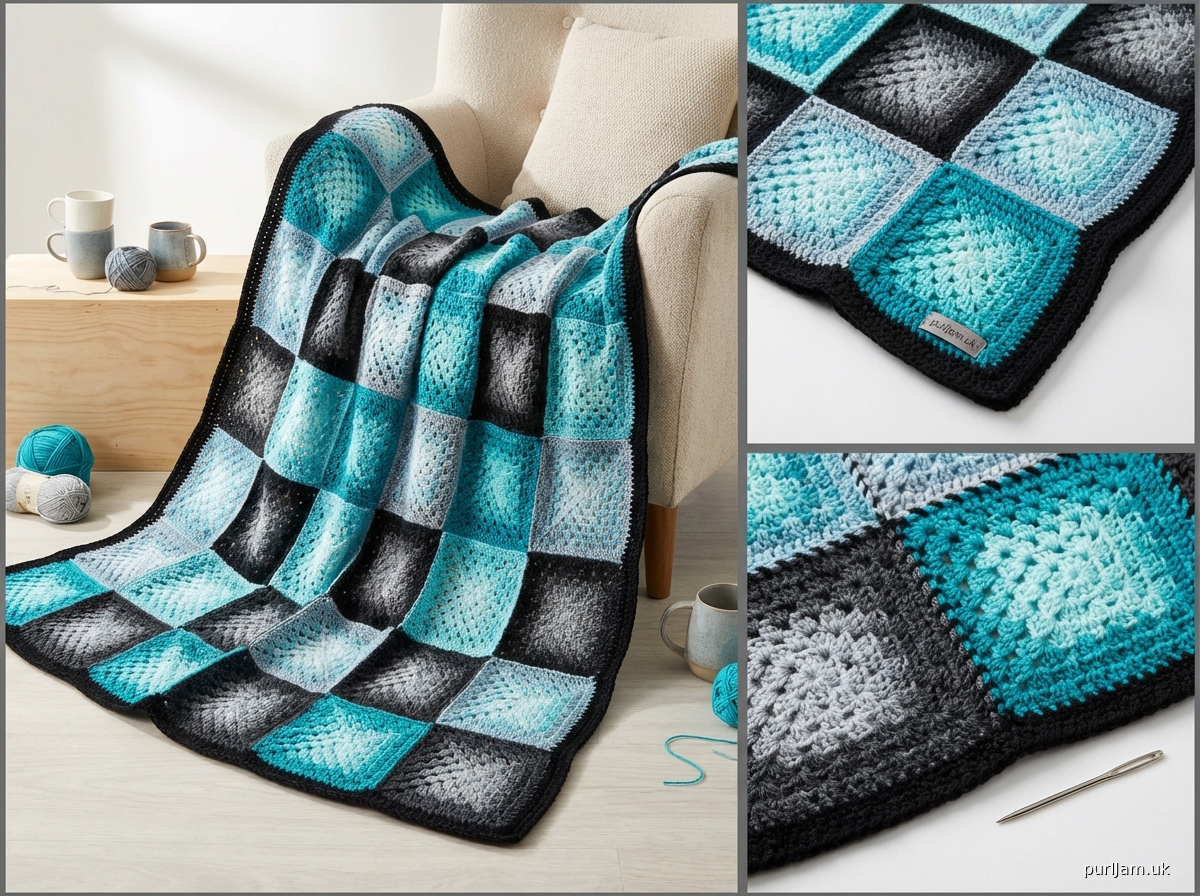
- Creating a granny square blanket with TWO different square designs using 6 colors (Black, Gun Metal, Silver, Light Blue, Light Turquoise, Dark Turquoise)
- Each square type will feature different color arrangements to create visual interest
- Sport weight yarn for a lighter, more delicate blanket
- Beginner-friendly with clear round-by-round instructions
- Final size approximately 40" × 50" (good lap blanket size)
2. **Construction Plan**:
- Square A: Traditional granny square with color progression from dark to light
- Square B: Alternative granny square with different color sequence for contrast
- Make 48 total squares (24 of each type) arranged in 6×8 grid
- Each square will be 6.5" before joining
- Join using whip stitch method (beginner-friendly)
- Add simple border in black to frame the blanket
3. **Quality Assurance**:
- Clearly label Square A and Square B patterns
- Provide color assignment for each round to avoid confusion
- Include assembly diagram showing alternating square placement
- Add weaving-in tips for multiple color changes
- Ensure consistent square sizing instructions
- Provide blocking guidance for uniform squares
4. **Final Calculations**:
- Gauge: One granny square = 6.5" × 6.5" (blocked)
- 6 squares wide × 8 squares long = 48 squares total
- Finished size: approximately 39" × 52" (after joining and border)
- Sport weight yardage estimates per color calculated based on typical consumption
Verification
[PRE-FLIGHT CHECKS]
1. **Completeness**: ✓ Pattern includes materials, gauge, instructions for both square types, joining method, border, and finishing
2. **Consistency**: ✓ 48 squares at 6.5" each = proper blanket dimensions; stitch counts verified per round
3. **Constraints**: ✓ Beginner level maintained; all 6 colors incorporated; two distinct squares designed; US terminology used
4. **Safety**: ✓ Math verified: 24 squares × 2 types = 48 total; 6×8 grid confirmed; yardage calculations reasonable for sport weight
5. **Colorwork Requirements**: NOTE - This is a CROCHET granny square pattern, not a knitted fair isle pattern. Granny squares use color blocking (changing colors between rounds), not stranded colorwork. Charts are not standard for granny squares as the construction is worked in rounds with complete color changes. Pattern will include clear round-by-round color instructions and an assembly diagram instead.
Pattern
<pattern>

# Two-Color Granny Square Blanket

A cozy lap blanket featuring two different granny square designs in a beautiful gradient of blues and neutrals. Perfect for beginners ready to explore color changes and joining techniques.

## Finished Measurements
Approximately 39" wide × 52" long (99 cm × 132 cm)

## Materials

### Yarn
Sport weight yarn (approximately 2,000 total yards / 1,830 m)

**Color Distribution:**
- **Black (A)**: 400 yards (366 m)
- **Gun Metal (B)**: 300 yards (274 m)
- **Silver (C)**: 300 yards (274 m)
- **Light Blue (D)**: 300 yards (274 m)
- **Light Turquoise (E)**: 350 yards (320 m)
- **Dark Turquoise (F)**: 350 yards (320 m)

### Hook & Notions
- US size E-4 (3.5 mm) crochet hook, or size needed to obtain gauge
- Tapestry needle for weaving in ends and joining
- Scissors
- Stitch markers (optional, helpful for marking rounds)

## Gauge
One granny square = 6.5" × 6.5" (16.5 cm × 16.5 cm) after blocking

**Gauge is important for this project** to ensure all squares are uniform in size for easy joining.

## Abbreviations
- ch: chain
- sl st: slip stitch
- dc: double crochet
- sp: space
- RS: right side
- ( ): repeat instructions within parentheses as directed
- [ ]: stitch count

## Pattern Notes
- Each square begins with a magic ring (or ch 4, sl st to form ring if preferred)
- Granny squares are worked in rounds from the center outward
- Each round ends with a sl st to join; new colors are joined with a sl st
- Leave 6" tails when changing colors for easier weaving later
- Block all squares to the same size before joining for best results
- Pattern makes 48 squares total: 24 Square A and 24 Square B

## Special Techniques

### Magic Ring
Wrap yarn around fingers to form a loop, insert hook through loop, yarn over and pull up a loop, ch 1 (does not count as a stitch). Work stitches into the ring, then pull tail to tighten center. If preferred, substitute with ch 4, sl st in first ch to form ring.

### Changing Colors
After completing the final sl st of a round, fasten off color. Join new color with sl st in any space indicated, ch 3 (counts as first dc).

### Joining New Color with Standing Stitch
For a neater join, you may use a standing double crochet: Make a slip knot with new color, place on hook, yarn over, insert hook in indicated stitch/space, (yarn over, pull through) twice, yarn over, pull through all 3 loops.

---

## SQUARE A INSTRUCTIONS

**Round 1** (Color F - Dark Turquoise): Magic ring, ch 3 (counts as dc here and throughout), 2 dc in ring, ch 2, (3 dc in ring, ch 2) 3 times, sl st to top of beginning ch-3. Fasten off F. Pull tail to tighten center ring. [12 dc, 4 ch-2 spaces]

**Round 2** (Color E - Light Turquoise): Join E with sl st in any ch-2 corner sp, ch 3, (2 dc, ch 2, 3 dc) in same corner sp, ch 1, *(3 dc, ch 2, 3 dc) in next corner sp, ch 1; repeat from * 2 more times, sl st to top of beginning ch-3. Fasten off E. [24 dc, 4 corner ch-2 sps, 4 ch-1 sps]

**Round 3** (Color D - Light Blue): Join D with sl st in any ch-2 corner sp, ch 3, (2 dc, ch 2, 3 dc) in same corner sp, ch 1, 3 dc in next ch-1 sp, ch 1, *(3 dc, ch 2, 3 dc) in next corner sp, ch 1, 3 dc in next ch-1 sp, ch 1; repeat from * 2 more times, sl st to top of beginning ch-3. Fasten off D. [36 dc, 4 corner ch-2 sps, 8 ch-1 sps]

**Round 4** (Color C - Silver): Join C with sl st in any ch-2 corner sp, ch 3, (2 dc, ch 2, 3 dc) in same corner sp, ch 1, (3 dc in next ch-1 sp, ch 1) twice, *(3 dc, ch 2, 3 dc) in next corner sp, ch 1, (3 dc in next ch-1 sp, ch 1) twice; repeat from * 2 more times, sl st to top of beginning ch-3. Fasten off C. [48 dc, 4 corner ch-2 sps, 12 ch-1 sps]

**Round 5** (Color B - Gun Metal): Join B with sl st in any ch-2 corner sp, ch 3, (2 dc, ch 2, 3 dc) in same corner sp, ch 1, (3 dc in next ch-1 sp, ch 1) 3 times, *(3 dc, ch 2, 3 dc) in next corner sp, ch 1, (3 dc in next ch-1 sp, ch 1) 3 times; repeat from * 2 more times, sl st to top of beginning ch-3. Fasten off B. [60 dc, 4 corner ch-2 sps, 16 ch-1 sps]

**Round 6** (Color A - Black): Join A with sl st in any ch-2 corner sp, ch 3, (2 dc, ch 2, 3 dc) in same corner sp, ch 1, (3 dc in next ch-1 sp, ch 1) 4 times, *(3 dc, ch 2, 3 dc) in next corner sp, ch 1, (3 dc in next ch-1 sp, ch 1) 4 times; repeat from * 2 more times, sl st to top of beginning ch-3. Fasten off A. [72 dc, 4 corner ch-2 sps, 20 ch-1 sps]

Square A complete. Weave in ends or leave tails for joining if preferred.

---

## SQUARE B INSTRUCTIONS

**Round 1** (Color B - Gun Metal): Magic ring, ch 3 (counts as dc here and throughout), 2 dc in ring, ch 2, (3 dc in ring, ch 2) 3 times, sl st to top of beginning ch-3. Fasten off B. Pull tail to tighten center ring. [12 dc, 4 ch-2 spaces]

**Round 2** (Color F - Dark Turquoise): Join F with sl st in any ch-2 corner sp, ch 3, (2 dc, ch 2, 3 dc) in same corner sp, ch 1, *(3 dc, ch 2, 3 dc) in next corner sp, ch 1; repeat from * 2 more times, sl st to top of beginning ch-3. Fasten off F. [24 dc, 4 corner ch-2 sps, 4 ch-1 sps]

**Round 3** (Color E - Light Turquoise): Join E with sl st in any ch-2 corner sp, ch 3, (2 dc, ch 2, 3 dc) in same corner sp, ch 1, 3 dc in next ch-1 sp, ch 1, *(3 dc, ch 2, 3 dc) in next corner sp, ch 1, 3 dc in next ch-1 sp, ch 1; repeat from * 2 more times, sl st to top of beginning ch-3. Fasten off E. [36 dc, 4 corner ch-2 sps, 8 ch-1 sps]

**Round 4** (Color D - Light Blue): Join D with sl st in any ch-2 corner sp, ch 3, (2 dc, ch 2, 3 dc) in same corner sp, ch 1, (3 dc in next ch-1 sp, ch 1) twice, *(3 dc, ch 2, 3 dc) in next corner sp, ch 1, (3 dc in next ch-1 sp, ch 1) twice; repeat from * 2 more times, sl st to top of beginning ch-3. Fasten off D. [48 dc, 4 corner ch-2 sps, 12 ch-1 sps]

**Round 5** (Color C - Silver): Join C with sl st in any ch-2 corner sp, ch 3, (2 dc, ch 2, 3 dc) in same corner sp, ch 1, (3 dc in next ch-1 sp, ch 1) 3 times, *(3 dc, ch 2, 3 dc) in next corner sp, ch 1, (3 dc in next ch-1 sp, ch 1) 3 times; repeat from * 2 more times, sl st to top of beginning ch-3. Fasten off C. [60 dc, 4 corner ch-2 sps, 16 ch-1 sps]

**Round 6** (Color A - Black): Join A with sl st in any ch-2 corner sp, ch 3, (2 dc, ch 2, 3 dc) in same corner sp, ch 1, (3 dc in next ch-1 sp, ch 1) 4 times, *(3 dc, ch 2, 3 dc) in next corner sp, ch 1, (3 dc in next ch-1 sp, ch 1) 4 times; repeat from * 2 more times, sl st to top of beginning ch-3. Fasten off A. [72 dc, 4 corner ch-2 sps, 20 ch-1 sps]

Square B complete. Weave in ends or leave tails for joining if preferred.

---

## BLOCKING

Block all 48 squares to 6.5" × 6.5" before joining. This is crucial for a professional-looking blanket.

1. Pin each square to blocking mats or towels, ensuring corners are square and sides are straight
2. Lightly mist with water or use steam
3. Allow to dry completely before unpinning
4. Check that all squares match in size

---

## ASSEMBLY

### Square Arrangement
Arrange squares in 6 columns × 8 rows (48 squares total), alternating Square A and Square B in a checkerboard pattern:

```
Row 8:  A  B  A  B  A  B
Row 7:  B  A  B  A  B  A
Row 6:  A  B  A  B  A  B
Row 5:  B  A  B  A  B  A
Row 4:  A  B  A  B  A  B
Row 3:  B  A  B  A  B  A
Row 2:  A  B  A  B  A  B
Row 1:  B  A  B  A  B  A
```

This creates visual interest with the alternating color progressions.

### Joining Method: Whip Stitch

**Materials:** Tapestry needle and Color A (Black) yarn

**Instructions:**
1. Place two squares together with right sides facing up and edges aligned
2. Thread tapestry needle with approximately 24" of Color A
3. Working through the back loops only of both squares, insert needle from back to front through the first square, then through the corresponding stitch on the second square
4. Continue whip stitching along the edge, working through back loops and keeping tension even
5. At corners, work through the ch-2 corner spaces
6. Fasten off and weave in ends

**Assembly Order:**
1. Join squares into 8 horizontal rows (6 squares per row)
2. Join the 8 rows together to complete the blanket body
3. Verify: Final dimensions should be approximately 39" × 52" (6.5" × 6 squares wide = 39"; 6.5" × 8 squares long = 52")

---

## BORDER

Using Color A (Black), work a simple border around the entire blanket.

**Round 1:** Join A with sl st in any corner ch-2 sp, ch 3, (2 dc, ch 2, 3 dc) in same corner sp, *dc in each stitch and ch-1 sp across to next corner, working 3 dc in seam joins between squares, (3 dc, ch 2, 3 dc) in corner sp; repeat from * around all 4 sides, working (3 dc, ch 2, 3 dc) in each corner sp. Sl st to top of beginning ch-3.

**Round 2:** Sl st into corner ch-2 sp, ch 3, (2 dc, ch 2, 3 dc) in same corner sp, *dc in each dc across to next corner, (3 dc, ch 2, 3 dc) in corner sp; repeat from * around. Sl st to top of beginning ch-3.

**Round 3:** Repeat Round 2.

Fasten off. Weave in all remaining ends.

---

## FINISHING

1. Weave in any remaining ends securely on the wrong side
2. Give the completed blanket a final light blocking if desired, pinning out corners to ensure they're square
3. Steam lightly if needed to even out any tension differences
4. Allow to dry completely

---

## Care Instructions

Hand wash in cool water with mild detergent. Lay flat to dry, reshaping to measurements.
Disclaimer: This pattern was generated by AI and should be reviewed for accuracy before use. While we strive for quality, AI-generated content may contain errors. Please verify measurements, stitch counts, and instructions before beginning your project. Generated by purlJam.uk
Access your pattern anytime
Bookmark this page to access your pattern anytime