Type
Crochet
Difficulty
intermediate
Category
dashboard cover
AI Thinking Process
Planning
Verification
Pattern
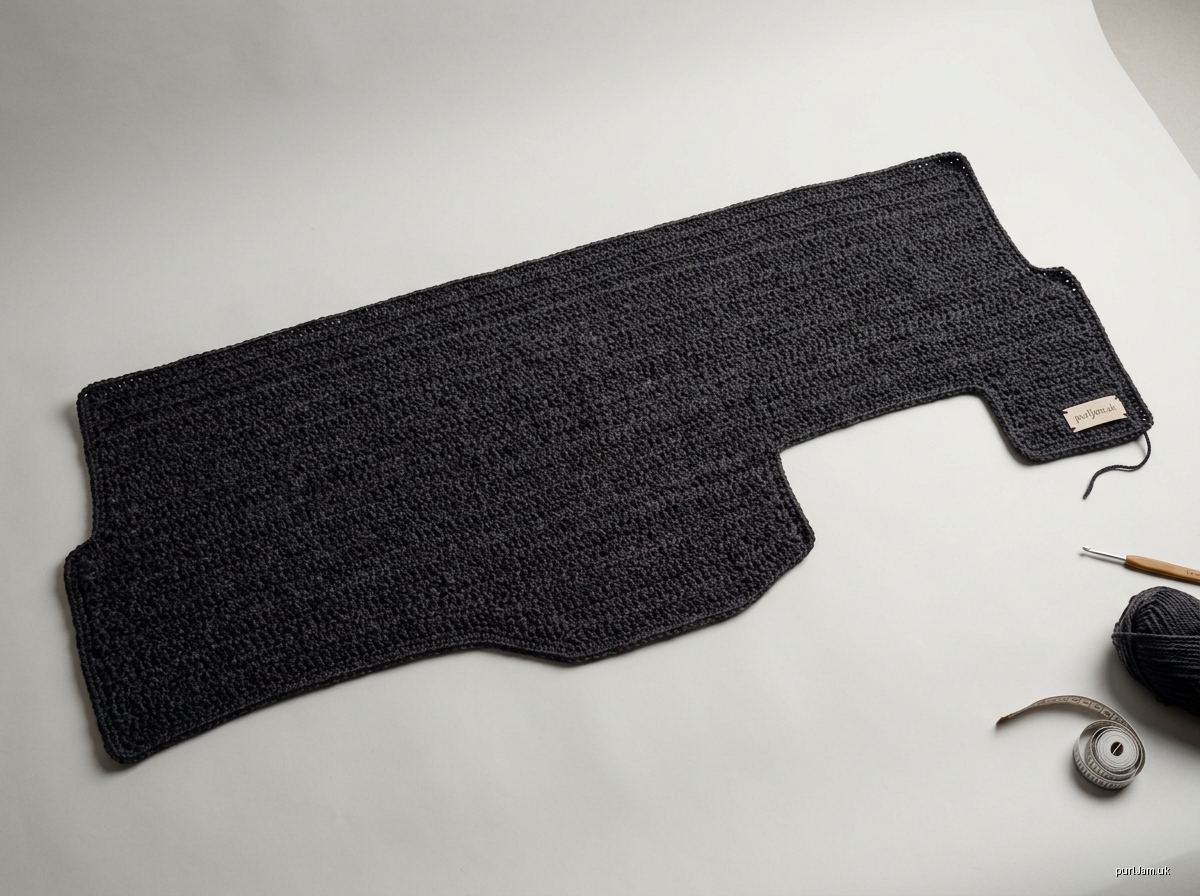
Ford Fiesta (2013, RHD) Dashboard Cover
Craft: Crochet (UK terms) | Level: Intermediate | Yarn weight: Worsted (aran/10-ply)
Important safety and fit notes
- Airbag: The 2013 Fiesta passenger airbag deploys through the dashboard. The cabin edge of this cover is designed to sit on the flat dash top only. If your cover would reach over the airbag panel seam (marked "SRS/AIRBAG"), remove rows of depth as described under "Adjusting the fit". Never stitch or glue the cover over the airbag door.
- Demister: The windscreen edge should sit just in front of the windscreen demister slot, never over it.
- Measurements: All measurements are for a Mk7 Fiesta (2008–2017 body) and are estimates. Make a paper template of your own dash first and compare it with the schematic below. One row = 1 cm of length, and 1.4 sts = 1 cm of depth.
Finished size
- Length (passenger end to driver end, along the windscreen): 130 cm (51.25 in)
- Depth at the passenger and driver ends: 28 cm (11 in)
- Depth across the centre: 38 cm (15 in)
- Depth at the binnacle cut-out: 20 cm (7.75 in)
- Cut-out: begins 70 cm (27.5 in) from the passenger end. It slopes in over 10 cm, stays at full width for 26 cm (10.25 in), then slopes out over 10 cm.
Schematic (row positions measured from the passenger end):
Windscreen edge (straight) ─────────────────────────────────────── 130 cm
|  A  |          B           | C |    D (binnacle)   | E |  F  |
0     14                     70  80                  106 116   130
28cm→38cm      38 cm          38→20      20 cm        20→38 38→28
Materials
- About 1,100 m (1,200 yd) of worsted acrylic, for example 6 × 100 g balls (about 185 m each), in black or charcoal to reduce glare
- 5.0 mm crochet hook (US H/8), or the size needed to obtain tension
- 4.0 mm hook for the border
- Stitch markers, tapestry needle, tape measure
- Optional: 4 strips of hook-and-loop tape (2 × 10 cm each)
Tension (gauge)
14 htr and 10 rows = 10 cm (4 in) in htr, after blocking.
The tension matters for length because each row is 1 cm. If your swatch gives more rows per 10 cm, change hook size before you begin.
Abbreviations (UK)
- ch – chain
- dc – double crochet (US sc)
- htr – half treble (US hdc)
- htr2tog – (yrh, insert hook in next st, yrh, pull through) twice, yrh, pull through all 5 loops
- sl st – slip stitch
- st(s) – stitch(es)
- yrh – yarn round hook
Pattern notes
- Turning chain: ch 2 at the start of each row. It does not count as a stitch. Work the first htr into the first st.
- Odd rows begin at the windscreen edge and end at the cabin edge.
- Even rows begin at the cabin edge and end at the windscreen edge.
- All shaping is at the cabin edge. Place a marker on the windscreen edge to keep track.
Instructions
Section A – Passenger-end taper (Rows 1–14)
Foundation: Ch 41.
Row 1 (odd): Htr in 3rd ch from hook and in each ch to the last ch, then 2 htr in the last ch. Turn. (40 sts: 38 + 2 = 40 ✓)
Row 2 (even): Ch 2, 2 htr in the first st, htr in each st to the end. Turn. (41 sts)
Rows 3–14: Repeat Rows 1 and 2 six more times, working 2 htr in the last st on odd rows and in the first st on even rows. (53 sts: 41 + 12 = 53 ✓)
Section B – Centre (Rows 15–70)
Every row: Ch 2, htr in each st. Turn.
Work 56 rows. (53 sts)
The piece measures 70 cm from the foundation.
Fit check: Lay the piece on the dash with the foundation edge at the passenger end. The last row should sit just to the left of the instrument binnacle hood. If it does not, add or remove plain rows here (1 row = 1 cm).
Section C – Binnacle slope in (Rows 71–80)
Row 71 (odd): Ch 2, htr in each st to the last 5 sts. Leave these 5 unworked. Turn. (48 sts)
Row 72 (even): Ch 2, htr in each st. Turn. (48 sts)
Rows 73–80: Repeat Rows 71 and 72 four more times. (28 sts: 48 − 20 = 28 ✓)
Section D – Binnacle (Rows 81–106)
Every row: Ch 2, htr in each st. Turn.
Work 26 rows. (28 sts)
Section E – Binnacle slope out (Rows 107–116)
Row 107 (odd): Ch 2, htr in each st. At the end, ch 7. Turn.
Row 108 (even): Htr in the 3rd ch from hook and in the next 4 ch (5 new sts), then htr in each st to the end. Turn. (33 sts)
Rows 109–116: Repeat Rows 107 and 108 four more times. (53 sts: 33 + 20 = 53 ✓)
Section F – Driver-end taper (Rows 117–130)
Row 117 (odd): Ch 2, htr in each st to the last 2 sts, then htr2tog. Turn. (52 sts)
Row 118 (even): Ch 2, htr2tog, htr in each st to the end. Turn. (51 sts)
Rows 119–130: Repeat Rows 117 and 118 six more times. (39 sts: 51 − 12 = 39 ✓)
Do not fasten off.
The piece measures 130 cm.
Border
Change to the 4.0 mm hook. Work in rounds, with the right side facing.
Round 1:
- Driver-end edge (last row): Ch 1, 3 dc in the first st (corner), 1 dc in each of the next 37 sts, 3 dc in the last st (corner).
- Windscreen edge: Work 2 dc into each row-end across the 130 rows (260 dc).
- Passenger-end edge (foundation): 3 dc in the first ch, 1 dc in each of the next 37 ch, 3 dc in the last ch.
- Cabin edge: Work 2 dc into each row-end (260 dc). Also work 1 dc into each exposed st on the 5 Section C steps (25 dc) and into each chain along the 5 Section E steps (25 dc).
- Join with a sl st to the first dc.
Count: 260 + 260 + 50 + 41 + 41 + 4 corner centre sts = 656 dc. Each end is 39 sts + 2 extra corner sts = 41, plus 4 corner centre sts. (656 dc ✓)
Round 2: Ch 1, dc in each dc, working 3 dc in each corner centre st. Join. (664 dc: 656 + 8 = 664 ✓)
Fasten off and weave in the ends.
Finishing
- Block: Wet block, pin to the schematic measurements, and leave to dry fully. Do not steam acrylic hot, as this can flatten or "kill" it.
- Fit: Lay the cover with the windscreen edge 1 cm in front of the demister slot, the foundation edge at the passenger A-pillar, and the cut-out framing the binnacle.
- Optional securing:
- Stick the hook halves of the hook-and-loop strips to the dash 5 cm in from each end and 40 cm in from each end, 5 cm in front of the windscreen.
- Sew the loop halves to the cover's underside at the matching points: Rows 5, 40, 90 and 125, between sts 7 and 14 counted from the windscreen edge.
- Never place a strip on the airbag panel.
Adjusting the fit
- Length: Add or remove plain rows in Section B (1 row = 1 cm).
- Binnacle width: Add or remove rows in Section D.
- Depth: Change the foundation chain by multiples of 1.4 sts per cm. Change every stated count by the same number. For example, ch 38 gives 36 sts at Row 1 and 50 sts in Section B.
Disclaimer: This pattern was generated by AI and should be reviewed for accuracy before use. While we strive for quality, AI-generated content may contain errors. Please verify measurements, stitch counts, charts, and instructions before beginning your project. Generated by purlJam.uk
Love this pattern?
Save this pattern to your free PurlJam libraryAccess your pattern anytime
Bookmark this page to access your pattern anytime