Type
Crochet
Difficulty
advanced
Category
blanket
AI Thinking Process
Planning
Verification
Pattern
Forest Mountain Scene Blanket
Advanced Textured Crochet Blanket (Intermediate)
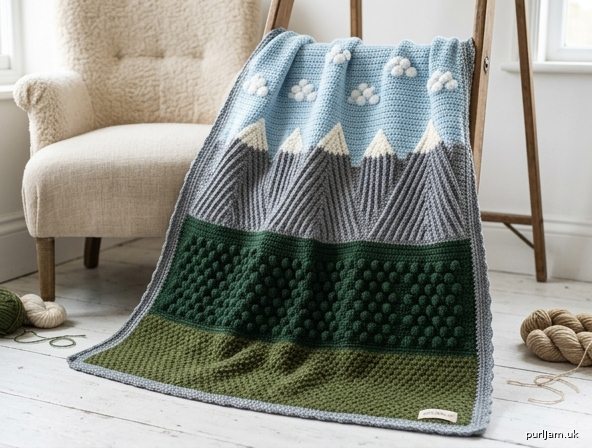
A cozy throw that reads as a landscape: mossy meadow, a grove of bobble pine trees, ridged gray mountains with snowy caps, and a soft sky with cloud puffs. Worked flat from the bottom up in worsted weight with clear band changes.
Finished Size: Approx. 50 × 60 inches (127 × 152 cm), excluding border; about 52 × 62 inches (132 × 157 cm) after border.
Skill Level: Intermediate (color changes, bobbles, front-post ridges, puff stitches).
Materials
Yarn: Worsted weight (category 4), approx. 1800 yd (1645 m) total:
- Color A (Meadow green): 280 yd (255 m)
- Color B (Forest/dark green): 400 yd (365 m)
- Color C (Mountain gray or slate): 450 yd (410 m)
- Color D (Snow/cream or white): 150 yd (135 m)
- Color E (Sky blue): 400 yd (365 m)
- Color F (Cloud soft white or pale gray): 120 yd (110 m)
Hook: US I/9 (5.5 mm), or size needed to obtain gauge
Notions: Stitch markers, yarn needle, scissors, blocking supplies
Gauge
16 sts and 10 rows = 4 inches (10 cm) in double crochet, lightly blocked.
Make a 6 × 6 inch swatch in dc and in bobble pattern. Textured sections are denser; adjust hook if your bobble band pulls in more than ½ inch versus plain dc.
Abbreviations (US)
ch – chain
st(s) – stitch(es)
sl st – slip stitch
sc – single crochet
hdc – half double crochet
dc – double crochet
fpdc – front post double crochet
bpdc – back post double crochet
yo – yarn over
rep – repeat
RS – right side
WS – wrong side
Special Stitches
Bobble (5-dc bobble):
Yo, insert hook in st, yo, pull up loop, yo, draw through 2 loops (2 loops on hook); [yo, insert hook in same st, yo, pull up loop, yo, draw through 2 loops] 4 times (6 loops on hook); yo, draw through all 6 loops; ch 1 to close. (Closing ch-1 does not count as a st; skip it when working into the bobble on the next row—work into the bobble top only.)
Pine Tree Bobble Cluster (used in Forest band):
Bobble in indicated st, sk next st, sc in next st, sk next st, bobble in next st. (Creates a small paired “tree” motif over 5 sts.)
Puff (3-hdc puff):
Yo, insert hook in st, yo, pull up loop to height of hdc (3 loops); [yo, insert hook in same st, yo, pull up loop] twice (7 loops on hook); yo, draw through all 7 loops; ch 1 to close.
Mountain Ridge (fpdc pair):
Fpdc around next st 2 rows below (or around indicated post), dc in next st. Used to build diagonal and vertical ridge lines.
Stitch Diagram Notes (text legend)
- ● = sc
- T = dc
- B = bobble
- P = puff
- ƒ = fpdc
- — = ch-1 (bobble/puff close; do not work into unless stated)
Forest row schematic (repeat): edge dc | 4 dc, B, sk 1, sc, sk 1, B, 2 dc | … | edge dc
Mountain ridge row: alternate dc and fpdc columns every 2–4 sts to suggest peaks; snow caps are short D stripes at peak tops.
Pattern Notes
- Blanket is worked in horizontal scenic bands from meadow (bottom) to sky (top).
- Turn at the end of every row unless stated.
- Keep first and last stitch of every row as a plain dc (or sc in sc rows) for stable edges.
- When changing color at the end of a row: work last yo of last st with new color.
- Weave ends as you go at band changes when possible.
- Bobble rows are worked on RS so bobbles pop to the front.
- Stitch multiple: 10 + 2 (202 sts). Do not add or drop edge stitches.
- Inline checks appear as (count → result ✓).
Blanket Body
Foundation
With A, ch 204.
Row 1 (RS): Dc in 4th ch from hook (3 skipped ch count as first dc), dc in each ch across.
(202 dc ✓)
Turn.
BAND 1 — Meadow (Color A)
Mossy ground texture, ~6 inches
Row 2 (WS): Ch 2 (does not count as st here and throughout unless noted), hdc in first st, *sc in next st, hdc in next st; rep from * to last st, hdc in last st. (202 sts ✓)
Row 3 (RS): Ch 2, hdc in first st, *hdc in next st, sc in next st; rep from * to last st, hdc in last st.
Rows 4–15: Rep Rows 2–3.
(14 rows moss ≈ 5.5–6" ✓)
Fasten off A.
BAND 2 — Forest Grove (Color B, accent A optional)
Bobble pine trees on dc ground, ~14 inches
Join B at beginning of next row.
Row 16 (RS): Ch 3 (counts as dc here and throughout), dc in each st across. (202 dc ✓)
Row 17 (WS): Ch 3, dc across.
Row 18 (RS) — Tree Row: Ch 3, dc in next 4 sts, *bobble in next st, sk 1 st, sc in next st, sk 1 st, bobble in next st, dc in next 5 sts; rep from * to last 7 sts, bobble, sk 1, sc, sk 1, bobble, dc in last 2 sts.
(Tree motifs centered on 10-st repeats; 20 tree pairs ✓)
Row 19 (WS): Ch 3, dc in each st and in each bobble top across (skip bobble closing ch-1 spaces). (202 dc ✓)
Row 20 (RS): Ch 3, dc across.
Row 21 (WS): Ch 3, dc across.
Row 22 (RS) — Offset Tree Row: Ch 3, dc in next 9 sts, *bobble, sk 1, sc, sk 1, bobble, dc in next 5 sts; rep from * until fewer than 10 sts remain, dc to end.
(Offset grove so trees are staggered ✓)
Row 23 (WS): Ch 3, dc across (into bobble tops).
Rows 24–25: Ch 3, dc across.
Rows 26–39: Rep the Tree / plain sequence (Rows 18–25 style), alternating aligned and offset tree rows, ending with 2 plain dc rows.
(Forest band ≈ 24 rows ≈ 14" ✓)
Fasten off B.
BAND 3 — Mountain Range (Colors C and D)
Ridged peaks with snow caps, ~18 inches
Join C.
Row 40 (RS): Ch 3, dc across. (202 ✓)
Row 41 (WS): Ch 3, dc across.
Row 42 (RS) — Ridge setup: Ch 3, *dc in next 3 sts, fpdc around next st of Row 40; rep from * to last st, dc in last st.
Row 43 (WS): Ch 3, dc across (work dc into both dc and fpdc tops).
Row 44 (RS): Ch 3, dc in next st, *fpdc around next fpdc 2 rows below, dc in next 3 sts; rep from *, adjusting to keep 202 sts, dc in last st.
Rows 45–52: Continue alternating a RS ridge row (fpdc columns climbing or held vertical) with a WS plain dc row. Shift fpdc columns 1 st left or right every 2 RS rows to form peak silhouettes (wider bases, narrower tops).
Suggested peak layout (sts 1–202):
- Peak 1 base sts 20–55
- Peak 2 base sts 70–120
- Peak 3 base sts 140–185
Work fpdc denser (every 2 sts) on peak faces and every 4 sts in “valleys.”
Snow caps (Color D):
On the next 4–6 RS rows, when you reach the top third of each peak, change to D for 6–14 sts at each peak tip only (tapestry or intarsia style: drop C, work D across tip, pick up C). Carry unused color loosely on WS or cut and weave if preferred.
Rows 53–58 (example snow zone): Maintain ridge pattern; work peak tips in D as above; valleys stay C.
Rows 59–70: Continue C ridges, tapering fpdc lines so peaks read clearly; last 2 rows plain dc in C.
(Mountain band ≈ 31 rows ≈ 18" ✓)
Fasten off C and D.
BAND 4 — Sky & Clouds (Colors E and F)
Open sky with puff clouds, ~16 inches
Join E.
Row 71 (RS): Ch 3, dc across. (202 ✓)
Rows 72–75: Ch 3, dc across.
Row 76 (RS) — Cloud Row: Ch 3, dc in next 14 sts, *puff in next st, dc in next 2 sts, puff in next st, dc in next 18 sts; rep from * across, placing 6–8 cloud pairs, dc to end.
(Change to F only for each puff and the 1–2 dc between paired puffs if you want white clouds; otherwise work puffs in E for subtle texture.)
Row 77 (WS): Ch 3, dc across (into puff tops; skip closing ch-1).
Rows 78–80: Ch 3, dc across in E.
Row 81 (RS) — Offset Clouds: Ch 3, dc in next 6 sts, place puff pairs in gaps between previous clouds, dc between groups.
Rows 82–95: Rep plain dc rows, adding 1 more lightly offset cloud row around Row 88 if desired. End with 4–6 plain dc rows in E.
(Sky band ≈ 25 rows ≈ 16" ✓)
Total body rows ≈ 95–100 patterned rows; add plain dc rows in E if needed to reach 60" length before border.
Measure: body should read ~50" wide × 60" long.
Fasten off E/F.
Border
Join A (or C) at any corner with RS facing.
Round 1: Ch 1, sc evenly around entire blanket:
- Along top/bottom: 1 sc per st.
- Along sides: ~5 sc per 2 row-ends (or 2 sc per dc row) to keep edges flat.
- Corners: (sc, ch 2, sc) in each corner st.
Join with sl st to first sc.
Round 2: Ch 3, dc in each sc around; in each corner ch-2 space work (2 dc, ch 2, 2 dc). Join.
Round 3 (optional shell edge): Ch 1, sc in same st, sk 1, *5 dc in next st, sk 1, sc in next st, sk 1; rep from * around, adjusting near corners so a shell or (sc, ch 2, sc) sits cleanly on each corner. Join. Fasten off.
(Border adds ~1–1.5" each side → ~52 × 62" ✓)
Finishing
- Weave in all ends securely on WS, especially at color changes and bobble closes.
- Block (essential):
- Wet block or steam block.
- Pin to 50 × 60 inches (body) or finished measurements, squaring corners.
- Do not crush bobbles, puffs, or fpdc ridges — steam from WS or hover iron; pat puffs into shape with fingers while damp.
- Let dry completely.
- Optional: add a fabric label on WS corner.
Schematic (text)
↑ Sky + clouds (E/F)     ~16"
↑ Mountains + snow (C/D) ~18"
↑ Forest bobble pines (B)~14"
↑ Meadow moss (A)        ~6"
←———————— 50" ————————→
Care
Hand wash or machine gentle cold; lay flat to dry. Do not iron directly on texture.
Designer notes for the maker:
Tree bobbles should sit in vertical “groves.” If a tree row gathers, go up half a hook size for Forest band only. Mountain fpdc lines are intentionally imperfect—nature is not symmetrical. Enjoy your forest mountain scene.
End of pattern.
Disclaimer: This pattern was generated by AI and should be reviewed for accuracy before use. While we strive for quality, AI-generated content may contain errors. Please verify measurements, stitch counts, charts, and instructions before beginning your project. Generated by purlJam.uk
Love this pattern?
Save this pattern to your free PurlJam libraryAccess your pattern anytime
Bookmark this page to access your pattern anytime