Type
Knitting
Difficulty
intermediate
Category
custom
AI Thinking Process
Planning
Verification
Pattern
Frida Kahlo Crochet Portrait Wall Hanging
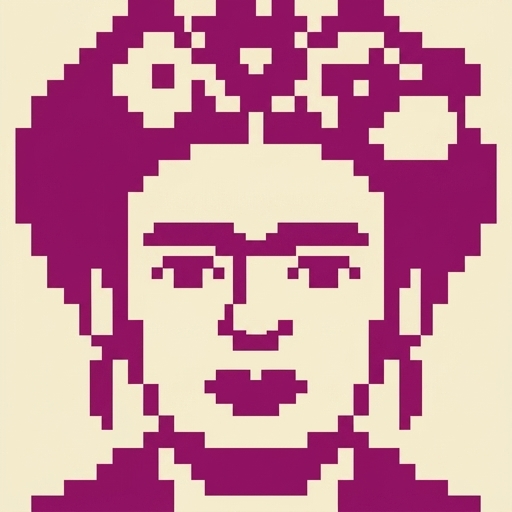
A beginner-friendly single-crochet colorwork portrait of Frida Kahlo, worked flat from an attached stitch chart. The piece shows her floral crown, signature unibrow, hoop earrings, and traditional embroidered blouse against a teal ground, then is framed with a black single-crochet border and finished for hanging. All fabric is single crochet — no increases, decreases, or specialty stitches in the portrait itself.
Skill level: Beginner (chain, single crochet, color changes, weaving in ends, blocking)
Finished Size
One size (wall hanging)
- Portrait body: 17¼" wide × 20" tall (44 × 51 cm)
- After border: 18¼" wide × 21¼" tall (46.5 × 54 cm), after blocking
Size is set by gauge. A different hook will change both the finished measurements and the “pixel” scale of the portrait.
Materials
Yarn: Worsted weight (#4 Medium), wool, acrylic, or cotton with clear stitch definition.
Approximate yardage (includes swatch and tails):
| Color | Role | Yards (meters) |
|---|---|---|
| A Teal | Background | 160 yd (146 m) |
| B Warm tan | Skin | 75 yd (69 m) |
| C Black | Hair, brows, eyes, border | 130 yd (119 m) |
| D Cream | Blouse, eye whites | 70 yd (64 m) |
| E Crimson | Lips, red flowers | 25 yd (23 m) |
| F Leaf green | Foliage / embroidery | 35 yd (32 m) |
| G Magenta | Pink flowers | 25 yd (23 m) |
| H Mustard gold | Earrings, flower centers | 20 yd (18 m) |
Hook: US H/8 (5.0 mm), or size needed to obtain gauge. A US G/6 (4.0 mm) may be used if your colorwork fabric looks holey; re-check gauge if you switch.
Notions:
- Tapestry needle
- Scissors
- 8–12 small yarn bobbins (or clothespins) for intarsia
- 4 stitch markers
- Blocking mats and pins
- 20" (51 cm) wooden dowel or hanging rod (optional)
- 2 small jump rings or ribbon for hanging (optional)
Gauge
14 sc and 16 rows = 4" × 4" (10 × 10 cm) in single crochet with US H/8 (5.0 mm), blocked.
Work a swatch at least 6" (15 cm) square in sc, block it, then measure the center 4" (10 cm).
Gauge check: 14 sc = 4" → 60 sc = 17¼" (44 cm) wide ✓
Row gauge check: 16 rows = 4" → 80 rows = 20" (51 cm) tall ✓
If you have too many stitches per 4" (10 cm), go up a hook size. If you have too few, go down a hook size. Portrait features will distort if gauge is off.
Abbreviations (US Crochet)
- ch — chain
- sc — single crochet
- sl st — slip stitch
- st(s) — stitch(es)
- RS — right side
- WS — wrong side
- yo — yarn over
- rep — repeat
Pattern Notes
- The portrait is worked flat, in turned rows of single crochet, from the bottom of the chart to the top.
- Turning chain: Ch 1 at the start of every row. The ch-1 does not count as a stitch. Work the first sc into the first stitch of the row.
- Stitch count is constant: Every portrait row has 60 sc. Count at the end of Row 1 and spot-check every 10 rows.
- Colorwork method (recommended for beginners): Intarsia. Wind a bobbin for each color area that appears in a row (for example, separate bobbins of A on the left background and A on the right background). Drop the old color and pick up the new color at each change. Do not carry unused colors across long stretches — that adds bulk and muddies the portrait.
- How to change color: Work the last sc of the old color until 2 loops remain on the hook. Yarn over with the new color and pull through both loops. That completes the stitch in the new color and sets the next stitch.
- Closing holes: At every color change, twist the two yarns once (bring the old yarn over the new yarn) before working the next stitch. This locks the join.
- Wrong-side rows: Color changes are made the same way. Keep bobbins on the WS and give each a gentle tug after the change so the RS looks smooth.
- Yarn tails: Leave 6" (15 cm) tails at every start and end. Weave them in as you go when a color area finishes, or leave them for the finishing step.
- The attached chart is the authority for every color placement. There are no written stitch-by-stitch color rows.
Attached Stitch Chart
Use the separate attached chart panel for the visual grid. Do not work from a chart drawn in this text — there isn’t one here.
Where to find it: The Frida Kahlo portrait chart is in the companion chart panel of this pattern (to the right of, or immediately following, these written instructions).
Chart size used in this pattern: 60 squares wide × 80 squares high. Each square = 1 sc. Confirm those counts on your attached panel before you chain; this pattern’s stitch counts, row counts, and finished measurements are built on 60 × 80.
How to read the chart (crochet, worked flat):
- Work from the bottom row of the chart upward. Chart Row 1 = pattern Row 1.
- Odd-numbered rows (RS): read the chart from right to left.
- Even-numbered rows (WS): read the chart from left to right.
- The square on the far right of Chart Row 1 is the first sc you work after the foundation chain.
- Colors on the chart match Materials: A teal, B warm tan, C black, D cream, E crimson, F leaf green, G magenta, H mustard gold.
Color and yarn management:
- Prepare bobbins before you start each new color area (face, hair masses, blouse, background left, background right, individual flowers).
- Change color on the last yo of the stitch before the new color square.
- Do not strand a color more than 3 stitches if you choose to carry instead of using a bobbin; for this portrait, bobbins are cleaner.
- When a color is not used for several rows, cut it, leaving a 6" (15 cm) tail, rather than carrying it up the side.
Stitch-count integration:
Chart width 60 = stitches per row.
Foundation: ch 61, sc in 2nd ch from hook and in each remaining ch (61 − 1 = 60 sc ✓).
Rows 1–80: 60 sc each row, 1 row per chart row (80 chart rows = 80 worked rows ✓).
Do not increase, decrease, or skip stitches to “fit” a motif — if a row does not have 60 sc, a stitch was missed or added; fix that row before continuing.
Instructions
Setup
Wind bobbins of Colors A–H. Keep Color C (black) and Color A (teal) in larger bobbins; they are used most.
Foundation
With Color A (or the color shown in the bottom-right square of Chart Row 1 if it is not A), ch 61.
Portrait
Row 1 (RS): Sc in 2nd ch from hook and in each ch across, following Chart Row 1 from right to left for color. 60 sc ✓. Ch 1, turn.
Row 2 (WS): Sc in each sc across, following Chart Row 2 from left to right for color. 60 sc ✓. Ch 1, turn.
Rows 3–80: Continue in sc, 1 row per chart row, reading RS (odd) rows right to left and WS (even) rows left to right. Ch 1 and turn at the end of every row except the last.
Place a marker on the RS so you always know which way to read the chart.
Checkpoint — Row 20 (WS): 60 sc. You should be well into the lower blouse and background. ✓
Checkpoint — Row 40 (WS): 60 sc. You should be at the lower face / neck / upper blouse. ✓
Checkpoint — Row 60 (WS): 60 sc. You should be through the eyes and unibrow, into the lower floral crown. ✓
Checkpoint — Row 80 (WS): 60 sc. Floral crown and top background complete. ✓
Fasten off at the end of Row 80. Weave in or leave tails to weave during finishing.
(Row 80 is a WS row, so the last row is worked with the WS facing. The next section is joined with the RS facing.)
Border (frame)
The border is worked in the round with Color C (black) so the portrait reads like a framed print. Do not turn.
Join: With RS facing, join Color C with a sl st in the top-right corner stitch of Row 80 (the first stitch of that row as viewed with RS facing). Ch 1.
Rnd 1:
- Top edge: 3 sc in the same corner st, sc in each of the next 58 sts, 3 sc in the last st of the top edge. (3 + 58 + 3 = 64 sc along the top, including corner groups ✓)
- Left side (working down the row edges): sc in the side of each of the 80 rows. (80 sc ✓)
Tip: Work under 2 strands of each row edge so the side does not stretch. - Bottom edge: 3 sc in the first foundation ch, sc in each of the next 58 foundation ch, 3 sc in the last foundation ch. (3 + 58 + 3 = 64 sc along the bottom ✓)
- Right side (working up the row edges): sc in the side of each of the 80 rows. (80 sc ✓)
- Sl st to first sc to join.
Rnd 1 total: 64 + 80 + 64 + 80 = 288 sc ✓.
Rnd 2: Ch 1. Sc in each sc around, working 3 sc in the center sc of each 3-sc corner group. Sl st to first sc. Fasten off.
Corner math: 4 corners × 2 extra sc = 8 extra. 288 + 8 = 296 sc ✓.
Finishing
-
Weave in ends. On the WS, weave each tail along a path of the same color for at least 2" (5 cm). For short color areas (earrings, lips, flower centers), weave in two directions so tails cannot pull free. Do not weave a dark tail under a light area (it will show through).
-
Optional definition (beginner-friendly embroidery). If the unibrow, pupils, or hoop earrings look too pixelated after blocking, use Color C and a tapestry needle to work a few short straight stitches over the charted shapes. Keep this minimal — the chart already places these features.
-
Block. Soak in lukewarm water with a drop of wool wash (or dampen thoroughly if using acrylic). Roll in a towel. Pin to 18¼" × 21¼" (46.5 × 54 cm) on blocking mats, squaring the corners. For wool, allow to dry fully. For acrylic, hover a steam iron just above the fabric (do not press the stitches flat) until the piece holds its shape, then let cool.
-
Hanging. Choose one:
- Dowel: Weave a 20" (51 cm) wooden dowel through the top round of border stitches, skipping 2–3 sts between bites so the piece hangs evenly. Tie a length of Color C or ribbon to both ends of the dowel.
- Loops: With Color C, join in the top-left corner, ch 15, sl st in the same corner. Fasten off. Repeat at the top-right corner. Hang from both loops.
-
Final check. RS should show a clear teal field, a centered face with a continuous unibrow, a floral crown, cream blouse, and a black frame. Stitch count across the portrait remains 60; the border sits evenly on all four sides.
Care: Hand wash cold, lay flat to dry. Do not wring. A wall hanging in acrylic may be spot-cleaned.
Designer note: This pattern is an original crochet interpretation of Frida Kahlo’s public likeness for personal, non-commercial display. It is not affiliated with the Frida Kahlo Corporation or the artist’s estate.
Disclaimer: This pattern was generated by AI and should be reviewed for accuracy before use. While we strive for quality, AI-generated content may contain errors. Please verify measurements, stitch counts, charts, and instructions before beginning your project. Generated by purlJam.uk
Love this pattern?
Save this pattern to your free PurlJam libraryAccess your pattern anytime
Bookmark this page to access your pattern anytime