Type
Crochet
Difficulty
intermediate
Category
custom
AI Thinking Process
Planning
Verification
Pattern
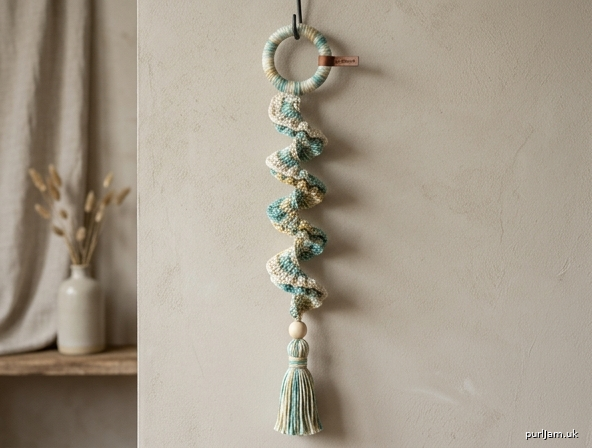
Spiral Breeze Wind Spinner Wall Hanging
A beginner corkscrew spinner that hangs from a built-in loop (or an optional wooden ring) and twists in the breeze. You work one long ruffled strip of double crochet along both sides of a foundation chain — no shaping, no seaming. Hang it from a porch hook, a tree branch, or a wall peg. A tassel at the bottom weights the spiral so it hangs true and spins.
Skill level: Beginner
Materials
Yarn Worsted weight (category 4), smooth acrylic or cotton-blend recommended so the spiral holds its twist and sheds weather if hung outdoors.
- Small: 110 yd (101 m)
- Medium: 170 yd (155 m)
- Large: 230 yd (210 m)
Yardage includes the tassel. Add about 20 yd (18 m) if you cover a wooden ring. One 200 yd (183 m) skein makes Small or Medium; Large needs a full 220–230 yd skein or two contrasting colors.
Hook US I/9 (5.5 mm), or size needed for a relaxed fabric. A slightly larger hook (US J/10 / 6.0 mm) makes a looser, airier spinner that catches more wind.
Notions
- Yarn needle
- Scissors
- 2 stitch markers
- 6" (15 cm) piece of cardboard (for tassel)
- Optional: 3" (7.5 cm) wooden or metal ring
- Optional: 1 large-hole wooden bead (about ¾–1" / 2–2.5 cm) for extra bottom weight
- Optional: 6–8" (15–20.5 cm) wooden dowel if you prefer a bar-style wall hanging
Gauge
16 ch = 4" (10 cm) 14 dc = 4" (10 cm)
Gauge is not critical for fit, but it does affect hanging length and how tightly the corkscrew coils. If your chains are much tighter than 16 ch = 4" (10 cm), go up a hook size so the ruffle can twist freely.
Sizes
Instructions are written for Small (Medium, Large).
| Small | Medium | Large | |
|---|---|---|---|
| Body chain | 83 | 123 | 163 |
| Chains worked (each side) | 80 | 120 | 160 |
| Dc each side | 240 | 360 | 480 |
| Approx. coiled hanging length (loop and tassel not included) | 12–16" (30.5–40.5 cm) | 18–24" (45.5–61 cm) | 24–32" (61–81.5 cm) |
| Approx. coil diameter | 3–4" (7.5–10 cm) | 3–4" (7.5–10 cm) | 3–4½" (7.5–11.5 cm) |
Hanging length varies with how tightly you twist the finished spiral. Medium is the best first size.
To customize length, chain any number, then work 3 dc in each chain as written. Every extra 4 body chains add about 1" (2.5 cm) of uncoiled spine.
Abbreviations (US)
- ch — chain
- dc — double crochet
- rep — repeat
- sc — single crochet
- sk — skip
- sl st — slip stitch
- st(s) — stitch(es)
- yd — yard(s)
Pattern Notes
- US crochet terminology throughout.
- The spinner is worked as one continuous strip: hanging loop, foundation chain, first ruffle pass, second ruffle pass. There are no rows to turn.
- Ch 3 counts as the first dc. The skipped 3 chains at the start of the body plus 2 dc in the 4th chain from the hook equal 3 dc in the first stitch.
- Work into both loops of each dc. On the second pass, work into the unused loops (the “bottom bumps”) of the foundation chain.
- Stitch counts appear in parentheses at the end of each section and must match before you continue.
- The piece will look like a long, curly ruffle while you work. That is correct. The spiral appears when you hang it and twist it.
- Do not wet-block this project flat — you would press out the corkscrew.
- Count in groups of 10 chain-spaces (30 dc) and drop a marker every so often so you do not lose your place on the long chain.
Color tip (optional): For candy-cane stripes that follow the corkscrew, change color every 24 dc (8 groups of 3 dc). Cut the old color, join the new color in the next unused chain, and weave tails into the ruffle as you go.
Spinner
Hanging loop and foundation
Ch 18, sl st in the first ch to form a ring (hanging loop).
Ch 83 (123, 163) for the body.
You now have a small loop at one end and a long chain hanging from it. The long chain is the spine of the spinner. The 4th chain from the hook is where the first 3-dc group is worked; the loop sits at the opposite end and will be the top.
First side (work toward the hanging loop)
The next 3 chains (the ones closest to the hook) count as the first dc.
Work 2 dc in the 4th ch from the hook. (3 dc in the first st — the ch-3 plus these 2 dc)
Work 3 dc in each remaining body ch until 1 ch remains unworked next to the hanging loop, then work 3 dc in that last body ch. Do not work into the hanging-loop chains.
Stitch count: 240 (360, 480) dc.
Check: 3 dc × 80 (120, 160) body chains = 240 (360, 480) dc ✓
The ruffle will curl hard. Keep going; do not flatten it.
You should now be at the hanging loop. The loop is the top of the spinner.
Second side (work back to the starting end)
Do not turn in the usual way. Pivot the work so the unused loops of the foundation chain face up. The hanging loop stays at this end.
Work 3 dc in the unused loop of the same chain you just finished (the chain beside the hanging loop), then work 3 dc in the unused loop of each remaining foundation chain back to the starting end (the end with the original ch-3).
Skip the 3 chains that counted as the first dc; they will be covered by the tassel.
Stitch count: 240 (360, 480) dc on the second side.
Check: 3 dc × 80 (120, 160) unused loops = 240 (360, 480) dc ✓
Total dc in spinner: 480 (720, 960) ✓
Fasten off, leaving a 12" (30.5 cm) tail at this end (the bottom). Weave in the starting tail around the hanging loop, wrapping it a few extra times so the loop is firm.
Finishing
Shape the spiral
Hold the hanging loop and let the spinner dangle. Starting at the bottom, twist the whole strip 8–12 times in one direction only. The ruffles will nest into a corkscrew. If it looks more like a ruffled scarf than a spiral, twist more. It will relax a little after hanging, so a firm twist is better than a timid one.
Tassel (bottom weight)
The tassel is not only decorative — it weights the spinner so it hangs straight and turns in a breeze.
- Wrap yarn 20 times around a 6" (15 cm) piece of cardboard (wrap 25–30 times for a fuller tassel).
- Slide a 12" (30.5 cm) length of yarn under the wraps at one edge and tie in a tight square knot (this is the top of the tassel). Do not trim these ties yet.
- Cut through all wraps at the opposite edge.
- Slide the tassel off the cardboard. About ¾" (2 cm) below the top knot, wrap a second length of yarn around the neck 8–10 times. Tie firmly and hide the ends inside the tassel.
- Optional bead: thread the two top-tie tails through a large-hole wooden bead before attaching, so the bead sits between spinner and tassel.
- Using the 12" (30.5 cm) tail left on the spinner (and the tassel’s top ties), sew the tassel securely to the bottom end of the spinner, catching the starting ch-3 so that end is enclosed. Knot firmly. Trim the tassel ends even.
Finished tassel length is about 5–6" (12.5–15 cm).
Hanging options
Option A — Simple loop (already on the spinner) Hang the built-in loop from a ceiling hook, porch hook, or wall peg. This is the classic wind-spinner hang.
Option B — Wooden ring wall hanging With the same yarn (or a contrast color) and US I/9 (5.5 mm) hook, join with sl st around a 3" (7.5 cm) wooden or metal ring. Ch 1, work sc around the ring until it is fully covered (about 40–48 sc on a 3" / 7.5 cm ring; add or subtract sc so the ring does not show through). Sl st in the first sc. Fasten off, leaving a 10" (25.5 cm) tail.
Sew or sl-st the spinner’s hanging loop to the covered ring in 3–4 places so it cannot slide. Weave in ends. Hang the ring from a wall hook. The spinner drops below the ring like a corkscrew pendant.
Option C — Dowel wall hanging Thread the hanging loop onto a 6–8" (15–20.5 cm) wooden dowel and center it. Tie a separate length of yarn to both ends of the dowel for a wall string, or rest the dowel on two nails.
Setting the twist
Hang the spinner and let it dangle for a few hours. If the coil loosens, twist from the tassel end again in the same direction you used before. A light shot of steam from a kettle or steamer, held several inches away while the spinner is hanging and twisted, helps set the spiral. Do not press, pin, or soak.
Care
Acrylic: machine wash gentle, lay flat or hang to dry; reshape the spiral while damp if needed. Cotton blend: hand wash, hang to dry. If hung outdoors, bring it in during heavy rain and high wind so the tassel does not tangle. Keep away from open flames and heater vents.
Beginner troubleshooting
- It looks like a long ruffle, not a spiral. Twist it. The fabric only becomes a corkscrew when hung and twisted; it will not spiral while it is in your lap.
- The second side has fewer stitches than the first. You missed unused loops. Unpick back to the hanging loop and work 3 dc in every bottom bump; the count must be 240 (360, 480) again.
- The chain is twisting while I work. Let the work hang and untwist every 20–30 groups. A twisted foundation chain makes an uneven coil.
- The spiral will not hang straight. Add the tassel (and optional bead). An unweighted spinner folds in half.
- I want it longer. Add body chains in groups of 4 before you start the dc. Do not try to add length after the ruffle is started.
Disclaimer: This pattern was generated by AI and should be reviewed for accuracy before use. While we strive for quality, AI-generated content may contain errors. Please verify measurements, stitch counts, charts, and instructions before beginning your project. Generated by purlJam.uk
Love this pattern?
Save this pattern to your free PurlJam libraryAccess your pattern anytime
Bookmark this page to access your pattern anytime