Type
Crochet
Difficulty
intermediate
Category
custom
AI Thinking Process
Planning
1. **Design Strategy**: Classic granny square jumper in DK with a mix of plain multi-color grannies and flower-motif squares. Easy level — simple granny square + basic flower center, seamed construction.
2. **Construction Plan**: Make individual 6" squares, arrange in grid (front/back/sleeves), whip-stitch seam together, add ribbed neckband and cuffs.
3. **Quality Assurance**:
- Block squares before seaming for uniform size
- Consistent tension across all squares
- Clear square layout diagram to avoid confusion
4. **Final Calculations**: Gauge: 1 granny square = 6" × 6" (7 rounds). Size M: Body = 40" bust → 7 squares wide × 2 (front+back) = needs 14 squares body. Sleeves = 3×4 squares each. Total ~30 squares. Flower squares: ~8 scattered.
Verification
1. **Completeness**: Title, materials, gauge, sizes, abbreviations, notes, charts, instructions, finishing — all included.
2. **Consistency**: 6" square × 7 wide = 42" bust (ease for size M). Length 4 squares = 24". Sleeve 3 wide × 4 long = 18" circumference × 24" long (adjustable).
3. **Constraints**: Multiple colors ✓, granny squares ✓, flower motif squares ✓, easy level ✓, US terms ✓, charts included ✓.
4. **Safety**: Granny square stitch counts verified: Rnd 1 = 12 dc, Rnd 2 = 24 dc + 4 ch-sps, etc.
Pattern
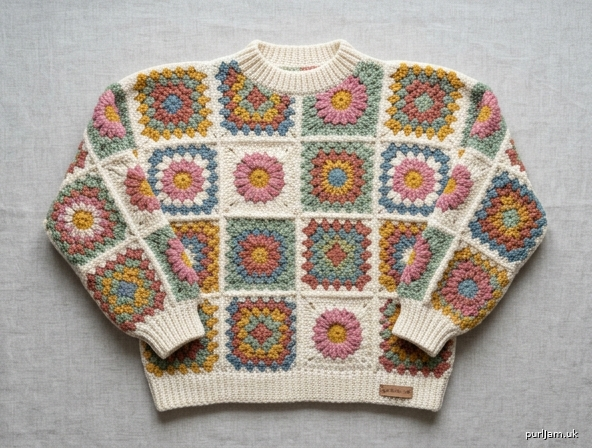
# GARDEN PATCH GRANNY JUMPER
*A cozy DK-weight pullover made from classic granny squares and sweet flower-motif squares, joined together in a patchwork of color.*

---

## SKILL LEVEL
Easy — if you can make a granny square, you can make this jumper!

---

## SIZES
**XS (S, M, L, XL, 2XL)**
Finished bust: 36 (42, 48, 54, 60, 66)" / 91 (107, 122, 137, 152, 168) cm
Finished length: 22 (22, 24, 24, 26, 26)" / 56 (56, 61, 61, 66, 66) cm
Sample shown in **size M (48" bust)** with approx. 8" positive ease.

---

## MATERIALS

### Yarn
**DK weight yarn** (approx. 230 yds / 210 m per 100g skein). Quantities are approximate and depend on size.

| Color | Role | Abbr. | Yardage (size M) |
|---|---|---|---|
| Cream | Main Color (background) | **MC** | 650 yds |
| Sage Green | Contrast 1 (leaves/rounds) | **CC1** | 300 yds |
| Rose Pink | Contrast 2 (flowers) | **CC2** | 200 yds |
| Mustard Yellow | Contrast 3 (flower centers/rounds) | **CC3** | 200 yds |
| Dusty Blue | Contrast 4 (rounds) | **CC4** | 200 yds |
| Terracotta | Contrast 5 (rounds) | **CC5** | 150 yds |

*Size adjustments: Add/subtract ~40 yds MC and ~20 yds of each CC per size up/down.*

### Hooks & Notions
- **US H/8 (5.0 mm)** crochet hook — main hook
- **US G/6 (4.0 mm)** crochet hook — for ribbing
- Tapestry needle
- Stitch markers
- Scissors
- Blocking mat and pins

---

## GAUGE
- **One granny square = 6" × 6" (15 × 15 cm)** after blocking, using US H/8 hook and 7 rounds.
- Ribbing gauge: 20 sc in back loop rows = 4" (10 cm) with US G/6 hook.

**Gauge is critical** — make one square first and block it. Adjust hook size if needed.

---

## ABBREVIATIONS (US TERMS)
- **ch** — chain
- **sl st** — slip stitch
- **sc** — single crochet
- **dc** — double crochet
- **st(s)** — stitch(es)
- **sp** — space
- **rnd** — round
- **rep** — repeat
- **BLO** — back loop only
- **MC, CC1–CC5** — main color, contrast colors
- **RS / WS** — right side / wrong side

---

## PATTERN NOTES

- This jumper is built from **6" granny squares**, seamed together. You will make two types:
  - **Plain Granny Squares** (classic concentric-color grannies) — make in various color combinations
  - **Flower Motif Squares** (flower bloom in center, solid background) — make in various colors
- Beginning ch-3 counts as a dc throughout.
- Join rounds with a sl st to top of beginning ch-3 unless otherwise stated.
- Fasten off and change colors between every round for maximum variation (or keep some rounds matching for a calmer look — your choice!).
- Weave in ends as you go — it will save you hours later.
- Stitch counts are given at the end of each round in parentheses.

---

## SQUARE COUNT BY SIZE

Each garment piece is a rectangle of 6" squares:

| Piece | XS | S | M | L | XL | 2XL |
|---|---|---|---|---|---|---|
| Front | 3×4 = 12 | 3×4 = 12 | 4×4 = 16 | 4×4 = 16 | 5×4 = 20 | 5×4 = 20 |
| Back | 3×4 = 12 | 3×4 = 12 | 4×4 = 16 | 4×4 = 16 | 5×4 = 20 | 5×4 = 20 |
| Sleeve (×2) | 2×4 = 8 | 2×4 = 8 | 3×4 = 12 | 3×4 = 12 | 3×4 = 12 | 3×4 = 12 |
| **TOTAL** | **40** | **40** | **56** | **56** | **64** | **64** |

*Width check (size M): 4 squares × 6" = 24" per panel × 2 panels = 48" finished bust ✓*
*Length check: 4 squares × 6" = 24" + 2" neckband allowance ≈ finished length ✓*

**Recommended mix**: About **75% plain granny squares, 25% flower squares** for a balanced look. For size M: ~42 plain + ~14 flower squares.

---

## PATTERN 1: PLAIN GRANNY SQUARE
*Make the bulk of your squares using this pattern. Vary color combinations freely.*

With US H/8 hook and Color A, ch 4; join with sl st to form a ring.

**Rnd 1 (Color A):** Ch 3 (counts as dc), 2 dc in ring, ch 2, [3 dc in ring, ch 2] 3 times; join with sl st to top of ch-3. Fasten off. **(12 dc, 4 ch-2 sps)**

**Rnd 2 (Color B):** Join in any ch-2 corner sp. Ch 3, (2 dc, ch 2, 3 dc) in same sp, ch 1, *[3 dc, ch 2, 3 dc] in next corner sp, ch 1*; rep from * to * 2 more times; join. Fasten off. **(24 dc, 4 corner ch-2 sps, 4 side ch-1 sps)**

**Rnd 3 (Color C):** Join in any corner sp. Ch 3, (2 dc, ch 2, 3 dc) in same sp, ch 1, 3 dc in next ch-1 sp, ch 1, *(3 dc, ch 2, 3 dc) in corner, ch 1, 3 dc in ch-1 sp, ch 1*; rep from * to * 2 more times; join. Fasten off. **(36 dc, 4 corners, 8 side ch-1 sps)**

**Rnd 4 (Color D):** Join in any corner. Ch 3, (2 dc, ch 2, 3 dc) in same sp, ch 1, [3 dc in next ch-1 sp, ch 1] 2 times, *(3 dc, ch 2, 3 dc) in corner, ch 1, [3 dc in next ch-1 sp, ch 1] 2 times*; rep from * to * 2 more times; join. Fasten off. **(48 dc, 4 corners, 12 side ch-1 sps)**

**Rnd 5 (Color E):** As Rnd 4, but with 3 groups of 3 dc per side. **(60 dc, 4 corners, 16 side ch-1 sps)**

**Rnd 6 (Color F):** As Rnd 4, but with 4 groups of 3 dc per side. **(72 dc, 4 corners, 20 side ch-1 sps)**

**Rnd 7 (MC border):** With MC, work as Rnd 4 with 5 groups of 3 dc per side. Do not fasten off — continue with an even-up round:

**Rnd 7b (edging, MC):** Ch 1, sc evenly around, working 1 sc in each dc, 1 sc in each ch-1 sp, and (sc, ch 1, sc) in each corner ch-2 sp; join with sl st. Fasten off. **(Approx. 22 sc per side + corners)**

Square should measure **6" × 6"** after blocking.

---

## PATTERN 2: FLOWER MOTIF SQUARE
*Make approx. 25% of your squares this way. Vary flower (CC2) and background (MC) as desired.*

With US H/8 hook and CC3 (flower center), ch 4; join with sl st to form a ring.

**Rnd 1 (CC3 — center):** Ch 1, 8 sc in ring; join with sl st to first sc. Fasten off. **(8 sc)**

**Rnd 2 (CC2 — petals):** Join CC2 in any sc. *(Sl st, ch 2, 2 dc, ch 2, sl st) in same st — petal made; sl st in next sc*; rep from * 3 more times, working last sl st into joining st. Fasten off. **(8 petals — actually 4; see note)**

*Note: If you want 8 petals, work a petal in every sc: (sl st, ch 2, 2 dc, ch 2, sl st) in each of the 8 sc.* **(8 petals)**

**Rnd 3 (CC1 — leaf round):** Join CC1 between any two petals (in the sl st between petals). Ch 3, 2 dc in same sp (behind petal), ch 2, *3 dc between next two petals, ch 2*; rep from * 2 more times (working behind petals); join to top of ch-3. Fasten off. **(12 dc, 4 ch-2 sps — now a tiny granny square base)**

**Rnd 4 (MC):** Join MC in any ch-2 sp. Work as **Rnd 2 of Plain Granny Square** — (3 dc, ch 2, 3 dc) in each corner, ch 1 between. Join; fasten off. **(24 dc, 4 corners, 4 side ch-1 sps)**

**Rnds 5–7 (MC):** Continue exactly as Rnds 3, 4, 5 of Plain Granny Square, all in MC, to build out the background. **(After Rnd 7: 60 dc, 4 corners, 16 side ch-1 sps)**

**Rnd 8 (Color of choice — border):** As Rnd 6 of Plain Granny Square. **(72 dc, 4 corners, 20 side ch-1 sps)**

**Rnd 8b (edging, MC):** Work sc even-up round as in Plain Granny Square Rnd 7b. Fasten off.

Square should measure **6" × 6"** after blocking.

---

## CHART A: FLOWER MOTIF SQUARE (13 × 13 stitch grid approximation)

*This chart shows color placement looking at the finished square (RS). Read from bottom to top. Each cell = approx. one stitch cluster/area.*

```
Row 13: □ □ □ □ □ □ □ □ □ □ □ □ □
Row 12: □ □ □ □ □ □ □ □ □ □ □ □ □
Row 11: □ □ □ ● ● ● ● ● ● ● □ □ □
Row 10: □ □ ● ● ▲ ▲ ▲ ▲ ▲ ● ● □ □
Row 9:  □ ● ▲ ■ ■ ■ ■ ■ ■ ■ ▲ ● □
Row 8:  □ ● ▲ ■ ■ ✿ ✿ ✿ ■ ■ ▲ ● □
Row 7:  □ ● ▲ ■ ✿ ✿ ★ ✿ ✿ ■ ▲ ● □
Row 6:  □ ● ▲ ■ ■ ✿ ✿ ✿ ■ ■ ▲ ● □
Row 5:  □ ● ▲ ■ ■ ■ ■ ■ ■ ■ ▲ ● □
Row 4:  □ □ ● ● ▲ ▲ ▲ ▲ ▲ ● ● □ □
Row 3:  □ □ □ ● ● ● ● ● ● ● □ □ □
Row 2:  □ □ □ □ □ □ □ □ □ □ □ □ □
Row 1:  □ □ □ □ □ □ □ □ □ □ □ □ □
```

**KEY:**
- ★ = CC3 (Mustard — flower center, Rnd 1)
- ✿ = CC2 (Rose — petals, Rnd 2)
- ■ = CC1 (Sage — leaf round, Rnd 3)
- ▲ = MC (Cream — Rnd 4 inner background)
- ● = MC (Cream — Rnds 5–7 outer background)
- □ = Border color / edging (Rnd 8 + sc round)

*How to read: Granny squares are worked in the round, so this chart is conceptual — use it to visualize placement. Begin at the center (★) and work outward in rounds.*

---

## CHART B: PLAIN GRANNY SQUARE COLOR PLACEMENT

```
Row 13: F F F F F F F F F F F F F
Row 12: F E E E E E E E E E E E F
Row 11: F E D D D D D D D D D E F
Row 10: F E D C C C C C C C D E F
Row 9:  F E D C B B B B B C D E F
Row 8:  F E D C B A A A B C D E F
Row 7:  F E D C B A ★ A B C D E F
Row 6:  F E D C B A A A B C D E F
Row 5:  F E D C B B B B B C D E F
Row 4:  F E D C C C C C C C D E F
Row 3:  F E D D D D D D D D D E F
Row 2:  F E E E E E E E E E E E F
Row 1:  F F F F F F F F F F F F F
```

**KEY:**
- ★ / A = Rnd 1 color (center ring)
- B = Rnd 2
- C = Rnd 3
- D = Rnd 4
- E = Rnd 5
- F = Rnd 6 (+ Rnd 7 border in MC + sc edge)

**Suggested color combos (mix freely!):**
1. CC3→CC2→CC1→CC4→CC5→MC
2. CC5→CC3→CC1→CC2→CC4→MC
3. CC2→CC4→CC3→CC5→CC1→MC
4. CC1→CC3→CC5→CC2→CC4→MC

---

## ASSEMBLY

### Step 1: Block All Squares
Wet-block each square to **exactly 6" × 6"**. Pin on a blocking mat and allow to dry completely. **This step is essential** for a neat finished jumper.

### Step 2: Lay Out Panels
Arrange squares on a flat surface according to size chart. Scatter flower squares among plain squares for balance. Take a photo before seaming!

**Layout for Size M Front (4 wide × 4 tall = 16 squares):**
```
[P] [F] [P] [P]
[P] [P] [F] [P]
[F] [P] [P] [F]
[P] [F] [P] [P]
```
P = Plain granny, F = Flower square. Repeat similarly for back and each sleeve.

### Step 3: Join Squares
With MC and tapestry needle, **whip stitch** squares together through back loops only (BLO) for a flat seam. Join each panel (front, back, two sleeves) into a flat rectangle.

Alternative join: **sc join** — with MC and H/8 hook, hold two squares RS together and sc through BLO of both squares across the seam.

### Step 4: Seam Panels
1. **Shoulder seams:** Place front and back with RS together. Whip stitch across the top, leaving the center 8 (8, 9, 9, 10, 10)" open for the neckline. For size M, that's approximately the center 1.5 squares.
2. **Attach sleeves:** Mark center top of each sleeve. With RS together, pin sleeve top to armhole edge (armhole depth = 2 squares / 12"). Whip stitch.
3. **Side and underarm seams:** With RS together, seam from sleeve cuff, through underarm, down to hem in one continuous line on each side.

---

## NECKBAND

With US G/6 hook and MC, RS facing, join yarn at shoulder seam.

**Rnd 1:** Ch 1, sc evenly around neck opening (aim for a multiple of 2), ensuring flat edge; join with sl st to first sc. **(approx. 72–96 sc depending on size)**

**Rnd 2:** Ch 10. Working across ch: sc in 2nd ch from hook, sc in each rem ch (9 sc); sl st in next 2 sc of neck edge; turn.

**Rnd 3:** Skip the 2 sl sts, sc in BLO of each of 9 sc; ch 1, turn.

**Rnd 4:** Sc in BLO of each sc (9 sc); sl st in next 2 sc of neck edge; turn.

**Rep Rnds 3–4** around entire neck edge until ribbing meets start. Fasten off, leaving a long tail. Seam ribbing ends together with tail.

---

## CUFFS (make 2)

With US G/6 hook and MC, RS facing, join yarn at underarm seam of sleeve.

**Rnd 1:** Ch 1, sc evenly around cuff edge (multiple of 2); join. **(approx. 48–60 sc)**

**Rnds 2+:** Work BLO rib as for neckband (ch 10, BLO ribs) until cuff is 2.5" / 6 cm deep. Seam ends. Fasten off.

---

## HEM BAND

With US G/6 hook and MC, RS facing, join yarn at side seam at bottom edge.

**Rnd 1:** Ch 1, sc evenly around bottom edge; join.

**Rnds 2+:** Work BLO rib as above for 2" / 5 cm. Seam ends. Fasten off.

---

## FINISHING

1. Weave in all remaining ends securely.
2. **Steam block** the entire jumper gently — avoid crushing the granny square texture. Lay flat to dry.
3. Try on and admire!

---

## COLOR MANAGEMENT TIPS

- **Ends:** Each granny square round change creates 2 ends. With ~56 squares × 6 changes = lots of ends! Weave in as you complete each square.
- **Float management:** Not applicable — colors are changed between rounds, not carried.
- **Consistent tension:** If some squares feel tighter than others, re-block them more aggressively to match.
- **Color balance:** Before seaming, stand back and check no two identical squares sit adjacent. Shuffle as needed.

---

**Enjoy your handmade Garden Patch Granny Jumper! 🌸**
Disclaimer: This pattern was generated by AI and should be reviewed for accuracy before use. While we strive for quality, AI-generated content may contain errors. Please verify measurements, stitch counts, and instructions before beginning your project. Generated by purlJam.uk
Access your pattern anytime
Bookmark this page to access your pattern anytime