Type
Crochet
Difficulty
advanced
Category
blanket
AI Thinking Process
Planning
Verification
Pattern
Ghoulish Dreams
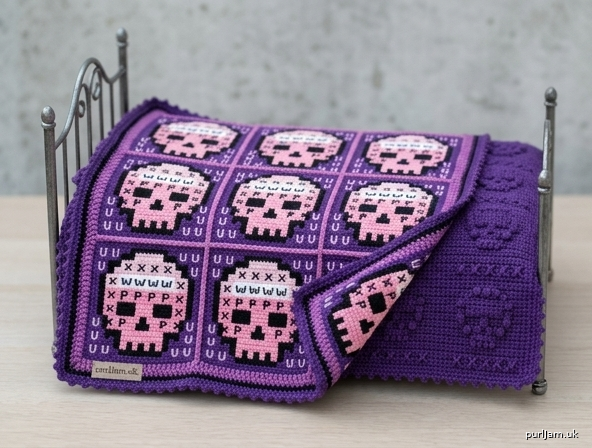
Monster High Doll Skull Blanket & Bed Cover Set
Advanced textured crochet · DK yarn · US terms
A gothic bedding set sized for a Monster High doll (about 11" / 28 cm tall). The throw blanket is a 3 × 4 grid of framed skull squares; the bed cover is a matching one-piece coverlet with an allover repeating skull texture. Skulls are formed with stitch texture—raised bobble eyes, a chain nasal cavity, post-stitch socket columns, and picot teeth—not a colourwork chart. Work them tone-on-tone for a damask look, or use bone-coloured yarn for the skulls on a black, purple, or scream-pink ground.
Skill level: Advanced
Techniques: 5-dc bobbles, picots, front-post dc, even edging around an irregular motif, squaring a motif, whip-stitch joining, multi-round borders, wet blocking.
Finished measurements (blocked)
| Piece | Size | Construction |
|---|---|---|
| Skull square | 3½" × 3½" (9 × 9 cm) | 1 motif |
| Throw blanket | 12" × 15½" (30.5 × 39.5 cm) | 3 squares wide × 4 squares tall |
| Bed cover | 12" × 15" (30.5 × 38 cm) | One rectangle, 4 skulls across |
Doll beds vary. Add or omit a row of squares on the throw, or extra 8-row repeats on the cover, to match your furniture. All skulls sit upright (chin toward the foot of the bed).
Materials
Yarn: Light worsted / DK (Category 3), about 18–22 wpi.
- MC (ground / frames / cover): 300 yd / 275 m (black, deep purple, or hot pink)
- CC (skull faces on the throw): 120 yd / 110 m (ivory, bone, or white)
- Accent (optional eyes, teeth, and outer border): 40 yd / 37 m (hot pink or black)
Two 100 g DK skeins of MC plus one 50 g skein of CC is typically enough for the set, with Accent taken from leftovers or a mini-skein.
Hook: G/6 (4.0 mm), or size needed to obtain gauge
Optional: E/4 (3.5 mm) if your squares come out larger than 3½" or the fabric looks open at doll scale
Notions: Stitch markers (at least 4), yarn needle, scissors, blocking board, rust-proof pins, spray bottle or basin for wet blocking. Optional embroidery needle for eye details.
Gauge
18 dc = 4" (10 cm) in double crochet, unblocked.
Skull square = 3½" × 3½" (9 × 9 cm) blocked.
Skull Pattern (bed cover): 18 sts and 12 rows = 4" (10 cm), measured over Rows 3–10 after blocking.
Make one full skull square as your swatch. If it is wider than 3½" after blocking, drop to 3.5 mm. Dense fabric looks more refined on an 11" doll and keeps picots from flopping.
Abbreviations (US)
- beg – beginning
- BLO – back loop only
- bo – 5-dc bobble (see Special Stitches)
- CC – contrast color
- ch – chain
- dc – double crochet
- FPdc – front post double crochet
- hdc – half double crochet
- MC – main color
- pc – used in notes only; bobble is specified
- rep – repeat
- rnd(s) – round(s)
- RS – right side
- sc – single crochet
- sc2tog – single crochet 2 together
- sk – skip
- sl st – slip stitch
- sp(s) – space(s)
- st(s) – stitch(es)
- WS – wrong side
- yo – yarn over
Special Stitches
5-dc bobble (bo): Yo, insert hook in indicated st, yo, pull up a loop, yo, draw through 2 loops (2 loops on hook). [Yo, insert hook in same st, yo, pull up a loop, yo, draw through 2 loops] 4 times (6 loops on hook). Yo, draw through all 6 loops. Counts as 1 stitch. Do not skip the next stitch.
Picot (border): Ch 3, sl st in the 3rd ch from hook.
Picot tooth (skulls): Sc in indicated st, ch 2, sl st in the 2nd ch from hook. Counts as 1 stitch (the sc). The ch-2 stands up as a tooth.
FPdc: Yo, insert hook from front to back to front around the post of the indicated stitch, yo, pull up a loop, (yo, draw through 2 loops) twice.
Sc2tog: Insert hook in next st, yo, pull up a loop, insert hook in following st, yo, pull up a loop, yo, draw through all 3 loops.
Pattern notes
- US crochet terms throughout. Imperial measurements are given first, with metric in parentheses.
- Turning ch-1 at the start of a sc row does not count as a stitch. Turning ch-3 at the start of a dc row does count as the first dc.
- Keep 50 stitches on every bed-cover row. Bobbles, FPdc, and picot teeth each occupy one stitch.
- Work throw skulls in CC, then frame them in MC. The bed cover is worked in MC so the skulls read as texture; use Accent only for optional eye embroidery and the outer round.
- Do not flatten bobbles or picots when blocking. Pin to size and let them stand.
- This is a doll prop. Picot teeth are decorative; they are not suitable as a toy for children under 3.
Stitch pattern (what each skull is doing)
Each repeat is a stylized front-facing skull on a solid ground:
- A short run of dc forms the cranium.
- Two bobbles (cover) or two chain eye-sockets (squares) sit on the upper face.
- A chain-1 hole centered between the eyes is the nasal cavity.
- FPdc columns on the cover drop from the eye line to suggest the outer socket / cheek.
- A row of picot teeth closes the jaw.
- Quiet sc or dc rows separate one skull from the next.
Work all skulls facing the same direction.
THROW BLANKET
12 framed skull squares, 3 wide × 4 tall
Skull square (make 12)
Finished: 3½" (9 cm) blocked.
A. Skull face (CC)
Row 1 (RS): With CC, ch 8, sc in 2nd ch from hook and in each ch across, turn. (7 sc)
Row 2: Ch 1, 2 sc in first sc, sc in next 5 sc, 2 sc in last sc, turn. (7 + 2 = 9 sc ✓)
Row 3: Ch 1, 2 sc in first sc, sc in next 7 sc, 2 sc in last sc, turn. (9 + 2 = 11 sc ✓)
Row 4: Ch 1, sc in each sc across, turn. (11 sc)
Row 5 (eyes): Ch 1, sc in first 2 sc, ch 3, sk next 3 sc (left eye socket), sc in next sc (bridge), ch 3, sk next 3 sc (right eye socket), sc in last 2 sc, turn.
(2 + 3 skipped + 1 + 3 skipped + 2 = 11 foundation sts ✓; 2 sc + ch-3 + 1 sc + ch-3 + 2 sc on the row)
Row 6: Ch 1, sc in first 2 sc, 3 sc in next ch-3 sp, sc in next sc, 3 sc in next ch-3 sp, sc in last 2 sc, turn. (2 + 3 + 1 + 3 + 2 = 11 sc ✓)
Row 7 (nose): Ch 1, sc in first 5 sc, ch 1, sk next sc (nasal cavity), sc in last 5 sc, turn. (5 + 1 skipped + 5 = 11 ✓)
Row 8: Ch 1, sc in each sc and in the ch-1 sp across, turn. (11 sc)
Row 9 (jaw taper): Ch 1, sc2tog, sc in next 7 sc, sc2tog, turn. (11 − 2 = 9 sc ✓)
Row 10: Ch 1, sc2tog, sc in next 5 sc, sc2tog, turn. (9 − 2 = 7 sc ✓)
Row 11 (teeth): Ch 1, sc in first sc, *(sc, ch 2, sc) in next sc, sl st in next sc; rep from * once more, (sc, ch 2, sc) in next sc, sc in last sc. Fasten off CC.
(Stitches of the 7-st row, in order: sc · V-picot · sl st · V-picot · sl st · V-picot · sc = 3 teeth ✓)
Weave CC ends into the WS of the skull only, so they do not shadow through the MC frame.
Optional eye accent: With Accent, embroider a small French knot or satin stitch in each ch-3 socket, or work (sc, hdc, sc) into the socket from the RS and sl st to fasten. Keep the fill smaller than the socket so the eyes stay hollow.
B. Even round (MC) — equalize to a square
Join MC with RS facing in the first foundation ch at the top-right of the skull (start of Row 1).
Rnd 0 (equalizing sc):
Working 11 sc along each of the four sides and 1 sc in each of the four corners:
- Top: 11 sc across the opposite side of the foundation chain. On 7 ch, place 2 sc in 4 of the ch and 1 sc in the remaining 3 ch (4 × 2 + 3 × 1 = 11 ✓).
- Corner: 1 sc in the corner.
- Right side: 11 sc in the 11 row-ends (1 per row).
- Corner: 1 sc.
- Bottom (teeth): 11 sc into the 7 sts of Row 11, skipping the ch-2 teeth so they stand free. Place 2 sc in 4 sts and 1 sc in 3 sts (11 ✓).
- Corner: 1 sc.
- Left side: 11 sc in the 11 row-ends.
- Corner: 1 sc.
Join with sl st to first sc. (11 × 4 sides + 4 corner sc = 48 sc ✓)
Mark the 4 corner sc.
C. Square-off round (MC)
Rnd 1: Ch 3 (counts as dc), (dc, ch 2, 2 dc) in same corner sc, *dc in next 11 sc, (2 dc, ch 2, 2 dc) in next corner sc; rep from * twice more, dc in next 11 sc, 1 more dc in beg corner (this completes 2 dc before the already-made ch-2), join with sl st to top of beg ch-3. Fasten off, leaving a 12" (30.5 cm) tail if you will whip-stitch with MC.
Per side: 11 dc + 2 dc from each end of the corner groups = 15 dc and 1 ch-2 sp.
At 18 dc = 4", 15 dc = 3.33" plus the ch-2 ≈ 3½" (9 cm) after blocking ✓.
Make 12 identical squares. Weave remaining ends. Wet-block every square to 3½" × 3½" (9 × 9 cm) before joining, pinning corners first, then sides. Do not crush the teeth.
Join the throw (3 × 4)
Layout, RS up, all chins toward the same short edge:
- 4 rows of 3 squares.
- 12 squares (3 × 4 = 12 ✓).
Whip stitch (recommended at this scale — flatter on a doll bed):
With MC and RS facing you, hold two squares WS together. Whip stitch through the back loops only of the 15 dc along the matching sides, and through one loop of each ch-2 at the corners. Align corner ch-2 sps exactly. Join into 4 strips of 3, then join the 4 strips along the long edges.
Alternative (join-as-you-go): On Rnd 1 of each subsequent square, replace each ch-2 that touches a neighbor with (ch 1, sl st in the neighbor’s corresponding ch-2, ch 1), and join 3–5 side dc with a sl st into the matching dc of the neighbor after each dc. Use whip stitch if JAYG pulls the doll-scale fabric.
Throw border
Join MC with RS facing in any throw corner ch-2.
Rnd 1: Ch 1, *3 sc in corner sp, sc in each dc to next join, sc in join, continue in this way to the next throw corner; rep from * around, working 3 sc in each of the 4 throw corners. Join to first sc. Stitch count is not critical; keep the work flat. Place markers in the center sc of each 3-sc corner.
Rnd 2: Ch 3 (counts as dc), 2 dc in marked corner sc, *dc in each sc to next marked corner, 3 dc in corner sc; rep from * around, ending dc to beg corner, join to top of ch-3. (The first corner already has 1 dc from the ch-3 + 2 dc = 3 dc ✓.)
Rnd 3 (picot bone edge): Ch 1, sc in same st, picot, *sc in next 2 dc, picot; rep from * around, placing (sc, picot, sc) in each of the 4 corner dc groups so the corners stay flat. Join to first sc. Fasten off.
Optional: work Rnd 3 in Accent.
BED COVER
One-piece textured skull coverlet
Worked flat in rows, 4 skulls across. MC throughout unless you choose Accent for bobbles and teeth.
Stitch multiple: 12 + 2 selvedge.
Cast-on math: 4 repeats × 12 = 48, + 2 selvedge = 50 sts. Foundation: ch 51, sc in 2nd ch from hook = 50 sc (51 − 1 = 50 ✓).
Body
With MC, ch 51.
Row 1 (RS, setup): Sc in 2nd ch from hook and in each ch across, turn. (50 sc)
Row 2: Ch 1, sc in each sc across, turn. (50 sc)
Row 3 (RS, eyes): Ch 3 (counts as dc), *dc in next 3 sts, bo in next st, dc in next 3 sts, bo in next st, dc in next 4 sts; rep from * 3 times more, dc in last st, turn.
(12-st repeat: 3 dc + bo + 3 dc + bo + 4 dc = 12 ✓; 4 repeats = 48 + 2 selvedge = 50 ✓. Bobbles sit in positions 4 and 8 of each skull.)
Row 4: Ch 3, dc in each st across, working into the top of each bobble, turn. (50 dc)
Row 5 (nose): Ch 3, *dc in next 5 sts, ch 1, sk next st (nasal cavity), dc in next 6 sts; rep from * 3 times more, dc in last st, turn.
(5 + 1 skipped + 6 = 12 ✓. Nose sits between the two eye bobbles.)
Row 6: Ch 3, *dc in next 5 dc, dc in next ch-1 sp, dc in next 6 dc; rep from * 3 times more, dc in last st, turn. (50 dc)
Row 7 (socket columns): Ch 3, *dc in next 3 sts, FPdc around next st, dc in next 3 sts, FPdc around next st, dc in next 4 sts; rep from * 3 times more, dc in last st, turn.
(FPdc in the same columns as the Row 3 bobbles — positions 4 and 8 of the repeat ✓.)
Row 8 (teeth): Ch 1, sc in first dc, *sc in next 4 sts, (picot tooth in next st) 4 times, sc in next 4 sts; rep from * 3 times more, sc in last st, turn.
(4 sc + 4 teeth + 4 sc = 12 ✓. Four picot teeth across the jaw.)
Row 9: Ch 1, sc in each st across, turn. (50 sc)
Row 10: Ch 1, sc in each sc across, turn. (50 sc)
Rows 11–42: Rep Rows 3–10 four more times (5 skull bands total: 5 × 8 = 40 pattern rows; 2 setup + 40 = 42 rows ✓).
Work until the piece measures 13½" (34.5 cm) from the foundation chain, ending after a Row 10. If your row gauge is off, add or omit full 8-row repeats rather than part of a skull.
Do not fasten off if you are continuing the border in MC.
Bed cover border
Rotate and work in rnds around the rectangle, RS facing.
Rnd 1: Ch 1, 3 sc in the last st of Row 42 (first corner), sc evenly down the left side (about 3 sc per 2 row-ends of dc, 1 sc per sc row-end — keep the edge flat), 3 sc in the first foundation ch, sc in each remaining foundation ch to the last ch, 3 sc in last ch, sc evenly up the right side to match the left, 3 sc in the first st of Row 42, sc in each remaining st across the top, join to first sc. Mark the center sc of each 3-sc corner.
Rnd 2: Ch 1, sc in each sc around, working 3 sc in each marked corner sc. Join.
Rnd 3 (crab-stitch bone ridge): Ch 1, reverse sc (crab st) in each sc around, working 2 reverse sc in each corner sc so the ridge does not cup. Join with sl st. Fasten off.
Optional Accent on Rnd 3 only.
Optional corner crossbones: With CC, surface-sl-st two short crossed “bones” (each bone a 6–8 st surface chain with a 3-hdc knob at both ends) in each of the four corners, outside the skull field.
Finishing
- Weave in every end on the WS. On the throw, bury CC ends inside the skull, MC ends in the frames and border.
- Wet-block both pieces (essential). Soak in lukewarm water with a drop of wool wash for 15 minutes. Press out water in a towel — do not wring. Pin the throw to 12" × 15½" (30.5 × 39.5 cm) and the bed cover to 12" × 15" (30.5 × 38 cm). Pin each skull square’s corners first if any motif still looks skewed. Hover-steam the dc frames if needed, but do not press the iron onto bobbles, FPdc, or picot teeth. Dry completely.
- If eye sockets look faint on the cover, add Accent French knots in the two bobbles of each skull.
- Dress the doll bed with the cover first (skulls upright, teeth toward the footboard), then fold the throw at the foot or drape it.
Size notes for other doll beds
- Wider cover: Add 12 sts (one skull) to the foundation. Ch 63 for 62 sc (5 × 12 + 2 = 62 ✓).
- Longer cover: Add 8-row repeats; each repeat is about 2¾" (7 cm) at pattern gauge.
- Larger throw: 3 × 5 squares → about 12" × 19" (30.5 × 48.5 cm) after the same border; make 15 squares.
Quick stitch count checklist
- Skull face: 7 / 9 / 11 sc, then back to 7.
- Equalizing round: 48 sc.
- Squared motif: 15 dc per side + ch-2.
- Throw: 12 squares, 3 × 4.
- Cover: 50 sts every row; 4 skulls × 5 bands.
Disclaimer: This pattern was generated by AI and should be reviewed for accuracy before use. While we strive for quality, AI-generated content may contain errors. Please verify measurements, stitch counts, charts, and instructions before beginning your project. Generated by purlJam.uk
Love this pattern?
Save this pattern to your free PurlJam libraryAccess your pattern anytime
Bookmark this page to access your pattern anytime