Type
Crochet
Difficulty
beginner
Category
Pattern
AI Thinking Process
Planning
1. **Design Strategy**: A knitted amigurumi cat worked in sport weight yarn using stockinette in the round on DPNs or magic loop, with ginger/orange as the main color and reddish-brown stripes added via duplicate stitch or intarsia after assembly for beginner accessibility. Safety eyes in light topaz, embroidered pink nose, and sewn-on white thread whiskers complete the face.
2. **Construction Plan**: Each piece (head, body, two front legs, two back legs, tail, and two ears) is worked separately in the round from cast-on to gathered close, stuffed, then seamed together.
3. **Quality Assurance**:
- Stripe placement via duplicate stitch keeps stripe work accessible for beginners and avoids tension issues from carrying yarn in the round.
- Safety eyes must be inserted and secured before the head is fully stuffed and closed.
- Tight, even stuffing is critical for amigurumi; over-stuffing distorts shape, under-stuffing leaves pieces floppy.
4. **Final Calculations**:
- Gauge: 6.5 sts × 9 rows = 1 inch (2.5 cm) in stockinette in the round on US 2 / 2.75 mm needles with sport weight yarn.
- Head: CO 8, increase to 36 sts peak, approximately 2.5 inches (6.5 cm) diameter.
- Body: CO 8, increase to 42 sts peak, approximately 3 inches (7.5 cm) long.
- Front legs: CO 8, increase to 16 sts, work ~1.5 inches (4 cm).
- Back legs: CO 8, increase to 20 sts, work ~1.75 inches (4.5 cm).
- Tail: CO 8, work straight ~3 inches (7.5 cm).
- Ears: CO 12, decrease to point over 6 rows.
- Finished cat height (seated): approximately 7 inches (18 cm).
Verification
[PRE-FLIGHT CHECKS]
1. **Completeness**: ✅ Pattern includes all template sections: materials, gauge, abbreviations, piece-by-piece instructions (head, body, front legs, back legs, tail, ears), finishing, assembly, and face embellishment. Stripe and color notes included.
2. **Consistency**: ✅ Gauge of 6.5 sts/inch is consistent with sport weight on US 2 / 2.75 mm needles. Head peak of 36 sts ÷ 6.5 = ~5.5 inch circumference = ~1.75 inch radius = ~2.5 inch diameter. ✅ Body peak 42 sts ÷ 6.5 = ~6.5 inch circumference. ✅ Seated height ~7 inches accounts for head (~2.5"), body (~3"), plus legs tucked under. All stitch counts are multiples that divide cleanly for increases/decreases on 4 needles.
3. **Constraints**: ✅ Ginger/orange main color addressed. ✅ Reddish-brown tabby stripes via duplicate stitch addressed. ✅ Pink nose (embroidered). ✅ White whiskers (thread/yarn). ✅ Light topaz safety eyes specified (12 mm). ✅ Beginner difficulty maintained — no colorwork in the round, no complex techniques. ✅ Sport weight yarn. ✅ US terminology throughout. ✅ Imperial measurements primary with metric secondary.
4. **Safety**: ✅ Decrease rounds checked — from 36 sts head, 6 decrease rounds of k2tog×6 = removes 6 sts per round, 36→30→24→18→12→6, then gather. ✅ Body 42 sts: 42→36→30→24→18→12→6, gather. ✅ All increase sequences verified symmetrical. ✅ Safety eye warning for children included.
Pattern
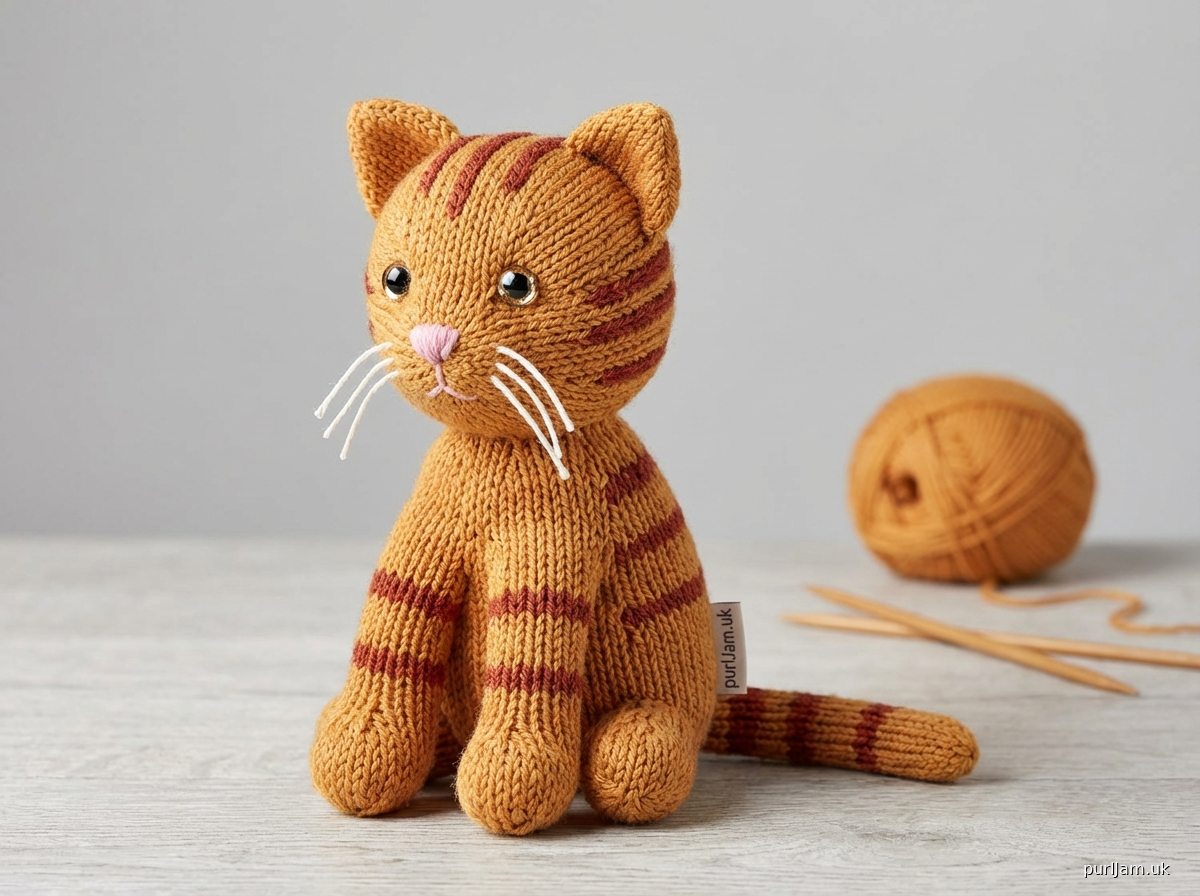
---

# **GINGER TABBY CAT AMIGURUMI**
### A Knitted Soft Toy Pattern

---

## ABOUT THIS PATTERN

Meet your new favorite knitted companion — a chubby, cheerful ginger tabby cat with warm reddish-brown stripes, sparkling light topaz eyes, a sweet pink nose, and perky white whiskers. Worked in sport weight yarn on double-pointed needles, this medium-sized knitted amigurumi stands approximately **7 inches (18 cm)** tall when seated. Each piece is worked separately in the round, stuffed, and then seamed together, making this a wonderfully portable project.

**Skill Level:** Beginner
**Techniques Used:** Knitting in the round (DPNs or magic loop), knit stitch, purl stitch (minimal), increases (kfb), decreases (k2tog), gathering, seaming, duplicate stitch (for stripes), basic embroidery

---

## MATERIALS

**Yarn:**
- **Main Color (MC) — Ginger:** Sport weight yarn, approx. **200 yards (183 m)**
  - *Suggested colorway: a warm medium orange, such as pumpkin, tangerine, or ginger spice*
- **Contrast Color (CC) — Reddish Brown:** Sport weight yarn, approx. **25 yards (23 m)**
  - *Suggested colorway: a deep auburn, russet, or reddish-brown*
- **Nose Color (NC) — Pink:** Sport weight yarn or embroidery floss, small amount (approx. **2 yards / 2 m**)
  - *Suggested colorway: soft blush or bubblegum pink*

**Needles:**
- US 2 / 2.75 mm double-pointed needles (DPNs), set of 5 — *or*
- US 2 / 2.75 mm circular needle, 32–40 inches (80–100 cm) long for magic loop

**Notions:**
- 1 set **12 mm safety eyes in light topaz** (clear amber-gold; 2 eyes total)
  - ⚠️ *Safety note: If this toy is intended for a child under 3 years, omit safety eyes and embroider eyes in gold or yellow yarn instead.*
- Polyester fiberfill stuffing, approx. 2–3 oz (55–85 g)
- Tapestry needle (blunt tip) for seaming and embroidery
- **White yarn or pearl cotton thread** for whiskers, approx. 1 yard (1 m)
- Stitch markers (4)
- Scissors
- Row counter (optional but helpful)

---

## GAUGE

**6.5 stitches × 9 rounds = 1 inch (2.5 cm)** in stockinette stitch in the round

*Gauge is important for achieving the correct finished size. Please take time to check your gauge. Adjust needle size up or down as needed.*

---

## FINISHED MEASUREMENTS

| Piece | Dimensions |
|---|---|
| Head diameter | approx. 2.5 in (6.5 cm) |
| Body length | approx. 3 in (7.5 cm) |
| Front leg length | approx. 1.5 in (4 cm) |
| Back leg length | approx. 1.75 in (4.5 cm) |
| Tail length | approx. 3 in (7.5 cm) |
| **Seated height (assembled)** | **approx. 7 in (18 cm)** |

---

## ABBREVIATIONS

| Abbreviation | Meaning |
|---|---|
| CO | cast on |
| BO | bind off |
| k | knit |
| p | purl |
| kfb | knit into front and back of stitch (1 stitch increased to 2) |
| k2tog | knit 2 stitches together (1 stitch decreased) |
| pm | place marker |
| sm | slip marker |
| rnd(s) | round(s) |
| st(s) | stitch(es) |
| MC | main color (ginger) |
| CC | contrast color (reddish-brown) |
| RS | right side |
| WS | wrong side |
| rep | repeat |
| approx | approximately |

---

## PATTERN NOTES

1. **Working in the round:** All pieces except the ears are worked in the round in stockinette (knit every round). The right side — the smooth "V" stitch face — faces outward.

2. **DPNs vs. Magic Loop:** Either method works. With DPNs, distribute stitches evenly across 4 needles and knit with the 5th. With magic loop, work as usual, pulling the loop out at the halfway point.

3. **Starting cast-on:** Use a long-tail cast on or your preferred stretchy cast-on. After casting on 8 stitches, distribute across needles before joining. Be careful not to twist.

4. **Closing gaps:** At the cast-on tail, you may have a small gap. After finishing, use the tail to close it neatly.

5. **Safety eyes:** Always insert and lock safety eyes before final stuffing and closing. Once the opening is too small to reach inside comfortably, you cannot add them.

6. **Stripes are added last:** To keep this pattern beginner-friendly, all pieces are knitted entirely in MC (ginger). Reddish-brown tabby stripes are added using **duplicate stitch** after all pieces are assembled. Full instructions are in the Finishing section.

7. **Stuffing:** Stuff firmly but not so tightly that stitches stretch and fiberfill shows through. Use small pinches of stuffing and pack evenly.

8. **Seaming:** Use mattress stitch or whipstitch to join pieces. The tapestry needle and yarn tail are your best tools.

---

## PATTERN INSTRUCTIONS

---

### PIECE 1: HEAD

*Makes 1. Work in MC (ginger) throughout.*

**Setup:** CO 8 sts. Distribute across DPNs (2 sts per needle if using 4 needles). Join to work in the round, being careful not to twist. Place marker for beginning of round.

*(After joining: 8 sts)*

**Rnd 1 (Increase):** [Kfb] 8 times. *(16 sts)*

**Rnd 2:** Knit all sts.

**Rnd 3 (Increase):** [Kfb, k1] 8 times. *(24 sts)*

**Rnd 4:** Knit all sts.

**Rnd 5 (Increase):** [Kfb, k2] 8 times. *(32 sts)*

**Rnd 6:** Knit all sts.

**Rnd 7 (Increase):** [Kfb, k3] 8 times. *(36 sts)* ✓ *Peak stitch count for head.*

**Rnds 8–15:** Knit all sts. *(8 rounds even — approx. 0.9 in / 2.2 cm)*

> **⚠️ Safety eye placement:** After Rnd 12, try the head on a flat surface. This is the time to insert your safety eyes. Place them between Rnds 9 and 10, approximately 8–9 stitches apart (roughly centered on the face, slightly closer together than the sides of the head). Lock the washers firmly on the inside. Set safety eyes into position, then continue knitting.

**Rnd 16 (Decrease):** [K2tog, k4] 6 times. *(30 sts)*

**Rnd 17:** Knit all sts.

**Rnd 18 (Decrease):** [K2tog, k3] 6 times. *(24 sts)*

**Rnd 19:** Knit all sts.

> **⚠️ Stuff now:** Begin stuffing the head firmly with fiberfill. Continue adding stuffing as you work the remaining decrease rounds, using a pencil or stuffing tool to pack it in.

**Rnd 20 (Decrease):** [K2tog, k2] 6 times. *(18 sts)*

**Rnd 21:** Knit all sts.

**Rnd 22 (Decrease):** [K2tog, k1] 6 times. *(12 sts)*

**Rnd 23 (Decrease):** [K2tog] 6 times. *(6 sts)*

**Finishing the Head:** Cut yarn, leaving a 6-inch (15 cm) tail. Thread tail onto tapestry needle. Pass needle through remaining 6 sts, removing them from knitting needle as you go. Pull tight to close. Knot and weave in end on the inside. Set head aside.

---

### PIECE 2: BODY

*Makes 1. Work in MC (ginger) throughout.*

**Setup:** CO 8 sts. Join to work in the round. Place marker.

*(After joining: 8 sts)*

**Rnd 1 (Increase):** [Kfb] 8 times. *(16 sts)*

**Rnd 2:** Knit all sts.

**Rnd 3 (Increase):** [Kfb, k1] 8 times. *(24 sts)*

**Rnd 4:** Knit all sts.

**Rnd 5 (Increase):** [Kfb, k2] 8 times. *(32 sts)*

**Rnd 6:** Knit all sts.

**Rnd 7 (Increase):** [Kfb, k3] 8 times. *(40 sts)*

**Rnd 8:** Knit all sts.

**Rnd 9 (Increase):** [Kfb, k19] twice. *(42 sts)* ✓ *Peak stitch count for body.*

**Rnds 10–23:** Knit all sts. *(14 rounds even — approx. 1.6 in / 4 cm)*

> *The body is worked a bit longer than the head to give the cat a chubby, rounded torso.*

**Rnd 24 (Decrease):** [K2tog, k5] 6 times. *(36 sts)*

**Rnd 25:** Knit all sts.

**Rnd 26 (Decrease):** [K2tog, k4] 6 times. *(30 sts)*

**Rnd 27:** Knit all sts.

> **⚠️ Stuff now:** Stuff body firmly before the opening gets too small. The body should feel plump and hold its shape.

**Rnd 28 (Decrease):** [K2tog, k3] 6 times. *(24 sts)*

**Rnd 29 (Decrease):** [K2tog, k2] 6 times. *(18 sts)*

**Rnd 30 (Decrease):** [K2tog, k1] 6 times. *(12 sts)*

**Rnd 31 (Decrease):** [K2tog] 6 times. *(6 sts)*

**Finishing the Body:** Cut yarn, leaving a 6-inch (15 cm) tail. Thread through remaining 6 sts, pull tight, knot, and weave in. Set body aside.

---

### PIECE 3: FRONT LEGS

*Makes 2. Work in MC (ginger) throughout.*

**Setup:** CO 8 sts. Join to work in the round. Place marker.

*(After joining: 8 sts)*

**Rnd 1 (Increase):** [Kfb] 8 times. *(16 sts)*

**Rnd 2:** Knit all sts.

**Rnd 3 (Increase):** [Kfb, k7] twice. *(18 sts)* ✓ *This slight extra width creates a rounded paw.*

**Rnds 4–6:** Knit all sts. *(3 rounds even — creates the paw)*

**Rnd 7 (Decrease):** [K2tog, k7] twice. *(16 sts)*

**Rnds 8–13:** Knit all sts. *(6 rounds even — the leg shaft, approx. 0.7 in / 1.8 cm)*

> *Total leg length (paw to top) is approx. 1.5 in (4 cm).*

**Finishing the Front Legs:** Stuff lightly — front legs should be soft and slightly floppy to sit naturally. Cut yarn, leaving a 12-inch (30 cm) tail for seaming. Thread through remaining 16 sts and pull snug but do not close completely — leave a flat, open edge for seaming to the body. *Alternatively,* cut yarn, thread through sts, pull tight, and leave the tail long for attaching. Set both legs aside.

> **Tip:** For the neatest seam, leave the leg opening fairly open and whipstitch it directly to the body later.

---

### PIECE 4: BACK LEGS

*Makes 2. Work in MC (ginger) throughout.*

The back legs are slightly larger and wider than the front legs to give the seated cat a stable base.

**Setup:** CO 8 sts. Join to work in the round. Place marker.

*(After joining: 8 sts)*

**Rnd 1 (Increase):** [Kfb] 8 times. *(16 sts)*

**Rnd 2:** Knit all sts.

**Rnd 3 (Increase):** [Kfb, k1] 8 times. *(24 sts)*

**Rnds 4–7:** Knit all sts. *(4 rounds even — creates wide rounded paw/haunch)*

**Rnd 8 (Decrease):** [K2tog, k2] 6 times. *(18 sts)*

**Rnd 9:** Knit all sts.

**Rnd 10 (Decrease):** [K2tog, k7] twice. *(16 sts)*

**Rnds 11–15:** Knit all sts. *(5 rounds even — upper leg shaft)*

> *Total back leg length is approx. 1.75 in (4.5 cm).*

**Finishing the Back Legs:** Stuff lightly to medium — back legs need a bit more structure than front legs to support the seated pose. Leave yarn tail of 12 inches (30 cm) for seaming. Close or leave open as for front legs. Set both legs aside.

---

### PIECE 5: TAIL

*Makes 1. Work in MC (ginger) throughout.*

The tail is worked as a simple tube.

**Setup:** CO 8 sts. Join to work in the round. Place marker.

*(After joining: 8 sts)*

**Rnd 1 (Increase):** [Kfb] 8 times. *(16 sts)*

**Rnd 2:** Knit all sts.

**Rnd 3 (Increase):** [Kfb, k7] twice. *(18 sts)*

**Rnds 4–25:** Knit all sts. *(22 rounds even — approx. 2.5 in / 6.5 cm)*

> *Total tail length (tip to base) is approx. 3 in (7.5 cm). For a longer or shorter tail, adjust the number of even rounds.*

**Finishing the Tail:** Stuff lightly and evenly — the tail should be flexible, not stiff. Leave 12-inch (30 cm) yarn tail for seaming. Thread through remaining 18 sts, pull snug, and leave open for seaming to body. Set tail aside.

---

### PIECE 6: EARS

*Makes 2. Worked flat (back and forth) on 2 DPNs. Work in MC (ginger).*

The ears are the only pieces worked flat. They are small triangular flaps.

**Setup:** CO 12 sts onto 1 DPN.

**Row 1 (RS):** Knit all sts. *(12 sts)*

**Row 2 (WS):** Knit all sts. *(Garter stitch gives ear a firm, tidy edge.)*

**Row 3 (RS — Decrease):** K1, k2tog, k6, k2tog, k1. *(10 sts)*

**Row 4 (WS):** Knit all sts.

**Row 5 (RS — Decrease):** K1, k2tog, k4, k2tog, k1. *(8 sts)*

**Row 6 (WS):** Knit all sts.

**Row 7 (RS — Decrease):** K1, k2tog, k2, k2tog, k1. *(6 sts)*

**Row 8 (WS):** Knit all sts.

**Row 9 (RS — Decrease):** K1, k2tog, k2tog, k1. *(4 sts)*

**Row 10 (WS):** Knit all sts.

**Row 11 (RS — Decrease):** K2tog, k2tog. *(2 sts)*

**Row 12:** K2tog. *(1 st)*

**Finishing the Ears:** Cut yarn, pull tail through last stitch. Do not stuff ears. Leave a long yarn tail (at least 10 inches / 25 cm) for seaming to head. Make both ears the same.

> *The ears have a natural garter ridge along all edges, which looks tidy and holds their shape without extra support.*

---

## FINISHING

### Step 1 — Weave In Starting Tails
Before assembling, go back to each piece and close any small gap at the cast-on end using the starting tail. Thread tail onto tapestry needle, weave around the cast-on edge, pull snug, and weave tail securely into the inside of the piece.

---

### Step 2 — Assemble the Cat

Use the long yarn tails left on each piece, plus additional MC yarn threaded on your tapestry needle, to seam pieces together. Whipstitch and mattress stitch both work well. Sew through multiple layers where needed to secure pieces firmly.

**Assembly Order:**

1. **Attach Head to Body:** Position the head at the top of the body with the face pointing forward. The flat closed end of the head sits against the flat closed top of the body. Use a length of MC yarn and whipstitch around the entire join, going through edge stitches of both pieces. Pull snug as you go. Knot and weave in end.

2. **Attach Front Legs:** Position one front leg on each side of the body, near the top, slightly below and to the front of where the head joins. The open top of each leg faces the body. Whipstitch the leg opening securely to the body. Check that both legs are at the same height and angle before finishing the seam on the second leg.

3. **Attach Back Legs:** Position one back leg on each side of the lower body, near the base. For a seated cat, angle the back legs so the wide paw/haunch extends outward and slightly downward, creating a stable base. Whipstitch securely.

4. **Attach Tail:** Position the tail at the back lower body, centered. Whipstitch the open end securely. You can curve the tail around to one side and tack it in place with a few stitches if desired.

5. **Attach Ears:** Fold the bottom edge of each ear slightly inward to create a natural ear cup shape. Position the ears on top of the head, evenly spaced, angled slightly outward. The ears should sit in the upper quarter of the head. Whipstitch firmly through the ear base and into the head.

---

### Step 3 — Add Tabby Stripes (Duplicate Stitch)

*This step adds the reddish-brown tabby markings using CC yarn and a tapestry needle. No additional knitting is required.*

**What is duplicate stitch?**
Duplicate stitch is an embroidery technique that mimics the look of a knitted stitch by tracing over existing stitches with a contrasting yarn. It sits on the fabric surface and looks like a knitted-in color change.

**How to work duplicate stitch:**
1. Thread CC yarn on tapestry needle.
2. Bring needle up through the base of the stitch you want to cover (the "V" base).
3. Pass needle under both legs of the stitch directly above it (go right to left).
4. Insert needle back down through the same hole at the base of the stitch.
5. Pull snug — the CC yarn now covers that stitch.
6. Move to the next stitch and repeat.

**Stripe Placement Guide:**

Work stripes in CC (reddish-brown) using duplicate stitch as follows. The stripe width is 1–2 stitches. Adjust placement to suit your eye — tabby markings do not need to be perfectly symmetrical!

> **Head:**
> - One curved stripe across the top of the head (forehead stripe): approx. 3–4 sts wide, running across Rnds 4–6 of the head.
> - Two shorter stripes on each cheek, running vertically (approx. 2 sts wide, 2–3 rows tall).

> **Body:**
> - 3–4 vertical or diagonal stripes running around the body, each approx. 2 sts wide and 4–6 sts tall, evenly spaced.
> - Optional: a few shorter stripes along the top/back of the body.

> **Legs:**
> - 1–2 horizontal ring stripes on each leg (approx. 2 sts wide), spaced evenly along the shaft.

> **Tail:**
> - 3–4 ring stripes evenly spaced along the tail length (approx. 2 sts wide each).

> **Ears (optional):**
> - A small inner ear detail: using NC (pink) or a lighter peach yarn, work a small triangle of duplicate stitch on the inner face of each ear to suggest the inner ear. Approx. 4–6 sts in a triangular arrangement.

---

### Step 4 — Embroider the Face

**Pink Nose:**
1. Thread NC (pink yarn or 3–4 strands of pink embroidery floss) onto tapestry needle.
2. Locate the center of the face, approximately 2–3 rounds below the safety eyes.
3. Work a small upside-down triangle: bring needle up at center top of the triangle, carry yarn down and to the left for the left side, bring up at center top again, carry yarn down to the right for the right side. Fill in with 2–3 horizontal satin stitches to create a solid pink triangle approximately 3 sts wide and 2–3 rows tall.
4. Optional: from the bottom point of the nose, bring yarn down and split into a small "Y" shape for the mouth, using 1–2 small straight stitches. Use the same pink or switch to a darker rose or brown.

**Mouth:**
Using a strand of the CC (reddish-brown) or dark brown yarn or floss, work two short straight stitches angling downward from the base of the nose to form a small "ω" or "W" shaped mouth. Each stitch approx. 2 sts long.

---

### Step 5 — Add Whiskers

1. Cut 3 lengths of white yarn or white pearl cotton thread, each approximately 4 inches (10 cm) long.
2. Thread one length onto the tapestry needle. Insert needle through the face just to the left of the nose, going through to the other side of the face. Pull through, leaving equal lengths on each side. This creates 2 whiskers.
3. Repeat once more on the right side of the nose.
4. For a third whisker on each side, insert a single strand and knot it securely just outside the nose on each side, trimming to approx. 1.5 inches (4 cm) on each side.
5. Trim all whiskers to a neat, even length — approximately 1–1.5 inches (2.5–4 cm) on each side of the face.
6. Apply a tiny drop of fabric glue to the base of each whisker at the knot to secure it permanently (optional but recommended).

---

### Step 6 — Final Details and Check

- Check all seams and reinforce any that feel loose.
- Trim and weave in any remaining yarn ends.
- Fluff the fiberfill stuffing inside any pieces that feel uneven by gently squeezing and reshaping.
- Give your cat a final look: are the eyes level? Are the ears even? Is the tail positioned how you like?

> **Congratulations — your ginger tabby cat amigurumi is complete!** 🧡🐱

---

## QUICK REFERENCE — STITCH COUNTS

| Piece | Cast-On | Peak Sts | Final Sts (before close) |
|---|---|---|---|
| Head | 8 | 36 | 6 |
| Body | 8 | 42 | 6 |
| Front Legs (×2) | 8 | 18 | 16 (open) |
| Back Legs (×2) | 8 | 24 | 16 (open) |
| Tail | 8 | 18 | 18 (open) |
| Ears (×2) | 12 | 12 (flat) | 1 |

---

## CARE INSTRUCTIONS

Hand wash in cool water with mild soap. Gently squeeze out excess water — do not wring. Lay flat or hang to dry. Do not machine wash or tumble dry, as this may cause the knitted fabric to felt or distort. Keep away from direct heat sources.

---

*Pattern designed for personal use. Please do not reproduce or sell this pattern without permission.*

---
Disclaimer: This pattern was generated by AI and should be reviewed for accuracy before use. While we strive for quality, AI-generated content may contain errors. Please verify measurements, stitch counts, and instructions before beginning your project. Generated by purlJam.uk
Access your pattern anytime
Bookmark this page to access your pattern anytime