Type
Crochet
Difficulty
intermediate
Category
bag
AI Thinking Process
Planning
Verification
Pattern
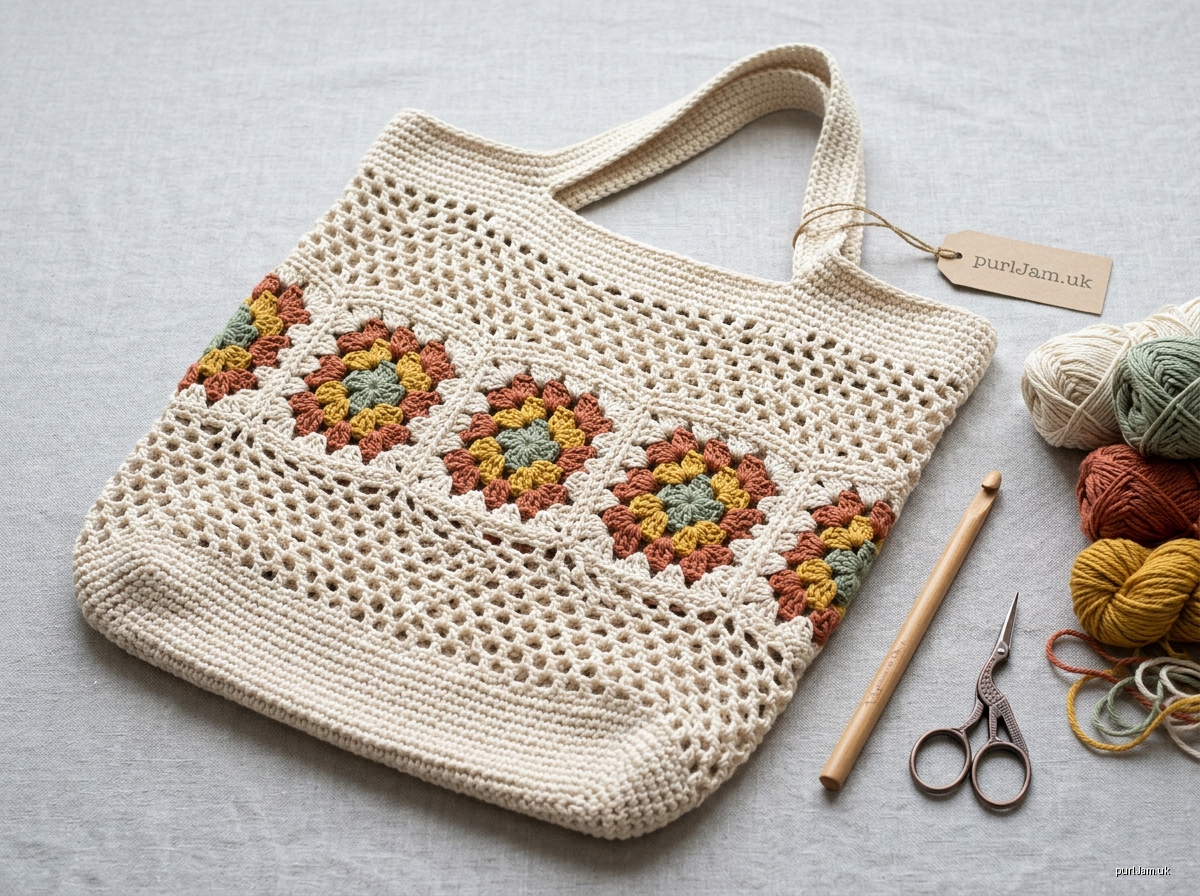
Granny Market Tote
Intermediate crochet pattern, US terms
Finished Measurements
- Width (flat): 16.5" (42 cm)
- Height: approximately 15" (38 cm), excluding handles
- Base: 14.5" × 2" (37 × 5 cm)
- Handle drop: approximately 9" (23 cm)
Materials
- Yarn: Worsted weight 100% cotton, approximately 200 yds (183 m) per 100 g skein.
- Main Color (MC): 2 skeins (approx. 380 yds)
- Contrast Colors A, B, C: 1 skein each (approx. 40 yds of each used)
- Hook: US H-8 (5 mm) crochet hook, or size needed to obtain gauge
- Notions: Stitch markers, tapestry needle, scissors
Gauge
- Single crochet: 16 sc and 18 rows = 4" (10 cm)
- Mesh: 8 (dc, ch 1) units and 8 rnds = 5" (13 cm), slightly relaxed
- Granny square: One 4-round square = 5.5" (14 cm) square
Gauge matters most for the squares. Six squares must form a 33" ring.
Abbreviations
- ch – chain
- sl st – slip stitch
- sc – single crochet
- dc – double crochet
- st(s) – stitch(es)
- sp – space
- rnd – round
- RS – right side
- sc2tog – single crochet 2 together
- BLO – back loop only
Pattern Notes
- The bag is worked bottom-up in joined rounds, with the RS facing throughout. Do not turn.
- The beginning ch does not count as a stitch unless stated otherwise.
- Mesh unit: (dc, ch 1).
- The square band is made separately, joined into a ring, then crocheted onto the body with sc.
Base
With MC, ch 56.
Rnd 1: Sc in 2nd ch from hook and in next 53 ch, 3 sc in last ch. Rotate and work along the underside of the foundation ch: sc in next 53 ch, 2 sc in last ch (same ch as the first sc). Sl st to the first sc. (54 + 3 + 53 + 2 = 112.)
Rnd 1 count check: the first-side 54 sc + 3 end + 53 underside + 2 end = 112 sts ✓. Mark the 6 corner sts: the 2nd of each 3-sc group, plus the sts on either side of each end group's center. Simplified, place the increases as follows.
Rnd 2: Ch 1, sc in next 54 sts, 2 sc in each of next 3 sts, sc in next 52 sts, 2 sc in each of next 3 sts. Sl st to first sc. (112 + 6 = 118 sts ✓)
Rnd 3: Ch 1, sc in next 55 sts, (sc, 2 sc in next st) 3 times, sc in next 54 sts, (sc, 2 sc in next st) 3 times except work the final group over the remaining sts to the end. Sl st to first sc. (118 + 6 = 124 sts ✓)
Rnd 4: Ch 1, sc around, working 2 sc in the center st of each end curve and 2 sc in the first and last st of each curve (4 increases at one end, 4 at the other). Sl st to first sc. (124 + 8 = 132 sts ✓)
The base measures approximately 14.5" × 2.5".
Rnd 5 (turning ridge): Ch 1, sc in BLO of each st around. Sl st to first sc. (132 sts) This ridge folds up and defines the base edge.
Lower Mesh Body
Rnd 1: Ch 4 (counts as dc + ch 1), sk 1 st, *dc in next st, ch 1, sk 1 st; rep from * around. Sl st to 3rd ch of beg ch-4. (132 ÷ 2 = 66 mesh units ✓)
Rnds 2–6: Sl st into the first ch-1 sp, ch 4 (counts as dc + ch 1), *dc in next ch-1 sp, ch 1; rep from * around. Sl st to 3rd ch of beg ch-4. (66 units each rnd) This section stretches to hold produce.
Rnd 7: Ch 1, *sc in dc, sc in ch-1 sp; rep from * around. Sl st to first sc. (66 × 2 = 132 sc ✓) Fasten off.
The lower body measures approximately 4.5" from the turning ridge.
Granny Squares (make 6)
Color sequence per square: Rnd 1 A, Rnd 2 B, Rnd 3 C, Rnd 4 MC. Rotate the colors between squares if you like.
Rnd 1: With A, ch 4, sl st to form a ring. Ch 3 (counts as dc), 2 dc in ring, ch 2, *3 dc in ring, ch 2; rep from * 2 more times. Sl st to top of ch-3. (4 groups of 3 dc = 12 dc, 4 corner ch-2 sps ✓) Fasten off.
Rnd 2: Join B in any corner sp. Ch 3, (2 dc, ch 2, 3 dc) in same sp, ch 1, *(3 dc, ch 2, 3 dc) in next corner sp, ch 1; rep from * 2 more times. Sl st to top of ch-3. (8 groups = 24 dc ✓) Fasten off.
Rnd 3: Join C in any corner sp. Ch 3, (2 dc, ch 2, 3 dc) in same sp, ch 1, *3 dc in next ch-1 sp, ch 1, (3 dc, ch 2, 3 dc) in next corner sp, ch 1; rep from * 2 more times, 3 dc in last ch-1 sp, ch 1. Sl st to top of ch-3. (12 groups = 36 dc ✓) Fasten off.
Rnd 4: Join MC in any corner sp. Ch 3, (2 dc, ch 2, 3 dc) in same sp, ch 1, *(3 dc in next ch-1 sp, ch 1) twice, (3 dc, ch 2, 3 dc) in next corner sp, ch 1; rep from * 2 more times, (3 dc in next ch-1 sp, ch 1) twice. Sl st to top of ch-3. (16 groups = 48 dc; each side has 4 groups ✓) Do not fasten off on squares 2–6. Fasten off square 1.
Joining the Band
Place two squares with their wrong sides together. With MC, sc through both layers along one side: 1 sc in each corner ch-2 sp, 1 sc in each dc, and 1 sc in each ch-1 sp. (Per side: 1 + 12 dc + 3 ch-sps + 1 = 17 sts.)
Join the squares into a strip of 6, then join the last square to the first to form a ring. Check the ring: 6 × 5.5" = 33" ✓, which matches 132 sc ÷ 4 sts per inch = 33" ✓.
Edging the Band (work on both the top and bottom edges)
Join MC at any square's corner. Ch 1, then work 22 sc evenly across each square's edge. The guide for each square: 1 sc in the corner sp, 1 sc in each of the 12 dc, 1 sc in each of the 3 ch-1 sps, and 6 additional sc spaced evenly (work 2 sc in every 2nd dc group). (1 + 12 + 3 + 6 = 22 ✓; 6 squares × 22 = 132 sc ✓) Sl st to first sc.
Edge the second side the same way. Fasten off the top edge. On the bottom edge, leave a long tail for seaming.
Attaching the Band to the Body
With the RS facing, align the band's bottom edge (132 sts) with the last round of the lower body (132 sts). Line up a square seam with one side of the bag.
Sl st through both layers in every st around, working on the WS so the ridge is hidden. Alternatively, whipstitch the edges together with the tail. (132 joined to 132 ✓)
Upper Mesh Body
Join MC at the band's top edge, positioned at the side seam.
Rnd 1: Ch 4, sk 1, *dc in next st, ch 1, sk 1; rep from * around. Sl st to 3rd ch. (66 units ✓)
Rnds 2–5: Work as for Lower Mesh Rnd 2. (66 units each rnd)
Rnd 6: Ch 1, *sc in dc, sc in ch-1 sp; rep from * around. Sl st to first sc. (132 sc ✓)
Rim and Handles
Rnds 1–2: Ch 1, sc in each st around. Sl st to first sc. (132 sts)
Place markers to mark the side edges: at st 1 and at st 67. Each half of the bag has 66 sts. Center each handle on its half: 66 − 30 handle-gap sts = 36, divided into 18 sts on each side.
Rnd 3 (handle openings): Ch 1, sc in next 18 sts, ch 50, sk next 30 sts, sc in next 36 sts, ch 50, sk next 30 sts, sc in last 18 sts. Sl st to first sc. (18 + 30 + 36 + 30 + 18 = 132 ✓; total now 72 sc + 100 ch = 172 sts)
Rnd 4: Ch 1, sc in each sc and in each ch around. Sl st to first sc. (172 sts ✓)
Rnd 5: Ch 1, sc in each st, working sc2tog at the start and end of each handle section (4 decreases per handle). Sl st to first sc. (172 − 8 = 164 sts ✓)
Rnd 6: Ch 1, sc in each st around. Sl st to first sc. (164 sts) Fasten off.
Handle Reinforcement
- Join MC at the inner edge of one handle opening.
- Work sc into each skipped st and each chain loop along the inner side, for 30 sc + 50 sc = 80 sc.
- Sl st to join. Fasten off.
- Repeat for the second handle.
The handles are now 5 sc rows thick and resist stretching.
Finishing
- Weave in all ends securely, splitting the plies of the cotton.
- Wet block lightly. Pin the squares flat, but do not stretch the mesh.
- Let the bag dry flat.
- Optional: Run a sl st round along the turning ridge in a contrast color to sharpen the base.
Enjoy your Granny Market Tote!
Disclaimer: This pattern was generated by AI and should be reviewed for accuracy before use. While we strive for quality, AI-generated content may contain errors. Please verify measurements, stitch counts, charts, and instructions before beginning your project. Generated by purlJam.uk
Love this pattern?
Save this pattern to your free PurlJam libraryAccess your pattern anytime
Bookmark this page to access your pattern anytime