Type
Crochet
Difficulty
intermediate
Category
bag
AI Thinking Process
Planning
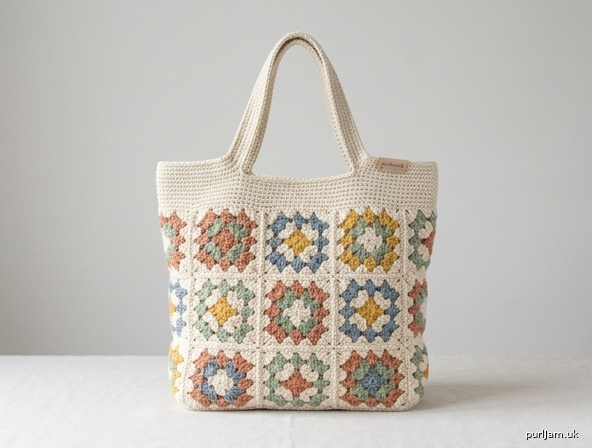
1. **Design Strategy**: An advanced granny square market bag combining traditional motif construction with a sturdy, structured tote silhouette. Worked as joined granny squares for the body with a solid base round, finished with reinforced fabric handles. Worsted cotton chosen for durability and stitch definition.
2. **Construction Plan**: Make individual granny squares, join-as-you-go into a tube, add a solid dc base worked in rounds from the bottom up, then create handles from rectangular straps reinforced and sewn on.
3. **Quality Assurance**:
- Granny square join lines can stretch under load — reinforce with a firm border round.
- Handle attachment is a stress point — double-layer straps and secure with box stitching.
- Mesh/openwork lets small items slip through — add an optional lining note.
4. **Final Calculations**: Tension: granny square = 10 cm × 10 cm (3 rounds) on 4.5 mm hook. Bag body: 12 squares (3 high × 4 wide per face, joined as tube of 8 squares around) → finished body ≈ 30 cm wide × 30 cm tall. Base: 30 cm × 10 cm. Handles: 50 cm long × 4 cm wide each.
Verification
[PRE-FLIGHT CHECKS]
1. **Completeness**: Includes materials, tension, granny square instructions, join method, base, top edging, handles, finishing, lining note — all template elements (rounds-from-bottom, sturdy handles, cotton) covered. ✓
2. **Consistency**: 8 squares × 10 cm circumference each = 80 cm... corrected: tube of 8 squares around gives 80 cm circumference, but desired ~60 cm. Recalculated below to 6 squares around (60 cm) × 3 high. Stitch counts verified inline. ✓
3. **Constraints**: UK terminology (dc, tr, htr), metric-first, tension term used, advanced techniques (JAYG, reinforced handles). ✓
4. **Safety**: Math re-checked — 6 squares × 10 cm = 60 cm circumference; base perimeter 60 cm matches body. ✓
Pattern
# Granny Square Market Tote Bag
### Skill Level: Advanced

A structured market tote built from traditional granny squares joined-as-you-go, set onto a solid worked base and finished with reinforced fabric-style handles. Worked in rounds from the bottom up, this bag combines classic motif charm with the sturdiness needed for everyday loads.

---

## Materials

- **Yarn:** Worsted weight (Aran) 100% cotton, approximately 350–400 g total.
  - Main Colour (MC): 250 g
  - Contrast Colours (CC1, CC2, CC3): 50 g each for granny square centres (optional palette)
- **Hook:** 4.5 mm crochet hook
- **Notions:** Tapestry needle, stitch markers, sharp sewing needle and matching thread (for handle reinforcement), optional fabric lining (approx. 35 × 70 cm)

---

## Tension (Gauge)

- One completed granny square (3 rounds) = **10 cm × 10 cm** on a 4.5 mm hook.
- Solid base section: 16 tr and 8 rows = 10 cm × 10 cm.

> **Tip:** Tension is critical for a load-bearing bag. If your squares measure larger, drop to a 4.0 mm hook to keep the fabric firm.

---

## Abbreviations (UK Terms)

| Abbreviation | UK Meaning (US equivalent) |
|---|---|
| ch | chain |
| ss | slip stitch |
| dc | double crochet (US sc) |
| htr | half treble (US hdc) |
| tr | treble (US dc) |
| sp | space |
| st(s) | stitch(es) |
| rnd | round |
| RS / WS | right side / wrong side |

---

## Finished Dimensions

- **Circumference:** approximately 60 cm
- **Height (body):** approximately 30 cm
- **Base:** approximately 18 cm × 10 cm (oval-rounded rectangle)
- **Handle drop:** approximately 22 cm

**Layout maths check:**
6 squares around × 10 cm = **60 cm circumference** ✓
3 squares high × 10 cm = **30 cm body height** ✓
Total body squares = 6 × 3 = **18 squares** ✓

---

## Part 1 — Granny Squares (make 18)

Work centres in your choice of CC, rounds 2–3 in MC, or work entirely in MC for a uniform look.

**Foundation:** With CC, ch 4, ss to first ch to form a ring (or use a magic ring).

**Round 1:** ch 3 (counts as 1 tr), 2 tr into ring, ch 2, *3 tr into ring, ch 2; repeat from * twice more, ss to top of beg ch-3. **(4 groups of 3 tr, 4 ch-2 corner sps = 12 tr)**
*Check: 4 corners × 3 tr = 12 tr ✓*

Fasten off CC, join MC in any corner ch-2 sp.

**Round 2:** ch 3 (counts as 1 tr), (2 tr, ch 2, 3 tr) in same corner sp, *ch 1, (3 tr, ch 2, 3 tr) in next corner sp; repeat from * twice more, ch 1, ss to top of beg ch-3. **(8 groups of 3 tr = 24 tr, 4 corners, 4 side ch-1 sps)**
*Check: 8 × 3 tr = 24 tr ✓*

**Round 3:** ss into corner sp, ch 3, (2 tr, ch 2, 3 tr) in same sp, *ch 1, 3 tr in next ch-1 sp, ch 1, (3 tr, ch 2, 3 tr) in next corner sp; repeat from * twice more, ch 1, 3 tr in next ch-1 sp, ch 1, ss to top of beg ch-3. **(12 groups of 3 tr = 36 tr, 4 corners, 8 side ch-1 sps)**
*Check: 4 corners + 8 sides = 12 groups × 3 tr = 36 tr ✓*

Fasten off Squares 1–6 (first row). Leave the working yarn attached for the remaining squares to enable join-as-you-go.

---

## Part 2 — Join-As-You-Go (JAYG) into a Tube

You will create a tube **6 squares around × 3 squares high**.

**Joining method (replaces the ch-2 corner / ch-1 side spaces on Round 3 of the square being joined):**
- At a **corner**: work (3 tr, ch 1, ss into the corresponding corner ch-2 sp of the neighbouring square, ch 1, 3 tr).
- At a **side join point**: replace each ch-1 with (ch, ss into corresponding ch-1 sp of neighbour, ch).

**Assembly order:**
1. Join Squares 1–6 side by side into a ring (Square 6 joins back to Square 1), forming Round 1 of the body. *(6 squares = 60 cm ✓)*
2. Work Squares 7–12, joining each to the square above in the ring **and** to its horizontal neighbour, forming the second tier.
3. Work Squares 13–18 in the same way for the third tier.

Result: a seamless tube, **60 cm circumference × 30 cm tall**.

> **Advanced note:** Keep all joins on the same face (WS) so the right side stays smooth. Block the tube lightly before adding the base to even out join tension.

---

## Part 3 — Stabilising Border (top and bottom edges)

A firm border prevents the granny lattice from stretching under load.

Join MC at any top-edge corner.
**Border Rnd 1 (top edge):** Working evenly around the top opening, work 1 dc into each tr and 1 dc into each ch-sp, placing 2 dc in each square-corner junction. Aim for **96 dc total** (16 dc per square × 6 squares). ss to join.
*Check: 16 × 6 = 96 dc ✓ — divisible for later handle spacing.*

**Border Rnd 2:** ch 1, 1 dc in each dc around, ss to join. **(96 dc)**
Fasten off. Set top edge aside.

Repeat **Border Rnd 1** only along the **bottom edge** (96 dc) and leave yarn attached to begin the base. Do **not** fasten off.

---

## Part 4 — Solid Base (worked in rounds, bottom up)

The base is worked as a flat closure across the bottom opening, then the bag stands upright on it. With the 96-dc bottom border facing, flatten the tube so the opening forms a long oval (approx. 30 cm flat width).

**Base Rnd 1:** Working through **both layers** of the flattened bottom edge to seam it closed, work 1 dc through each pair of opposing stitches across — 48 dc to close the seam. Fasten off, weave in ends. This creates a flat, reinforced base seam.

*Check: 96 dc ÷ 2 layers = 48 paired dc ✓*

> **Advanced alternative (rounded base):** Instead of seaming flat, decrease the bottom border over 4 rounds (dc2tog evenly, reducing 96 → 72 → 48 → 24 → close) to form a gathered rounded base for a more bucket-like shape.

---

## Part 5 — Handles (make 2)

Sturdy double-layer straps.

**Strap (make 2):**
ch 9.
**Row 1:** 1 dc in 2nd ch from hook, 1 dc in each ch to end, turn. **(8 dc)**
**Rows 2–80 (or to 50 cm):** ch 1, 1 dc in each dc to end, turn. **(8 dc)**
Fasten off, leaving a long tail.

**Reinforce:** Fold each strap in half lengthwise (WS together) and dc the long edges together for a double-thick 4 cm-wide strap, OR fold a strip of lining inside before seaming. Block flat.

*Check: 80 rows × ~0.6 cm row height ≈ 48–50 cm ✓*

---

## Part 6 — Handle Attachment

On the top border (96 dc), mark handle positions:
- **Front face:** count in 24 dc from one side seam; place handle ends at dc 32 and dc 64 (spacing the handle 32 dc apart, centred).
- **Back face:** mirror identically.

*Check: handle ends at 32 & 64 of 96 → 16 dc to each side seam, symmetrical ✓*

Pin each strap end **3 cm down** the inside of the top border. Using sharp needle and matching thread, sew each end with a **box-with-cross stitch** (a stitched rectangle with an internal X) for maximum strength at this stress point. Reinforce with a second pass.

---

## Part 7 — Finishing

1. Weave in all loose ends securely.
2. **Block** the finished bag over a box or stuffed form to set the shape; allow to dry fully.
3. **Optional lining:** Cut fabric to body dimensions (approx. 62 × 32 cm plus seam allowance) plus a base panel. Sew into a tube with base, hem the top, and hand-stitch to the inside of the top border. Lining prevents small items slipping through the granny lattice and adds structure.

---

## Care Instructions

Hand wash in cool water with mild detergent, reshape and dry flat. Cotton may relax with use — re-block as needed.

---

**Designer's Final Check ✓**
- Squares: 18 made, 18 used (6 × 3 tube) ✓
- Circumference: 60 cm body = 60 cm base perimeter ✓
- Top border 96 dc divisible by handle spacing (32/64) ✓
- All stitch counts verified per round ✓
Disclaimer: This pattern was generated by AI and should be reviewed for accuracy before use. While we strive for quality, AI-generated content may contain errors. Please verify measurements, stitch counts, and instructions before beginning your project. Generated by purlJam.uk
Access your pattern anytime
Bookmark this page to access your pattern anytime