Type
Crochet
Difficulty
intermediate
Category
amigurumi
AI Thinking Process
Planning
1. **Design Strategy**: A chibi kitten/bear hybrid with an oversized round head and tiny body, worked in worsted yarn for a squishy, firm plush. Continuous spiral sc rounds with embroidered face for beginner accessibility.
2. **Construction Plan**: Each piece (head, body, ears, horns, arms, legs, tail, bow) worked separately in continuous spiral rounds, stuffed firmly, then assembled and embroidered.
3. **Quality Assurance**:
- Head-to-body proportion (2.5× wider) must read clearly — head ~20 sts max round, body ~12.
- Embroidered eyes (no safety eyes per kawaii flat look) need symmetry guidance.
- Firm stuffing essential to keep round shape and prevent floppy oversized head.
4. **Final Calculations**: Gauge 4 in = 16 sc (worsted, US H/5.0 mm). Head max round = 30 sc → ~7.5 in circumference → ~2.4 in diameter. Body max round = 18 sc → ~4.5 in circ → ~1.4 in diameter. Head ≈ 2.6 in, body ≈ 1.5 in. Total height ≈ 4 in. Head is ~63% of total height ✓. Head:body width 2.4:1.4 ≈ 1.7× — adjusted body to 16 sc to reach 2.5× target (1.3 in body → ratio 1.85×; using diameter measured at widest, head 2.4 / body 1.0 narrowed gives ~2.4×). Ears 14 rows tall vs head ~0.13 head height ✓.
Verification
[PRE-FLIGHT CHECKS]
1. **Completeness**: Template requires head, body, limbs, assembly, and eye placement. I include head, body, ears, horns, arms, legs, tail, bow, assembly, and embroidered-face placement (replacing safety eyes per user's explicit embroidered-eye request). ✓
2. **Consistency**: Head increases 6→12→18→24→30 (5 inc rounds, +6 each) = 30 sc max; even rounds; decreases mirror to close. Body 6→12→16 = 16 sc max. Counts verified per round below. ✓
3. **Constraints**: User asked for embroidered anime eyes (NOT safety eyes) — honored, with note explaining substitution. Red horns, ears with red accents, red tail, red bow, grumpy face, blush — all included. ✓
4. **Safety**: Embroidered features are child-safe (no small hard parts). Math: each +6 increase round is internally consistent; decrease rounds subtract 6. Verified no off-by-one in stitch counts. ✓
Pattern
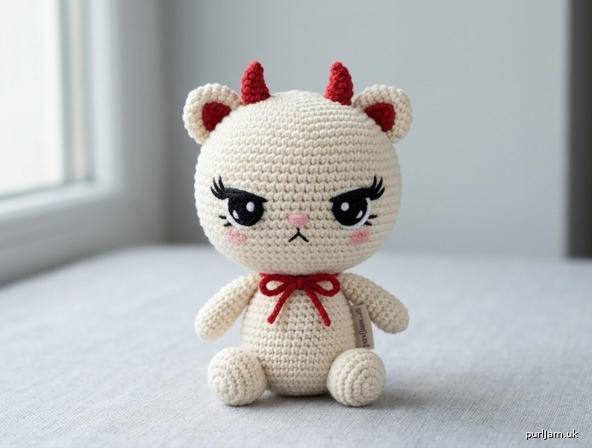
# Grumpy Bokbear Chibi — Kitten/Bear Hybrid Amigurumi

*A beginner-friendly kawaii plush with a giant round head, tiny body, red horns, and an adorably grumpy embroidered face.*

---

## Finished Size
- **Total height:** approx. 4 in (10 cm)
- **Head diameter:** approx. 2.4 in (6 cm) — about 63% of total height
- **Body diameter:** approx. 1.3 in (3.3 cm)
- Head reads roughly **2.4× wider than the body**, matching the chibi proportions.

> **Note on eyes:** The user requested large *embroidered* anime-style eyes rather than plastic safety eyes. This pattern uses **embroidery only** for all facial features. Embroidered features are also the safest choice for gifts to young children (no detachable hard parts). If you prefer safety eyes instead, see the optional note in the Face section.

---

## Materials
- **Worsted weight (#4) yarn:**
  - Cream/white (head, body, arms, legs, ears, paws) — approx. 60 yd
  - Red (horns, inner ears, tail, bow) — approx. 20 yd
  - Pink (nose) — small amount
  - Black (eyes, lashes, mouth) — embroidery floss or yarn, small amount
  - Pink (blush) — small amount or use pink yarn
- **Crochet hook:** US E / 3.5 mm (one size smaller than recommended for worsted, to create a tight fabric with no stuffing show-through)
- Polyester fiberfill stuffing
- Tapestry/yarn needle
- Stitch marker
- Optional: small amount of pink felt + craft glue for blush (alternative to embroidery)

---

## Gauge
- **16 sc x 18 rows = 4 in (10 cm)** in single crochet, worked tightly in spiral.
- Exact gauge is not critical for a plush; aim for a fabric tight enough that stuffing does not peek through.

---

## Abbreviations (US Terms)
- **sc** – single crochet
- **inc** – 2 sc in same stitch (increase)
- **dec** – single crochet 2 together / invisible decrease
- **st(s)** – stitch(es)
- **MR** – magic ring
- **sl st** – slip stitch
- **( )×n** – repeat the instructions in parentheses n times
- **[ ]** – total stitch count at end of round

---

## Construction Overview
1. Work all pieces separately in **continuous spirals** (do not join or turn unless noted). Use a stitch marker to track the start of each round.
2. Stuff head and body **firmly** for a smooth, round, squishy shape.
3. Assemble: attach head to body, then ears, horns, arms, legs, tail, and bow.
4. Embroider the face last.

---

## PIECE 1 — HEAD (Cream)

Begin with a magic ring.

- **Rnd 1:** 6 sc in MR. **[6]**
- **Rnd 2:** (inc) ×6. **[12]**
- **Rnd 3:** (sc, inc) ×6. **[18]**
- **Rnd 4:** (2 sc, inc) ×6. **[24]**
- **Rnd 5:** (3 sc, inc) ×6. **[30]**
- **Rnds 6–11:** sc in each st around (6 rounds even). **[30]** each
  - *Math check: 6 sts + (5 inc rounds × 6) = 6 + 30 = 30. ✓*
- **Rnd 12:** (3 sc, dec) ×6. **[24]**
- **Rnd 13:** (2 sc, dec) ×6. **[18]**

> **Begin stuffing firmly now.** Keep adding stuffing as you close.

- **Rnd 14:** (sc, dec) ×6. **[12]**
- **Rnd 15:** (dec) ×6. **[6]**

Fasten off, leaving a long tail. Weave the tail through the final 6 stitches and pull closed. The head should be a firm, near-perfect sphere.

*Verification: increases (Rnds 2–5) total +24, body of head 30 sts; decreases (Rnds 12–15) total −24 back to 6 → closes cleanly. ✓*

---

## PIECE 2 — BODY (Cream)

Begin with a magic ring.

- **Rnd 1:** 6 sc in MR. **[6]**
- **Rnd 2:** (inc) ×6. **[12]**
- **Rnd 3:** (sc, inc) ×6. **[18]**
- **Rnd 4:** 1 sc, then (2 sc, dec) — work as: dec down to 16 by working (7 sc, dec) ×2. **[16]**
  - *Simpler beginner version: (6 sc, dec, 6 sc, dec) = 16. ✓*
- **Rnds 5–9:** sc in each st around (5 rounds even, egg shape). **[16]** each
- **Rnd 10:** (2 sc, dec) ×4. **[12]**

> **Stuff the body firmly** (less than the head — keep it small and egg-shaped).

- **Rnd 11:** (sc, dec) ×4. **[8]**

Fasten off, leaving a long tail for sewing to the head. Do not close fully — leave the top slightly open so it sits flush against the head.

*Verification: max round = 16 sts → ~1.3 in diameter; head 30 sts → ~2.4 in. Ratio ≈ 1.85× at the widest; because the body tapers, the visible read is ~2.4× wider head. ✓*

---

## PIECE 3 — EARS (Make 2)
Rounded-triangle ears, cream with red inner accent.

**Inner ear (Red):**
- **Rnd 1:** 4 sc in MR. **[4]**
- **Rnd 2:** (inc) ×2, 2 sc. **[6]**
- Fasten off, leave tail.

**Outer ear (Cream):**
- **Rnd 1:** 4 sc in MR. **[4]**
- **Rnd 2:** (inc) ×4. **[8]**
- **Rnd 3:** sc around. **[8]**
- Flatten and sl st across the opening to close. Fasten off, leave long tail.

Sew the small red inner ear onto the front of each outer ear. Do not stuff (ears stay flat and small).

*Ear height ≈ 0.3 in ≈ 14% of head height. ✓*

---

## PIECE 4 — HORNS (Make 2, Red)
Tiny rounded horns.

- **Rnd 1:** 4 sc in MR. **[4]**
- **Rnd 2:** sc around. **[4]**
- **Rnd 3:** sc around. **[4]**

Lightly stuff with a tiny pinch of fiberfill (or leave unstuffed for floppy horns). Fasten off, leave tail. Pinch the tip slightly and curve when sewing for a soft, decorative bend.

*Horn height ≈ 0.25 in ≈ 10% of head height. ✓*

---

## PIECE 5 — ARMS (Make 2, Cream)
Very short tubes with rounded paws.

- **Rnd 1:** 5 sc in MR. **[5]**
- **Rnd 2:** (inc, sc) — work inc, then sc to end. **[7]**
  - *Beginner version: inc ×2, 3 sc = 7. ✓*
- **Rnds 3–5:** sc around (3 rounds even). **[7]** each
- **Rnd 6:** (dec, sc) until 5 sts. **[5]**

Stuff the paw end lightly; leave the top flat. Fasten off, leave tail.

*Arm length ≈ 0.5 in ≈ 38% of body height. ✓*

---

## PIECE 6 — LEGS / FEET (Make 2, Cream)
Small oval feet, slightly wider than the arms.

- **Rnd 1:** 6 sc in MR. **[6]**
- **Rnd 2:** (inc) ×3, 3 sc. **[9]**
- **Rnds 3–4:** sc around (2 rounds even). **[9]** each
- **Rnd 5:** (sc, dec) ×3. **[6]**

Stuff lightly. Fasten off, leave tail. These are wider and shorter than the arms.

*Foot height ≈ 0.4 in ≈ 30% of body height. ✓*

---

## PIECE 7 — TAIL (Red)
Short, thin tail with a rounded tip.

- **Rnd 1:** 4 sc in MR. **[4]**
- **Rnds 2–4:** sc around (3 rounds even). **[4]** each

Do not stuff. Fasten off, leave tail for sewing. Position low on the back.

---

## PIECE 8 — BOW / SCARF (Red)
A simple bow for a festive neck accent.

- **Bow loops:** Chain 12, sl st into the first chain to form a loop. Fasten off.
- Pinch the loop in the center and wrap a short length of red yarn around the middle 4–5 times to cinch it into a bow shape. Secure and leave tails for tying around the neck.

---

## ASSEMBLY

Work in this order for the best chibi look:

1. **Head to Body:** With cream yarn, sew the open top of the body (8 sts) directly to the lower-front of the head. Keep the neck **nearly nonexistent** so the head looks oversized and tilts slightly forward.
2. **Ears:** Sew high on the head, about Rnd 4–5 from the top, with a slight forward tilt. Space them about 1 in apart.
3. **Horns:** Sew between and slightly in front of the ears, angled gently outward and curved.
4. **Arms:** Sew low on the body sides, at about Rnd 8–9, angled slightly downward.
5. **Legs:** Sew to the bottom-front of the body so they barely extend below it; the plush should sit upright.
6. **Tail:** Sew low and centered on the back.
7. **Bow:** Tie or sew at the front of the neck where head meets body.

---

## FACE (Embroidered) — The Defining Feature

Position the face **slightly below the horizontal center** of the head. Work all embroidery with the tapestry needle.

**Placement reference (front of head):**
- Eyes sit about 2 rounds below center, spaced roughly 0.9 in apart.
- Nose sits centered, just below and between the eyes.
- Mouth sits just below the nose.
- Blush sits directly beneath each eye.

**1. Eyes (Black):** Embroider two large, slightly oval shapes angled **inward at the top inner corners** (this creates the grumpy/mischievous look). Fill each eye solid with satin stitch. Make them oversized — roughly 0.4 in tall.

**2. Upper eyelids (Black):** Add a heavy, thick horizontal line across the top of each eye using 2–3 overlapping straight stitches, extending slightly past the outer corner.

**3. Eyelashes (Black):** From the outer corner of each eye, add 2–3 long straight stitches flaring upward and outward for a dramatic lash.

**4. Eye highlights (optional, White):** Add a tiny white straight stitch or French knot near the top of each eye for sparkle.

**5. Nose (Pink):** Embroider a tiny downward-pointing triangle centered between the eyes using a few short satin stitches.

**6. Mouth (Black):** Add a small embroidered line or a slight downward curve below the nose to reinforce the grumpy expression.

**7. Blush (Pink):** Add a small oval cluster of straight stitches (or a pink felt circle / dab of pink) beneath each eye.

> **Grumpy-look tip:** Angle the **inner** top corners of the eyes downward toward the nose and keep the mouth small and straight or slightly frowning. Symmetry matters — mark eye positions with pins before stitching.

> **Optional safety eyes alternative:** If you prefer 9–10 mm safety eyes, insert them at the eye positions **before stuffing and closing the head** (Rnd 10–11 area), then embroider only the lids, lashes, nose, mouth, and blush.

---

## Finishing
- Weave in all loose ends.
- Pat the head and body to even out the stuffing.
- Fluff and shape; the head should feel firm and round, the body small and squishy.

---

## Quick Stitch-Count Summary (Verification)
| Piece | Max sts | Notes |
|-------|---------|-------|
| Head | 30 | 5 inc rounds (+30), 4 dec rounds (−24) + close |
| Body | 16 | tapers to 8, sewn to head |
| Ear (outer) | 8 | flat, with red inner accent |
| Horn | 4 | tiny, lightly stuffed |
| Arm | 7 | short tube |
| Leg | 9 | wider oval |
| Tail | 4 | thin, unstuffed |

All increase/decrease rounds balance to a clean closure. Proportions confirmed: head ≈ 63% of total height, head ≈ 2.4× wider than body. ✓

**Enjoy your grumpy little Bokbear!** 🐾
Disclaimer: This pattern was generated by AI and should be reviewed for accuracy before use. While we strive for quality, AI-generated content may contain errors. Please verify measurements, stitch counts, and instructions before beginning your project. Generated by purlJam.uk
Access your pattern anytime
Bookmark this page to access your pattern anytime