Type
Crochet
Difficulty
intermediate
Category
swimwear
AI Thinking Process
Planning
Verification
Pattern
GTA Triangle Bikini Set
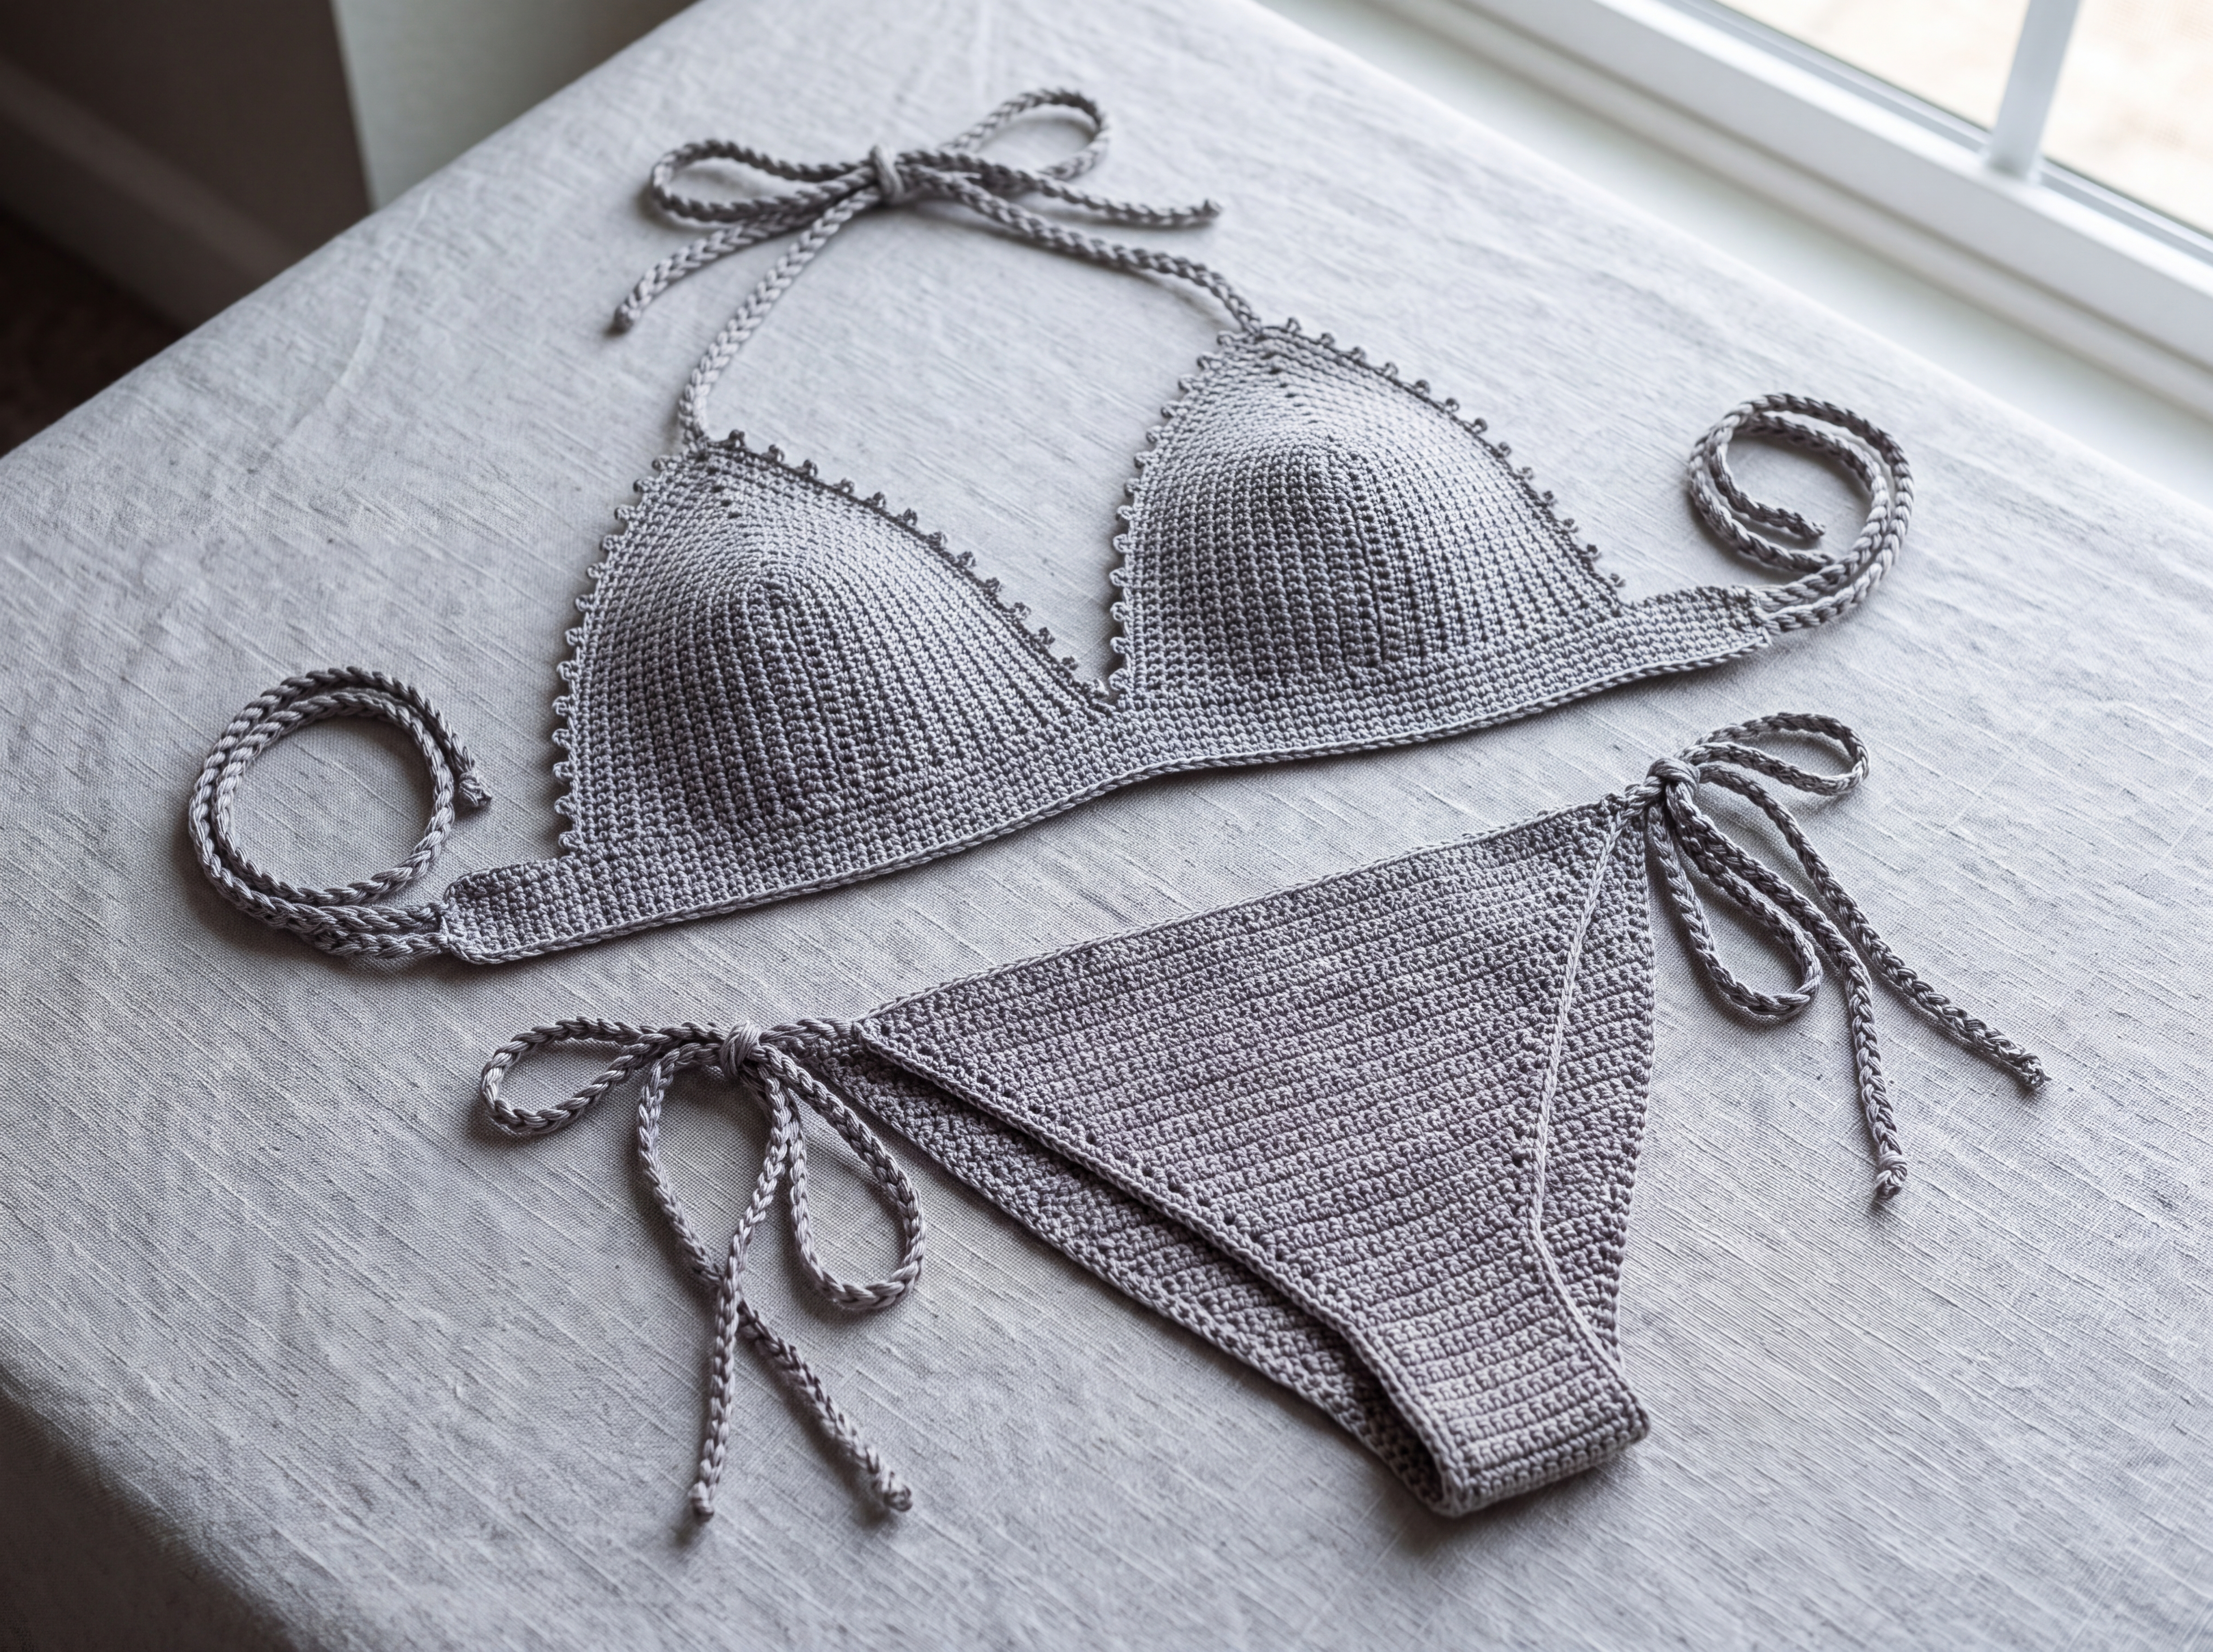
A women’s modular two-piece triangle bikini in dense single crochet. The top is two seamless cups worked around a center post, picot-edged, and sewn to an underbust tie band with braided halter ties. The bottom is a matching low-rise cheek-fit brief, worked flat from the gusset into triangular front and back panels, with adjustable braided hip ties.
Construction route: Classic around-the-chain cup (Route A) for the top. Gusset-up tie-side brief (Route C) for the bottom, with a narrower upper flare than a full-seat brief so the leg line cuts high across the cheek.
Skill level: Intermediate. You need even single crochet, a reliable gauge, and the habit of checking a stitch count at the end of every row. Shaping is simple; the fit depends on keeping it exact.
Terminology: US crochet terms. Imperial measurements are given first, metric in parentheses.
Sizes
Instructions are written for XS, with S, M, L, XL, and XXL in parentheses:
XS (S, M, L, XL, XXL)
When only one number is given, it applies to all sizes. Size M (B/C cup) is the sample size.
| XS | S | M | L | XL | XXL | |
|---|---|---|---|---|---|---|
| Cup coverage | A | A/B | B/C | C/D | D/DD | DD/E |
| To fit bust | 30–32 in (76–81 cm) | 32–34 in (81–86 cm) | 34–36 in (86–91 cm) | 36–39 in (91–99 cm) | 39–43 in (99–109 cm) | 43–47 in (109–119 cm) |
| To fit underbust | 24–26 in (61–66 cm) | 26–28 in (66–71 cm) | 28–30 in (71–76 cm) | 30–33 in (76–84 cm) | 33–36 in (84–91 cm) | 36–40 in (91–102 cm) |
| To fit hip | 32 in (81 cm) | 35 in (89 cm) | 38 in (96.5 cm) | 41 in (104 cm) | 45 in (114 cm) | 50 in (127 cm) |
Ties make the fit adjustable. Choose the size whose cup and hip are closest to your body. If those point to different sizes, make the top in the cup size and the bottom in the hip size.
Finished measurements (blocked, before ties are tied)
Top
| XS | S | M | L | XL | XXL | |
|---|---|---|---|---|---|---|
| Cup height, base to apex | 5 in (12.5 cm) | 5 1/2 in (14 cm) | 6 in (15 cm) | 6 3/4 in (17 cm) | 7 1/2 in (19 cm) | 8 1/4 in (21 cm) |
| Cup width across base | 4 1/2 in (11.5 cm) | 5 1/6 in (13 cm) | 5 1/6 in (13 cm) | 6 1/6 in (15.5 cm) | 7 1/6 in (18 cm) | 7 1/2 in (19 cm) |
| Center-post chains | 20 | 21 | 23 | 25 | 27 | 30 |
| Cup rows | 15 | 17 | 18 | 21 | 24 | 26 |
| Underbust band length | 9 3/4 in (25 cm) | 11 1/3 in (29 cm) | 11 1/3 in (29 cm) | 13 2/3 in (34.5 cm) | 15 2/3 in (40 cm) | 16 2/3 in (42.5 cm) |
| Underbust band height | 1 in (2.5 cm) | 1 in (2.5 cm) | 1 in (2.5 cm) | 1 in (2.5 cm) | 1 in (2.5 cm) | 1 in (2.5 cm) |
| Bridge between cups | 5/6 in (2 cm) | 1 in (2.5 cm) | 1 in (2.5 cm) | 1 1/3 in (3.5 cm) | 1 1/3 in (3.5 cm) | 1 2/3 in (4 cm) |
Bottom
| XS | S | M | L | XL | XXL | |
|---|---|---|---|---|---|---|
| Gusset width | 2.33 in (6 cm) | 2.50 in (6.5 cm) | 2.67 in (6.8 cm) | 2.83 in (7.2 cm) | 3 in (7.5 cm) | 3 in (7.5 cm) |
| Gusset length | 2.86 in (7.3 cm) | 2.86 in (7.3 cm) | 2.86 in (7.3 cm) | 2.86 in (7.3 cm) | 2.86 in (7.3 cm) | 2.86 in (7.3 cm) |
| Front panel height | 4 in (10 cm) | 4.57 in (11.6 cm) | 4.86 in (12.3 cm) | 5.14 in (13 cm) | 5.71 in (14.5 cm) | 6 in (15 cm) |
| Front rise (panel + half gusset) | 5.43 in (13.8 cm) | 6 in (15.2 cm) | 6.29 in (16 cm) | 6.57 in (16.7 cm) | 7.14 in (18.1 cm) | 7.43 in (18.9 cm) |
| Back panel height | 5.14 in (13 cm) | 5.71 in (14.5 cm) | 6.29 in (16 cm) | 6.86 in (17.4 cm) | 7.43 in (18.9 cm) | 8 in (20.5 cm) |
| Back rise (panel + half gusset) | 6.57 in (16.7 cm) | 7.14 in (18.1 cm) | 7.72 in (19.6 cm) | 8.29 in (21 cm) | 8.86 in (22.5 cm) | 9.43 in (24 cm) |
| Front top width | 11.67 in (29.5 cm) | 13.17 in (33.5 cm) | 14 in (35.5 cm) | 14.83 in (37.5 cm) | 16.33 in (41.5 cm) | 17 in (43 cm) |
| Back top width | 14.33 in (36.5 cm) | 15.83 in (40 cm) | 18 in (45.5 cm) | 20.17 in (51 cm) | 22.67 in (57.5 cm) | 27 in (68.5 cm) |
| Hip gap, each side | 3 in (7.5 cm) | 3 in (7.5 cm) | 3 in (7.5 cm) | 3 in (7.5 cm) | 3 in (7.5 cm) | 3 in (7.5 cm) |
Rises above are before the finishing edging, which adds a scant 1/8 in (3 mm). Hip check, Size M: 14 + 18 + 3 + 3 = 38 in (96.5 cm) ✓. The same 3 in (7.5 cm) gap holds for every size.
Tie lengths (finished braids)
- Halter neck ties: 22 in (56 cm) each — two ties.
- Underbust side ties: 20 in (51 cm) each — two ties. Band plus both ties spans about 50 (51, 51, 54, 56, 57) in [127 (130, 130, 137, 142, 145) cm], enough to wrap the underbust and bow at center back.
- Hip ties: 16 in (41 cm) each — four ties, one at each corner.
Yarn
Sport-weight (CYC #2) mercerized cotton, or a cotton/nylon/lycra swim blend in the same gauge.
Why this yarn: Fine cotton or an elastic-blend swim yarn, worked tightly, holds its shape and resists sagging in water. Pure cotton grows a little when wet; the ties are there to re-cinch. A blend with a small amount of lycra or elastane is the better choice for active swimming.
Amount: 275 (320, 370, 430, 500, 580) yd / 251 (293, 338, 393, 457, 530) m.
If your skeins are 150 yd (137 m) / 1.75 oz (50 g), purchase 3 (3, 3, 4, 4, 5) skeins. That includes the swatch and the multi-ply braids. One color is assumed. A contrast for picots and ties needs about 40 yd (37 m) extra, taken from the total above if you are already at the high end of a size.
DK substitute: DK-weight (CYC #3) cotton may be used only if you can obtain the gauge below, usually on a 3.25 mm (US D/3) or 3.0 mm hook. If you cannot match gauge, do not substitute. The cup and hip math will not fit, and a looser fabric will not be opaque.
Hooks and notions
- Hook: 2.75 mm (US C/2), or the size that gives gauge. This is 1–2 sizes smaller than a typical sport-weight garment hook, on purpose.
- Stitch markers: 6 (2 cup apexes, 4 gusset corners).
- Tapestry needle and scissors.
- Optional: 1/4 in (6 mm) swimwear elastic, about 2 yd (1.8 m).
- Optional: tricot swim lining, about 1/4 yd (0.25 m), and removable foam swim cups in A (A/B, B/C, C/D, D/DD, DD/E).
Gauge
24 sc and 28 rows = 4 in (10 cm) in single crochet, blocked. That is 6 sc and 7 rows per inch.
Swatch: ch 29, sc in the 2nd ch from the hook and in each ch across (28 sc). Work 32 rows of sc. Block and let dry. Measure the center 24 stitches and 28 rows. They must be 4 in (10 cm). If the swatch is large, or if you can see a hand’s silhouette through it against a window, go down a hook size and swatch again. Fit and opacity both depend on this gauge.
Opacity
Cups, gusset, and both brief panels are solid single crochet. Picot edging sits only on the slanted cup edges. The bridge between the cups is solid band, not openwork.
Dense sc at this gauge is opaque when the fabric is relaxed. Stretched over the body, and especially when wet, crochet can open slightly. Swim lining is recommended wherever you want coverage you can count on, and it is strongly recommended in light colors.
Abbreviations (US)
| Abbr. | Meaning |
|---|---|
| ch | chain |
| sc | single crochet |
| sl st | slip stitch |
| st(s) | stitch(es) |
| rep | repeat |
| RS | right side |
| WS | wrong side |
| pm | place marker |
| sk | skip |
Ch 1 at the start of a row does not count as a stitch.
Special stitches
3-sc apex increase: 3 sc in the marked center stitch. Move the marker to the center (2nd) of those 3 sc. This adds 2 stitches. Do this only in the marked stitch.
Edge increase (inc): 2 sc in the same stitch. Used at the start and end of brief-panel rows. Each edge increase adds 1 stitch; a row with an increase at both edges adds 2 stitches.
Double edge increase: 2 sc in each of the next 2 stitches. Used on the upper back rows of sizes M–XXL only. A row with this increase at both edges adds 4 stitches.
Picot: Ch 3, sl st in the 3rd ch from the hook.
Notes
- Cups are identical. There is no left/right shaping. The foundation chain is the center post: first chain made = apex, last chain made = base.
- Turn at the end of every row unless told otherwise.
- Keep a running count. Each cup row must be exactly 2 stitches more than the row before it. Each regular brief row must be exactly 2 stitches more than the row before it.
- Do not use a bare chain as a neck, back, or hip tie. Every tie in this pattern is a 12-strand braid.
- Block pieces to the tables before sewing. Weave every end through at least 2 in (5 cm) of dense sc. Sew tie knots flat on the wrong side so nothing rubs the skin.
Bikini Top
Cup (make 2)
Center post: Ch 20 (21, 23, 25, 27, 30).
The loop still on the hook is the base end. The first chain you made, farthest from the hook, is the apex. Pm in that first chain now, before you start Row 1. Do not twist the post when you work down the other side.
Row 1 (RS): Sc in the 2nd ch from the hook and in each ch across to the marked apex chain — that is 18 (19, 21, 23, 25, 28) sc. Work 3 sc in the marked apex chain; move the marker to the center of these 3 sc and remove the chain marker. Rotate the work and sc in the unused loop of each chain down the other side of the post, 18 (19, 21, 23, 25, 28) sc, stopping before the skipped base chain. Leave that skipped base chain unworked; it is the center of the bottom edge.
39 (41, 45, 49, 53, 59) sc.
Check: 18+3+18=39; 19+3+19=41; 21+3+21=45; 23+3+23=49; 25+3+25=53; 28+3+28=59 ✓. The marked stitch is the center stitch, number 20 (21, 23, 25, 27, 30) of the row.
Row 2 (WS): Ch 1, turn. Sc in each sc to the marked center st, 3 sc in the marked st, move the marker to the center of these 3 sc, sc in each sc to the end.
41 (43, 47, 51, 55, 61) sc. (+2)
Rows 3–15 (17, 18, 21, 24, 26): Rep Row 2. The count increases by 2 sc every row. End with the marker still in the apex center stitch.
Final count: 67 (73, 79, 89, 99, 109) sc.
Validation: final = 2 × chains + 2 × rows − 3.
- XS: 40 + 30 − 3 = 67 ✓
- S: 42 + 34 − 3 = 73 ✓
- M: 46 + 36 − 3 = 79 ✓
- L: 50 + 42 − 3 = 89 ✓
- XL: 54 + 48 − 3 = 99 ✓
- XXL: 60 + 52 − 3 = 109 ✓
Stitches on each side of the marked center stitch: 33 (36, 39, 44, 49, 54). Fasten off. Leave the apex marker in place until the picot edge is finished.
Cup stitch-count table (end of each row)
Each row is the previous row plus 2. A dash means that size has already ended.
| Row | XS | S | M | L | XL | XXL |
|---|---|---|---|---|---|---|
| 1 | 39 | 41 | 45 | 49 | 53 | 59 |
| 2 | 41 | 43 | 47 | 51 | 55 | 61 |
| 3 | 43 | 45 | 49 | 53 | 57 | 63 |
| 4 | 45 | 47 | 51 | 55 | 59 | 65 |
| 5 | 47 | 49 | 53 | 57 | 61 | 67 |
| 6 | 49 | 51 | 55 | 59 | 63 | 69 |
| 7 | 51 | 53 | 57 | 61 | 65 | 71 |
| 8 | 53 | 55 | 59 | 63 | 67 | 73 |
| 9 | 55 | 57 | 61 | 65 | 69 | 75 |
| 10 | 57 | 59 | 63 | 67 | 71 | 77 |
| 11 | 59 | 61 | 65 | 69 | 73 | 79 |
| 12 | 61 | 63 | 67 | 71 | 75 | 81 |
| 13 | 63 | 65 | 69 | 73 | 77 | 83 |
| 14 | 65 | 67 | 71 | 75 | 79 | 85 |
| 15 | 67 | 69 | 73 | 77 | 81 | 87 |
| 16 | — | 71 | 75 | 79 | 83 | 89 |
| 17 | — | 73 | 77 | 81 | 85 | 91 |
| 18 | — | — | 79 | 83 | 87 | 93 |
| 19 | — | — | — | 85 | 89 | 95 |
| 20 | — | — | — | 87 | 91 | 97 |
| 21 | — | — | — | 89 | 93 | 99 |
| 22 | — | — | — | — | 95 | 101 |
| 23 | — | — | — | — | 97 | 103 |
| 24 | — | — | — | — | 99 | 105 |
| 25 | — | — | — | — | — | 107 |
| 26 | — | — | — | — | — | 109 |
At gauge, a blocked cup measures about 5 (5 1/2, 6, 6 3/4, 7 1/2, 8 1/4) in [12.5 (14, 15, 17, 19, 21) cm] from base to apex, and 4 1/2 (5 1/6, 5 1/6, 6 1/6, 7 1/6, 7 1/2) in [11.5 (13, 13, 15.5, 18, 19) cm] across the base. Follow the stitch counts if your apex height is within about 1/4 in (6 mm) of the table. A larger miss means the gauge is off — adjust the hook and rework, rather than adding stray rows.
Base row
The bottom edge is the stacked row-ends on each side of the skipped base chain, not the last cup row. The last cup row is the slanted edge.
With RS facing and the apex pointing up, join yarn with a sl st at the lower corner where the row-ends begin.
Base row (RS): Ch 1. Work 1 sc in each row-end along the first side, skipping 2 (2, 3, 3, 3, 4) row-ends at even intervals, until you have 13 (15, 15, 18, 21, 22) sc. Work 1 sc in the skipped base chain. Work 13 (15, 15, 18, 21, 22) sc evenly along the remaining row-ends, again skipping 2 (2, 3, 3, 3, 4) row-ends at even intervals.
27 (31, 31, 37, 43, 45) sc.
Check: 13+1+13=27; 15+1+15=31; 15+1+15=31; 18+1+18=37; 21+1+21=43; 22+1+22=45 ✓. At 6 sc per inch this base blocks to 4 1/2 (5 1/6, 5 1/6, 6 1/6, 7 1/6, 7 1/2) in. Fasten off, leaving a 24 in (61 cm) tail for sewing the cup to the band.
Picot edge
Work this along both slanted edges only. Do not picot the base row.
With RS facing, join yarn with a sl st in the first stitch of the final cup row at one lower corner (the stitch just above the base row).
Picot row: Ch 1, sc in the same st. Sc in each st up the side to the marked apex st, working a picot after every 3rd sc. Sc in the apex st, picot. Sc in each st down the other side, working a picot after every 3rd sc, and end with a sc in the last side stitch above the base row. Fasten off. Weave in this end.
Side stitches are 33 (36, 39, 44, 49, 54), so a picot falls neatly on every 3rd stitch for XS, S, M, and XXL (11, 12, 13, and 18 picots per side). On L the last interval before the apex is 2 sc; on XL it is 1 sc. Work those stitches plain, then picot in the apex. About 15 picots per side on L and 16 on XL.
The picot row is decorative. It does not change the cup stitch count. For a plainer edge, omit the picots and work 1 sc in each slanted-edge stitch instead. A reverse sc (crab stitch) row may replace the picot row if you want a firm corded edge with no points.
Underbust band (make 1)
Ch 60 (69, 69, 83, 95, 101).
Row 1 (RS): Sc in the 2nd ch from the hook and in each ch across. 59 (68, 68, 82, 94, 100) sc.
Rows 2–7: Ch 1, turn, sc in each sc across. 59 (68, 68, 82, 94, 100) sc.
Fasten off. Seven rows at 7 rows per inch is 1 in (2.5 cm) tall. Band length = stitches ÷ 6 = 9 3/4 (11 1/3, 11 1/3, 13 2/3, 15 2/3, 16 2/3) in ✓.
Row 7 is the top edge. Lightly block the band before seaming.
Join cups to the band
Lay the band RS up, Row 7 at the top. Hold each cup wrong side against the wrong side of the band is not the join used here — hold wrong sides together (both right sides facing out), apex pointing away from the band, and mattress-stitch the base row to Row 7, stitch for stitch, so the seam lies flat on the inside.
Sew to these stitches of Row 7. The unsewn center stitches are the bridge.
| Size | Left cup | Bridge (leave open) | Right cup |
|---|---|---|---|
| XS | sts 1–27 | sts 28–32 (5 sts) | sts 33–59 |
| S | sts 1–31 | sts 32–37 (6 sts) | sts 38–68 |
| M | sts 1–31 | sts 32–37 (6 sts) | sts 38–68 |
| L | sts 1–37 | sts 38–45 (8 sts) | sts 46–82 |
| XL | sts 1–43 | sts 44–51 (8 sts) | sts 52–94 |
| XXL | sts 1–45 | sts 46–55 (10 sts) | sts 56–100 |
Check, Size M: 31 + 6 + 31 = 68 ✓. Repeat that sum for your size before you sew the second cup.
Bikini Bottom
Low-rise cheek-fit brief. The gusset is a dense rectangle. The front and back are triangles: narrow at the gusset, wider at the hip line, with a high-cut diagonal leg. Seat coverage is moderate at the top edge and open along the lower cheek because of that diagonal — that is the cheek-fit. Do not add rows to “cover more.” Extra rows raise the rise and change the hip gap.
Pm in the first and last stitch of the foundation row, and later in the first and last stitch of the last gusset row. Those four markers are the gusset corners.
Gusset
Ch 15 (16, 17, 18, 19, 19).
Row 1 (RS): Sc in the 2nd ch from the hook and in each ch across. 14 (15, 16, 17, 18, 18) sc.
Rows 2–20: Ch 1, turn, sc in each sc across. 14 (15, 16, 17, 18, 18) sc.
Twenty rows ÷ 7 = 2.86 in (7.3 cm) long. Width = 14÷6 (15÷6, 16÷6, 17÷6, 18÷6, 18÷6) = 2.33 (2.50, 2.67, 2.83, 3, 3) in ✓. Do not fasten off. The live end becomes the front.
Front panel
Increase 1 stitch at each edge every row. No special rows on the front.
Row 1 (RS): Ch 1, turn, 2 sc in the first st, sc in each st to the last st, 2 sc in the last st. 16 (17, 18, 19, 20, 20) sc.
Rows 2–28 (32, 34, 36, 40, 42): Rep Row 1. The count increases by 2 sc every row.
Final front count: 70 (79, 84, 89, 98, 102) sc.
Validation: gusset sts + (2 × front rows).
- XS: 14 + 56 = 70 ✓
- S: 15 + 64 = 79 ✓
- M: 16 + 68 = 84 ✓
- L: 17 + 72 = 89 ✓
- XL: 18 + 80 = 98 ✓
- XXL: 18 + 84 = 102 ✓
Widths: 11.67 (13.17, 14, 14.83, 16.33, 17) in. Fasten off.
Front checkpoints (count at the end of the row; dash = size already finished):
| After row | XS | S | M | L | XL | XXL |
|---|---|---|---|---|---|---|
| 1 | 16 | 17 | 18 | 19 | 20 | 20 |
| 10 | 34 | 35 | 36 | 37 | 38 | 38 |
| 20 | 54 | 55 | 56 | 57 | 58 | 58 |
| 28 | 70 | 71 | 72 | 73 | 74 | 74 |
| 32 | — | 79 | 80 | 81 | 82 | 82 |
| 34 | — | — | 84 | 85 | 86 | 86 |
| 36 | — | — | — | 89 | 90 | 90 |
| 40 | — | — | — | — | 98 | 98 |
| 42 | — | — | — | — | — | 102 |
Any other row: gusset sts + 2 × row number. Size M runs 18, 20, 22 … 84.
Back panel
With RS facing, join yarn with a sl st in the first foundation chain at the opposite short end of the gusset (the end you have not yet continued from). Work across the base of the foundation stitches so the right side matches the front.
Row 1 (RS): Ch 1, 2 sc in the same st, sc in each foundation st across to the last, 2 sc in the last st. 16 (17, 18, 19, 20, 20) sc.
Regular rows: Rep the front increase row (2 sc in the first st, sc across, 2 sc in the last st) through row 36 (40, 42, 44, 45, 40).
Count after the regular rows: 86 (95, 100, 105, 108, 98) sc.
- XS: 14 + 2×36 = 86 ✓ — this is the final count. Skip the special rows.
- S: 15 + 2×40 = 95 ✓ — this is the final count. Skip the special rows.
- M: 16 + 2×42 = 100 ✓
- L: 17 + 2×44 = 105 ✓
- XL: 18 + 2×45 = 108 ✓
- XXL: 18 + 2×40 = 98 ✓
Special rows — sizes M (L, XL, XXL) only: Work 2 (4, 7, 16) rows as follows.
Ch 1, turn, 2 sc in each of the first 2 sts, sc in each st across to the last 2 sts, 2 sc in each of the last 2 sts. (+4 sc each row)
These upper rows flare on purpose. The edge gets steeper near the hip. That is the graded cheek-fit: high-cut through the seat, wide enough at the hip line to keep a 3 in (7.5 cm) gap.
Final back count: 86 (95, 108, 121, 136, 162) sc.
Validation: gusset sts + (2 × all back rows) + (2 × special rows). The last term is the extra 2 stitches each special row adds beyond a normal increase row.
- XS: 14 + 72 + 0 = 86 ✓
- S: 15 + 80 + 0 = 95 ✓
- M: 16 + 88 + 4 = 108 ✓
- L: 17 + 96 + 8 = 121 ✓
- XL: 18 + 104 + 14 = 136 ✓
- XXL: 18 + 112 + 32 = 162 ✓
Widths: 14.33 (15.83, 18, 20.17, 22.67, 27) in. Fasten off.
Hip check: front width + back width + 6 in of gaps = 32 (35, 38, 41, 45, 50) in ✓.
Bottom edging
Work one stabilizing sc row on each top edge, then one sc row around each leg opening. Join with a sl st, ch 1, and count the joining sc as the first sc.
Front waist edge: With RS facing, join at one front top corner. Sc in each st across. 70 (79, 84, 89, 98, 102) sc. Fasten off.
Back waist edge: With RS facing, join at one back top corner. Sc in each st across. 86 (95, 108, 121, 136, 162) sc. Fasten off.
Leg opening (work twice): With RS facing, join at a front hip corner. Sc evenly down the front panel side, across one long side of the gusset, and up the back panel side, ending at the back hip corner. Do not crochet across the hip gap. That gap is where the tie sits.
Work 6 sc over every 7 row-ends. Row-ends on one leg = 28+20+36 (32+20+40, 34+20+44, 36+20+48, 40+20+52, 42+20+56) = 84 (92, 98, 104, 112, 118).
72 (79, 84, 89, 96, 101) sc per leg opening.
XS, M, and XL divide evenly (6 sc per 7 row-ends exactly: 72, 84, 96 ✓). On S, L, and XXL, skip one extra row-end beside the gusset so the total still matches. Fasten off. Repeat for the second leg.
Braided ties
Do not use a single unreinforced chain for any tie. Each tie is a 3-strand braid. Each of those 3 strands is a bundle of 4 lengths of yarn (12 lengths per tie). Knots are sewn flat on the wrong side.
| Tie | How many | Finished braid | Cut length, each of 12 strands |
|---|---|---|---|
| Halter | 2 | 22 in (56 cm) | 34 in (86 cm) |
| Underbust | 2 | 20 in (51 cm) | 32 in (81 cm) |
| Hip | 4 | 16 in (41 cm) | 26 in (66 cm) |
Method: Cut the 12 lengths. Divide them into 3 bundles of 4 and knot all 12 together at one end, close to the ends. Braid tightly and evenly until the braid measures the finished length in the table. Knot the other end. Trim sewing tails to about 4 in (10 cm). Do not trim them off — they are what you sew with.
If you prefer a crocheted cord to a yarn braid, make 3 reinforced cords per tie instead (ch to the cut length above, sc in each ch back along the cord) and braid those 3 cords to the same finished length. Either way the tie is multi-ply, not a bare chain.
Attach the halter ties: Sew one braid to each cup apex. Catch the marked center stitch, the 3-sc group around it, and the row below it. Sew the knot flat on the WS. The wearable length is the 22 in (56 cm) braid.
Attach the underbust ties: Sew one braid to each short end of the band. Stitch through all 7 rows of the band end in a small rectangle about 1/2 in (1.3 cm) wide, so a pull is shared by the band and not by one stitch. Knot on the WS.
Attach the hip ties: Sew one braid to each of the four hip corners, after the edging is complete. Catch the corner 4 stitches of the panel and the edging. Knot on the WS. The tie leaves the corner toward the hip gap; it does not close the gap.
Elastic (optional, for active swimming)
Elastic is encased in the edging. It does not run across the hip gaps or through the ties.
Cut 1/4 in (6 mm) swim elastic to these lengths (about 85% of the crocheted edge, so it hugs without gathering the fabric into ripples):
| Edge | XS | S | M | L | XL | XXL |
|---|---|---|---|---|---|---|
| Each leg | 10 1/4 in (26 cm) | 11 1/4 in (28.5 cm) | 12 in (30.5 cm) | 12 1/2 in (32 cm) | 13 1/2 in (34.5 cm) | 14 1/4 in (36 cm) |
| Front waist | 10 in (25.5 cm) | 11 1/4 in (28.5 cm) | 12 in (30.5 cm) | 12 1/2 in (32 cm) | 14 in (35.5 cm) | 14 1/2 in (37 cm) |
| Back waist | 12 1/4 in (31 cm) | 13 1/2 in (34.5 cm) | 15 1/4 in (39 cm) | 17 1/4 in (44 cm) | 19 1/4 in (49 cm) | 23 in (58.5 cm) |
Hold the elastic on the wrong side of the edge and work the edging sc over it, stretching the elastic evenly so it finishes at the same time as the crochet. Leave 1/2 in (1.3 cm) of elastic free at each end, fold it under, and sew it down so it cannot slip back out. Leg elastic is a length from front hip corner to back hip corner, not a loop.
If you have already worked the edging, sew the elastic to the wrong side of that row with a wide zigzag or by hand, stretching it to match the table, and do not let the stitches show on the right side.
Lining (optional, recommended)
Cut tricot swim lining 1/8 in (3 mm) inside the outline of each cup and of the gusset (include about half of each brief panel if you want the front and back lined too). Turn the lining edge under 1/8 in (3 mm) and whipstitch it to the wrong side, inside the picot and outside the leg elastic. Lining stops before the tie knots so the ties can still be sewn flat.
Removable foam cups, if used, sit between the lining and the crochet. Tack them at the base only, with three or four stitches, so they can be taken out to wash.
Blocking and finishing
- Weave in every end through dense stitches for at least 2 in (5 cm). Split the plies of the last inch so the end cannot work back out when wet.
- Block the top and the bottom flat to the finished-measurement tables. Pin the cup bases to 4 1/2 (5 1/6, 5 1/6, 6 1/6, 7 1/6, 7 1/2) in and the cup heights to about 5 (5 1/2, 6, 6 3/4, 7 1/2, 8 1/4) in. Pin the brief fronts and backs to their top widths. Do not stretch the hip gaps shut.
- Let the pieces dry fully before wearing. Cotton that is worn damp will grow.
- Tie the halter behind the neck, the underbust band at center back, and each hip pair at the side. The crocheted hip line is meant to sit with a 3 in (7.5 cm) gap on each side before the ties are pulled snug. Cinch the ties; do not add positive ease. Cotton relaxes in water.
Fit notes
- Cup too wide or ruffled: An increase was worked somewhere other than the marked apex stitch. The count will be higher than the table. Rip back to the last correct row.
- Cup cupping the wrong direction: The 3-sc group was not centered. The marker must move to the middle of the 3 sc every row.
- Base wavy where it meets the band: The base row has too many stitches, or it was worked loosely. It must be 27 (31, 31, 37, 43, 45) sc, worked at the same firm tension as the swatch.
- Brief rides up: The hip ties are too tight, or the leg edging skipped too many row-ends and the leg hole is small. Loosen the ties first. The leg row should be 72 (79, 84, 89, 96, 101) sc.
- Brief looks like a full brief, not cheek-fit: Extra back rows were added, or the upper flare was worked from the gusset instead of only on the last 0 (0, 2, 4, 7, 16) rows. The cheek curve is the diagonal from the narrow gusset up to the hip corner.
- See-through when worn: The hook is too large, or the yarn is being stretched. Line the cups and gusset. A smaller hook is the fix for a future piece; lining is the fix for this one.
- Wet sag: Re-tie. A cotton/lycra blend sags less than mercerized cotton. Do not compensate by making the next size smaller unless your dry, blocked gauge was actually large.
Care
Hand-wash in cool water with a mild soap. Rinse, press water out in a towel, and dry flat in the finished shape. Do not wring, and do not hang the piece by the ties. If the yarn label allows, a lingerie bag on a gentle cool cycle is acceptable; dry flat either way. Re-block if the ties or the leg edges curl after washing.
Disclaimer: This pattern was generated by AI and should be reviewed for accuracy before use. While we strive for quality, AI-generated content may contain errors. Please verify measurements, stitch counts, charts, and instructions before beginning your project. Generated by purlJam.uk
Love this pattern?
Save this pattern to your free PurlJam libraryAccess your pattern anytime
Bookmark this page to access your pattern anytime