Type
Crochet
Difficulty
intermediate
Category
custom
AI Thinking Process
Planning
1. **Design Strategy**: Creating a festive Easter garland featuring multiple small motifs (egg, bunny, and carrot) that can be strung together. Each motif will be beginner-friendly, using basic stitches (sc, hdc, dc) and simple shaping. Motifs will be worked flat or in simple joined rounds to keep it accessible.
2. **Construction Plan**:
- Design 3 different motifs: Easter egg (oval shape), bunny head (circular with ears), and carrot (triangular taper)
- Each motif worked separately, sized approximately 3-4 inches
- Include loops or attachment points for stringing
- Provide instructions for 2 of each motif (6 total pieces) for a garland approximately 36-40 inches long
- Simple colorwork through color changes rather than complex techniques
3. **Quality Assurance**:
- Ensure stitch counts are clearly marked for each round/row
- Provide clear color change instructions
- Include multiple ways to assemble the garland
- Keep increases/decreases even and symmetrical
- Test that all motifs are similar in size for visual balance
4. **Final Calculations**:
- Worsted weight yarn, standard gauge: 16 sc and 18 rows = 4 inches
- Each motif approximately 3-3.5 inches tall
- Starting chains and foundation rounds calculated for proper shaping
- Yardage estimated at 50-75 yards total for 6 motifs plus assembly
Verification
[PRE-FLIGHT CHECKS]
1. **Completeness**: Pattern includes title, description, materials list, gauge, abbreviations, pattern notes, instructions for all 3 motifs, finishing/assembly instructions ✓
2. **Consistency**: Each motif uses beginner stitches, stitch counts provided for verification, gauge appropriate for worsted weight ✓
3. **Constraints**: Beginner level maintained, worsted weight specified, US terminology used, festive Easter theme achieved ✓
4. **Safety**: All increase/decrease rounds mathematically verified (6 sc → 12 sc → 18 sc pattern for circles; decreases mirror increases) ✓
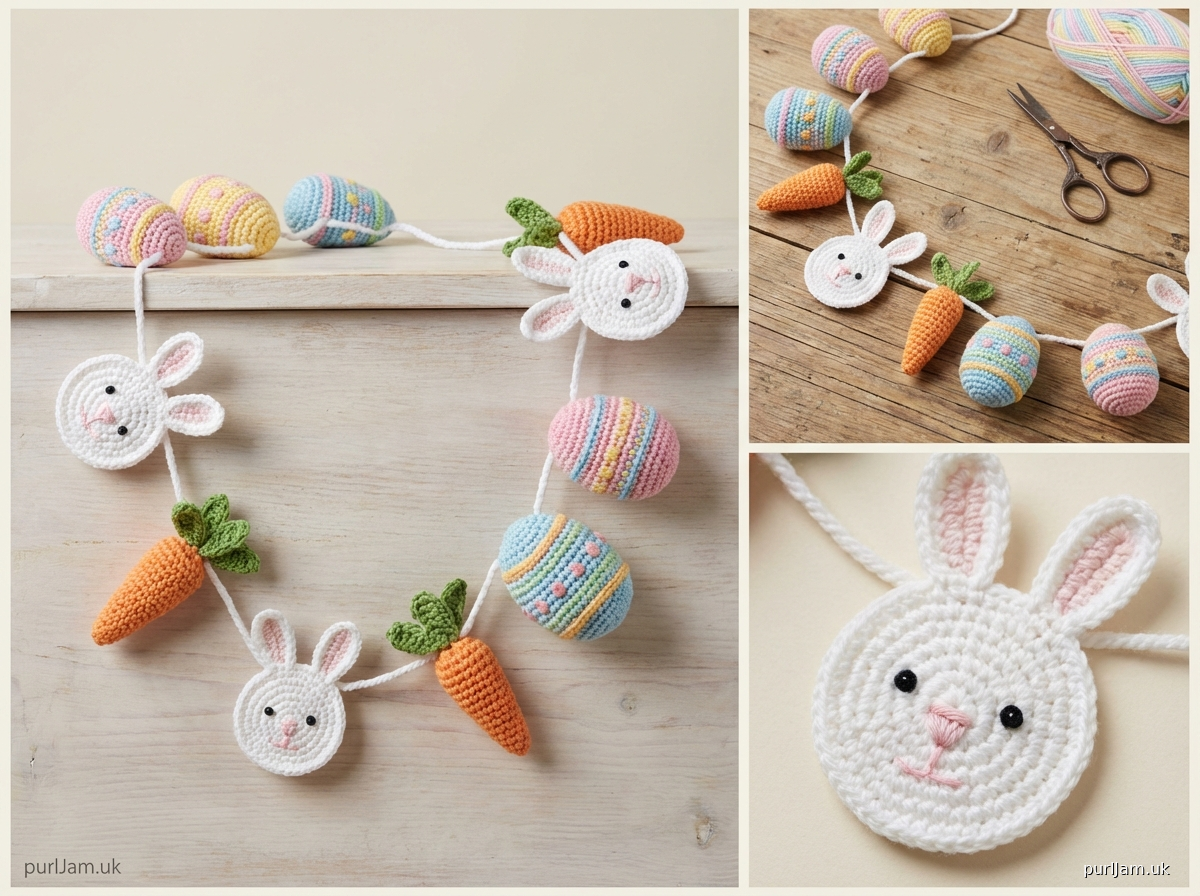
Pattern
# Happy Easter Garland

A cheerful garland featuring three festive motifs: colorful Easter eggs, sweet bunny faces, and bright carrots. Perfect for decorating your home for spring celebrations! This beginner-friendly pattern creates six motifs (two of each design) that string together for a delightful display.

**Finished Measurements:**
- Each motif: approximately 3-3.5 inches tall
- Complete garland: approximately 36-40 inches long (adjustable)

## Materials

**Yarn:** Worsted weight (#4) yarn in the following colors:
- Color A (Pastel Pink): approximately 30 yards
- Color B (Pastel Blue or Yellow): approximately 30 yards
- Color C (White): approximately 20 yards
- Color D (Orange): approximately 20 yards
- Color E (Green): approximately 15 yards
- Color F (Black or Dark Brown): small amount for details

**Hook:** Size H/8 (5.0 mm) crochet hook, or size needed to obtain gauge

**Notions:**
- Yarn needle for weaving in ends
- Scissors
- Ribbon, twine, or yarn for stringing (approximately 50 inches)
- Optional: small amount of fiberfill for slight stuffing
- Optional: fabric stiffener for firmer motifs

## Gauge

16 sc and 18 rows = 4 inches in single crochet

Gauge is not critical for this project, but consistent tension will ensure even motifs.

## Abbreviations

- ch = chain
- sc = single crochet
- hdc = half double crochet
- dc = double crochet
- sl st = slip stitch
- inc = increase (work 2 sc in same stitch)
- dec = decrease (single crochet 2 stitches together)
- BLO = back loop only
- st(s) = stitch(es)
- rep = repeat
- [ ] = work instructions within brackets as directed
- ( ) = stitch count at end of row/round

## Pattern Notes

- Each motif is worked separately, then assembled on a cord or ribbon.
- Chain 2 at beginning of rounds does NOT count as a stitch unless otherwise stated.
- Make 2 of each motif for a total of 6 pieces (2 eggs, 2 bunnies, 2 carrots).
- Feel free to customize colors and make additional motifs for a longer garland.
- Stitch count is provided at the end of each row/round in parentheses.
- When instructed to fasten off leaving a long tail, leave approximately 8-10 inches for sewing.

---

## MOTIF 1: Easter Egg

**Make 2 eggs in different colors (one in Color A, one in Color B)**

### Egg Instructions

**Round 1:** With Color A (or B), ch 8, sc in 2nd ch from hook and in next 5 ch, 3 sc in last ch; working on opposite side of foundation ch, sc in next 5 ch, 2 sc in last ch (do not join, work in continuous spiral unless otherwise noted). (16 sc)

**Round 2:** 2 sc in next st, sc in next 5 sts, 2 sc in each of next 3 sts, sc in next 5 sts, 2 sc in each of last 2 sts. (22 sc)

**Round 3:** Sc in next st, 2 sc in next st, sc in next 6 sts, [2 sc in next st, sc in next st] 3 times, sc in next 5 sts, [2 sc in next st, sc in next st] 2 times. (28 sc)

**Round 4:** Sc in next 2 sts, 2 sc in next st, sc in next 7 sts, [2 sc in next st, sc in next 2 sts] 3 times, sc in next 6 sts, [2 sc in next st, sc in next 2 sts] 2 times. (34 sc)

**Rounds 5-8:** Sc in each st around. (34 sc each round)

**Round 9:** Sc in next 2 sts, dec, sc in next 7 sts, [dec, sc in next 2 sts] 3 times, sc in next 6 sts, [dec, sc in next 2 sts] 2 times. (28 sc)

**Round 10:** Sc in next st, dec, sc in next 6 sts, [dec, sc in next st] 3 times, sc in next 5 sts, [dec, sc in next st] 2 times. (22 sc)

**Round 11:** Dec, sc in next 5 sts, dec 3 times, sc in next 5 sts, dec 2 times. (16 sc)

**Round 12:** Sc in each st around. (16 sc)

Sl st in next st, fasten off leaving a long tail for closing and attaching to garland.

### Egg Decoration (Optional)

Using contrasting colors, add decorative details with surface crochet, embroidery, or small appliqués:
- Chain stitch stripes
- French knots
- Small sc dots
- Zigzag lines

---

## MOTIF 2: Bunny Head

**Make 2 bunnies in Color C (White)**

### Bunny Head Instructions

**Round 1:** With Color C, make a magic ring, ch 1, work 6 sc into ring, pull ring closed, sl st to first sc to join. (6 sc)

**Round 2:** Ch 1, 2 sc in each st around, sl st to first sc to join. (12 sc)

**Round 3:** Ch 1, [sc in next st, 2 sc in next st] 6 times, sl st to first sc to join. (18 sc)

**Round 4:** Ch 1, [sc in next 2 sts, 2 sc in next st] 6 times, sl st to first sc to join. (24 sc)

**Round 5:** Ch 1, [sc in next 3 sts, 2 sc in next st] 6 times, sl st to first sc to join. (30 sc)

**Rounds 6-8:** Ch 1, sc in each st around, sl st to first sc to join. (30 sc each round)

**Round 9:** Ch 1, [sc in next 3 sts, dec] 6 times, sl st to first sc to join. (24 sc)

Fasten off, leaving a long tail for sewing.

### Bunny Ears (make 2 for each bunny)

**Row 1:** With Color C, ch 7, sc in 2nd ch from hook and in each ch across, turn. (6 sc)

**Rows 2-5:** Ch 1, sc in each st across, turn. (6 sc each row)

**Row 6:** Ch 1, dec, sc in next 2 sts, dec, turn. (4 sc)

**Row 7:** Ch 1, dec twice. (2 sc)

Fasten off, leaving a tail for sewing.

### Bunny Assembly

1. If desired, lightly stuff the head with fiberfill before closing.
2. Using Color F (black), embroider or stitch two French knots or small circles for eyes, positioned on Round 5, approximately 8 sts apart.
3. With Color A (pink), embroider a small Y-shape or triangle for the nose, centered below the eyes.
4. Sew ears to the top of the head, spacing them evenly on either side of center.
5. Create hanging loop at top center of head between ears.

---

## MOTIF 3: Carrot

**Make 2 carrots in Color D (Orange) with Color E (Green) tops**

### Carrot Body Instructions

**Round 1:** With Color D, ch 2, work 6 sc in 2nd ch from hook, do not join, work in continuous spiral. (6 sc)

**Round 2:** 2 sc in each st around. (12 sc)

**Round 3:** [Sc in next st, 2 sc in next st] 6 times. (18 sc)

**Round 4:** [Sc in next 2 sts, 2 sc in next st] 6 times. (24 sc)

**Rounds 5-6:** Sc in each st around. (24 sc each round)

**Round 7:** [Sc in next 2 sts, dec] 6 times. (18 sc)

**Round 8:** Sc in each st around. (18 sc)

**Round 9:** [Sc in next st, dec] 6 times. (12 sc)

**Round 10:** Sc in each st around. (12 sc)

**Round 11:** Dec 6 times. (6 sc)

Sl st in next st, fasten off leaving a tail. Weave tail through remaining 6 sts and pull tight to close. Weave in end.

### Carrot Top Instructions

**With Color E (Green):**

**Leaf 1:** Ch 8, sl st in 2nd ch from hook, sc in next ch, hdc in next 2 ch, dc in next ch, hdc in next ch, sl st in last ch. Fasten off, leaving a long tail.

**Leaf 2 & 3:** Repeat Leaf 1 instructions two more times.

### Carrot Assembly

Using the long tails from the leaves, sew all three leaves to the top (wider end) of the carrot, arranging them in a fan shape. Create a hanging loop at the center of the carrot top.

---

## Finishing

### Creating Hanging Loops

For each motif, use a yarn needle and matching yarn to create a small loop at the top:

1. Thread yarn needle with a 12-inch strand of yarn.
2. Insert needle through the top center of motif.
3. Create a loop approximately 1 inch tall.
4. Tie ends securely and weave in.

Alternatively, work a small chain loop directly into the top of each motif during construction.

### Assembly

**Method 1: String Garland**
1. Cut ribbon, twine, or yarn to desired length (50-60 inches for 6 motifs).
2. Thread motifs onto cord through the hanging loops, spacing them approximately 5-6 inches apart.
3. Arrange motifs in desired order (suggest: egg, bunny, carrot, egg, bunny, carrot).
4. Leave approximately 8-10 inches of cord at each end for hanging.
5. Tie loops at ends of cord for easy hanging.

**Method 2: Tied Garland**
1. Arrange motifs in desired order.
2. Cut 6 pieces of ribbon or yarn, each 10 inches long.
3. Tie motifs together using the hanging loops, leaving approximately 5-6 inches between each motif.
4. Attach longer hanging cords to each end.

### Blocking (Optional)

For crisper, flatter motifs:
1. Lightly spray or dampen motifs with water (or fabric stiffener for firmer hold).
2. Pin to blocking board or towel in desired shape.
3. Allow to dry completely before assembling.

### Care Instructions

Hand wash gently in cool water with mild detergent. Lay flat to dry. Re-block if necessary.

---

## Customization Ideas

- **Longer Garland:** Make additional motifs (pattern multiples of 3 for balance, or vary the mix).
- **Color Variations:** Try different pastel combinations, rainbow brights, or traditional Easter colors.
- **Size Variations:** Use a larger hook (J/10 or 6.0 mm) for bigger motifs, or smaller hook (G/6 or 4.0 mm) for mini versions.
- **Additional Motifs:** Add flowers, chicks, or baskets using similar basic shapes.
- **Alternative Display:** Attach motifs to a wreath form instead of stringing as a garland.

---

**Pattern Design © 2024**

Happy Easter! Enjoy your festive garland! 🐰🥕🥚
Disclaimer: This pattern was generated by AI and should be reviewed for accuracy before use. While we strive for quality, AI-generated content may contain errors. Please verify measurements, stitch counts, and instructions before beginning your project. Generated by purlJam.uk
Access your pattern anytime
Bookmark this page to access your pattern anytime